
Related Manuals for BLUM MZK.1900

Summary of Contents for BLUM MZK.1900
- Page 1 MZK.1900 / MZK.8800 Please keep a copy of the instruction leaflet. The drilling head should only be used by trained personnel who have completely read and understood the instruction leaflet. BA-092/0EN MZK.1900/8800...
-
Page 2: A Orientation Diagram Mzk.1900
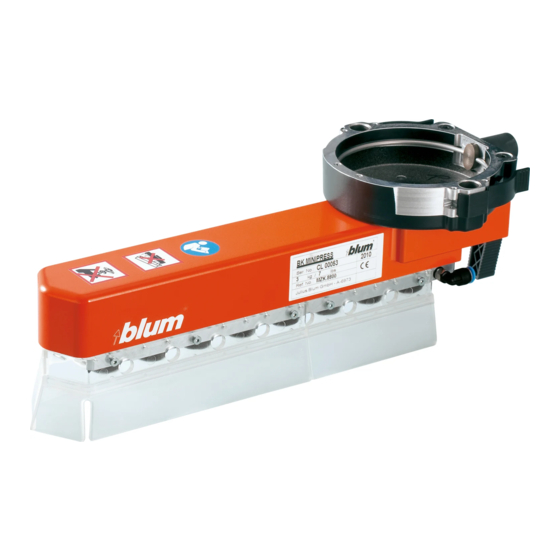
A - Orientation diagram MZK.1900 Location for Driving pin Locking mechanism Safety lever Locating pin Compressed air outlet Driving pin for standard chuck (MZK.1120) Spacer Air Pipe Air pipe connector BA-092/0EN MZK.1900/8800... - Page 3 A - Orientation diagram MZK.8800 Location for drive pin Safety lever Compressed air outlet Locking mechanism Safety lever Driving pin for standard chuck (MZK.1120) Spacer Air pipe Cover cap for standard chucks Air pipe connector BA-092/0EN MZK.1900/8800...
-
Page 4: Table Of Contents
B - Contents Orientation diagram MZK.1900 Orientation diagram MZK.8800 Contents C How to use this instruction leaflet D Safety information Technical data Drilling head preparation MINIPRESS / MINIDRILL preparation Drilling head assembly Working with the drilling head Maintenance and service Troubleshooting Spare parts MZK.1900... -
Page 5: C How To Use This Instruction Leaflet
For your own safety, you should only use Blum-approved replacement parts and accessories. Blum is not liable for any damages resulting from the use of unapproved products. -
Page 6: D Safety Information
D.3 - Intended use • This drilling head is only intended for drilling holes in work pieces of wood, particle board or epoxy coated wood. The drilling head should only be used in commercial and industrial applications. It was designed exclusively for use with the Blum MINIPRESS M, MINIPRESS P and MINIDRILL. The manufacturer assumes no liability for uses not described in the instruction leaflet. -
Page 7: E Technical Data
MZK.8800 • Weight: 3.7 kg / 8.2 lbs 3 kg / 6.6 lbs • Dimensions: H = 153 mm / 6-1/64" H = 120 mm / 4-23/32" W = 355 mm / 13-31/32" W = 130 mm / 5-7/64" D = 135 mm / 5-5/16" D = 355 mm / 13-31/32" E.2 - Drilling dimensions • Max. work piece thickness: 40 mm 1-9/16“ • Max. drilling distance: 102 mm 4-1/64“ • Max. drilling diameter: 10 mm 3/8“ E.3 - Accessories For accessories see Blum complete catalogue BA-092/0EN MZK.1900/8800... -
Page 8: Drilling Head Preparation
1 - Drilling head preparation 1.1 - Locating pin installation (only for MZK.1900) The following work steps are only required for the MZK.1900 drilling head: • Slide Locating pin (1.2) into the drilling head from below • Screw handle (1.3) on to Locating pin 1.2 - Required drill bits MZK.1900 • Drill bits: H2 H1 H2 H1 H2 4 x ø XX mm clockwise (1.7) - Page 9 (The flat on the drill shank must be aligned with the fixing screw) • Use a hex wrench (1.5) to tighten the fixing screws. • Insert cover caps (1.6)into the unused chucks. This will keep the chucks clean. • Colour coded bits: Clockwise - Right Hand (1.7) > black MZK.8800 Counter clockwise - Left Hand (1.8) > red BA-092/0EN MZK.1900/8800...
-
Page 10: Minipress / Minidrill Preparation
(2.6) attached. • Attach the spacer (2.6) to the drilling depth setting screw. ATTENTION The spacers must be flush with the knurled screw (2.7) and completely engaged. • This ensures the same drilling depth as before without a drill- ing head. BA-092/0EN MZK.1900/8800... -
Page 11: Drilling Head Assembly
The drilling head has an offset of 32 mm. 3.2 - Connecting the compressed air outlet 3.2.1) Connecting the compressed air outlet • Connect the air pipe (3.4) to the compressed air outlet (3.5) the drilling head. • Connect the other end of the air pipe to the connector (3.7) and the compressed air supply (3.4). BA-092/0EN MZK.1900/8800... -
Page 12: Working With The Drilling Head
Turn knurled screw (2.7) to the right Increase the depth: Turn knurled screw (2.7) to the left (one turn equals a 1.5 mm depth setting.) • Tighten and lock the knurled screw (2.7). • Re-trigger test cam and check the setting. Important Swivel out the drilling depth setting template (2.8) to achieve a drilling depth of 13 mm. BA-092/0EN MZK.1900/8800... - Page 13 If long system drillings are to be made, then use several stops to ensure a higher degree of accuracy over the long length. A setting template (4.6) can also be used to set several stops. The prescribed distance is 9 x 32 mm. BA-092/0EN MZK.1900/8800...
- Page 14 (A) of the machine, except the work piece! Keep your hands out of work area (A). • Main switch (4.1) • Hold down clamp (4.2) at Pos "ON." • Hold down work piece outside of danger area and press against the stop. • Press feed switch (4.3) until drilling depth is reached. • During drilling, locating pin (1.1) is again moved to the starting position BA-092/0EN MZK.1900/8800...
- Page 15 4.10 - Using the setting template to send to the next cycle • Attach extension ruler • Position setting template on the swivel stop (4.5). • Position swivel stop (4.5) on the extension ruler. The distance is provided by the setting template 4.6. • The template (MZK.1906 EINSTLE) (4.6) is optional and not included as a standard part when the drilling heads are deliv- ered. BA-092/0EN MZK.1900/8800...
-
Page 16: Maintenance And Service
5 - Maintenance and service 5.1 - Maintenance • Clean drilling dust from machine and drilling head on a regular basis to ensure optimal functionality and/or durability of devices. • Replace broken or damaged parts immediately. • Only use BLUM original parts. BA-092/0EN MZK.1900/8800... -
Page 17: Troubleshooting
Set locking mechanism to open See point 3.1 Drill bit cannot Drill bit surface for tightening too large Only use Blum-approved drill bits. See See chapter 1 be tightened or Dimension (9.3 mm) Blum product catalogue or www.blum.com... -
Page 18: Spare Parts Mzk.1900
7 - Spare parts MZK.1900 BA-092/0EN MZK.1900/8800... -
Page 19: Spare Parts Mzk.8800
7 - Spare parts MZK.8800 BA-092/0EN MZK.1900/8800... - Page 20 Julius Blum GmbH Beschlägefabrik 6973 Höchst, Austria Tel.: +43 5578 705-0 Fax: +43 5578 705-44 E-Mail: info@blum.com www.blum.com...
Need help?
Do you have a question about the MZK.1900 and is the answer not in the manual?
Questions and answers