Table of Contents
Advertisement
Advertisement
Table of Contents

Summary of Contents for Duke DU904
- Page 1 Page 1...
-
Page 2: Table Of Contents
DUKE Electric Mini Chain Hoist Introduction The DUKE Electric Mini Chain Hoist is designed for various workplace applications, such as general factories, warehouse, construction, plumbing, agriculture industries, unique rigging applications encountered at small venues, lightweight, quiet, and portable. CONTENTS Preface.................................... 3 Safety Instruction.................................... -
Page 3: Preface
1. Preface Please read this Instruction Manual carefully before you start using the electric winch. You will find many useful hints which will help you to keep the winch always in its first-class condition. You are kindly requested to read this manual thoroughly, to follow scrupulously ... -
Page 4: Safety Instruction
2. Safety Instruction 2-1 Safety regulations 2-1-1 General safety rules 1. This electric hoist is designed for lifting products only. Do not apply the electric hoist for lifting person. 2. The electric hoist should be mounted on a flat solid place. 3. -
Page 5: Electrical Safety Rules
2-1-2 Electrical safety rules 1. Before installing, please pay attention to the input rated voltage and current and make sure the hoist is grounded, in order to prevent accident. 2. There must be a main power switch at main input side of electric control system. 3. -
Page 6: Safety Rules Of Hoist
2-1-3 Safety rules of hoist 1. Don't misuse the hoist, to avoid danger. 2. Before start the hoist, make sure all the protecting covers are not breakdown and damage. 3. If the mechanism or any part breakdown, operator should stop the hoist immediately and then examine and repair it. -
Page 7: All Safety Related Elements
2-2. All safety related elements ITEM DESCRIPTION EMERGENCY STOP FUSE Chain Guide Spring Page 7... -
Page 8: 2-3.Checklist Of Electrical And Safety Function
2-3.Checklist of electrical and safety function Item Content inspection and safety requirement Result Comment 1 Is every terminal protected by isolation plate (IP2X)? 2 Does technician follow the procedure number to wire? Are the diameter of grounding wire and each circuit accord with safety requirement of designed electrical circuit? Is fuse accord with safety requirement of designed electrical circuit? -
Page 9: Mini Chain Hoist Description
3. Mini Chain Hoist Description 3-1 General characteristics 3-1-1 Usages Fit for various workplace applications, such as general factories, warehouse, construction, plumbing, and agriculture industries. Designed for unique rigging applications encountered at small venues, lightweight, quiet, and portable. Operates on 2 2 0 V- 2 4 0 V, w h i c h m e a n s yo u c a n p l u g i t i n j u s t a b o u t a n y w h e r e . -
Page 10: Specifications
3-2 Specifications Model DU-903 DU-904 Dimensions Length (mm) Width (mm) Height (mm) Capacity (kg) 1000 2000 Standard Lift(m) Control Cable(m) 50HZ-4 50HZ-2 Lifting Speed(m/min) 60HZ-5 60HZ-2.5 Chain(mm) 7.1x20 7.1x20 Safety Factor WLL x 1.25 Insulation Class No. Of Starts per hr Power Cable (m) Net Weight (kg) Page 10... -
Page 11: Overall Dimensions
3-3 Overall dimensions MODEL Length Width Height DU-903 456mm 212mm 535mm DU-904 456mm 214mm 675mm Page 11... -
Page 12: Working Space Required And Operating Position
3-4 Working space required and operating position FRONT OPERATOR 1500mm Top View 1500mm 1500mm 1500mm FRONT OPERATOR Page 12... -
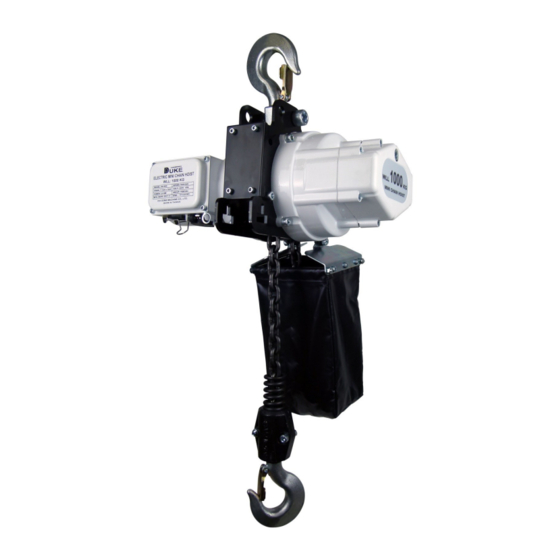
Page 13: Main Units And Name
3-5 Main units and name Item Part’s name Electric Department Motor Chain - 7.1mm x 20mm Lower Hook Chain bag Gear Box Upper Hook Page 13... -
Page 14: Pre-Use Preparation
4. Pre-use Preparation 4-1 Notice and inspection before operation 4-1-1 Mechanical Check 1. Are all transport protection facilities removed? 2. Is there any mechanical damage? 3.Are all the safety device, safety covers refitted from the set-up installation? 4. Are all winch unit correctly aligned and locked in position? 5. -
Page 15: Expected Use And Limits Of Use
4-2 Expected use and limits of use Specification of essential parts: Please refer to the list of specification in operation manual. This winch is expected to be used under industrial environment: The well lighting, well ventilation, clean environment, dry, and maintains a normal temperature. -
Page 16: Transport, Install And Dismantle
5. Transport, Install and Dismantle 5-1 Transport Always carry the winch with two hands to prevent a strike. Below table shows net weight and gross weight for each model of winch. MODEL NET WEIGHT GROSS WEIGHT DU-903 23 KGS 26 KGS DU-904 28 KGS 31 KGS... -
Page 17: Install
5-2-1 POWER & CONTROL SYSTEM REQUIREMENTS The DUKE hoist comes in a direct control. They must be connected to a power and control system that is properly designed to operate the chain hoist and to handle the power consumption of the motor. DUKE hoists are standard wired for 220V-240V-1ph-50/60Hz. - Page 18 RIGGING THE HOIST: 1. Before each use, visually inspect the hoist and all load bearing parts of the hoist, like hook and chain. 2. Make sure the intended structural support component is able to safely absorb the chain hoist lifting capacity. 3.
- Page 19 6. Connect the power (and control) cable and make sure these will have proper stress relieves and sufficient slack in every direction of planned tilting of the load. Use Velcro or cable-strings to tie the cable to the hoist body or lifting hook.
- Page 20 get under the load. 17. Make sure this secondary is as tight as possible, preferably using clutch-chains. DE-RIGGING THE HOIST: 1. Remove the secondary (when present). 2. Check the direction of travel. If the pre-selection switch on the controller is in the down-direction the chain hoist should run in down-direction.
-
Page 21: Continuous Rating
5-2-3 Continuous rating Never use the hoist beyond the 20 minutes permitted per hour. The life of the hoist depends on the conditions of the load and working frequency. During long operating periods make sure to use the hoist within its continuous rating. Continuous Rating means the amount of allowable usage within one hour which is 25% or 20 minutes per hour or 300 starts per hour. -
Page 22: Operation
6. Operation 6-1 Control device: Control panel 6-2 Operating procedure The person who is untrained or unfamiliar with the operation procedure is prohibited from operating machine. Preparation before Working3. Working Me Check all safety and environmental conditions Connect the main power source and ensure grounding. ... -
Page 23: Handling Precautions
5. Do not allow the load and/or attachments to bear against the hook latch and/or hook tip. Apply load to hook bowl or saddle only. 6. The DUKE can be mounted upright as “motor up” in the traditional industry situation or “motor down”, which has become standard in the entertainment touring industry. -
Page 24: Maintenance And Adjustment
7. Maintenance and Adjustment 7-1 Inspections & Maintenance To maintain continuous and satisfactory operation, a regular inspection procedure must be initiated to replace worn or damaged parts before they become unsafe. Inspection intervals must be determined by the individual application and are based on the type of service to which the hoist will be subjected to the degree of exposure to wear, deterioration or malfunction of the critical components. - Page 25 PREVENTIVE MAINTENANCE In addition to the above inspection procedure, a preventive maintenance program should be established to prolong the useful life of the hoist and maintain its reliability and continued safe use. The program should include the periodic and frequent inspections with particular attention being paid to the lubrication of the various components using the recommended lubricants.
- Page 26 HOOK INSPECTION Hooks damaged from chemicals, deformations or cracks, or that have more than a 10 degree twist from the hook’s unbent plane, excessive opening or seat wear must be replaced. Also, hooks that are opened and allow the latch to not engage the tip must be replaced.
- Page 27 3. Also check chain for stretch using a larger caliper as show below to measure the outside length of a convenient number of links about 11(pitchs). Measure the same number of links in a used section of chain and calculate the percentage increase in length of the worn chain.
- Page 28 IDENTIFICATION OF CHAIN: FEC load chain can be recognized and determined original by the following marks on the chain Chain specifications: • diameter-7.1mm • pitch-20.2mm • grade-Grade80 • type of marking-see sample picture below. Every 15 links. • minimum breaking strength-6300kgs •...
- Page 29 CHAIN REPLACEMENT WITH NO CHAIN IN CHAIN HOIST 1. With the unit placing on workbench, run the hook to its up limit. 2. Remove the load block assembly from the old chain. 3. Remove the chain stop from the old chain. 4.
- Page 30 LOAD CHAIN CLEANING Clean the load chain with acid-free solvent and coat with new ISO VG-320 or equivalent gear oil. Wipe excess Oil to prevent dripping. Never apply grease to the chain. OVERLOAD LIMITING CLUTCH The parts of limiting clutch are mounted free on the gear input shaft. The adjustable slip clutch, fitted as an overload safety device.
-
Page 31: Troubleshooting
7-2 Troubleshooting If the winch fails to start after several attempts or the hoist’s operation appears to be defective check the following: TROUBLE SHOOTING FOR CHAIN HOIST Trouble Probable Cause Check and Remedy A) Power failure in supply A) Check circuit, breakers, switch line and connection in power supply line... - Page 32 A) Reduce load to within rated A) Lifting motor overload capacity of chain hoist. B) Determine cause of low voltage and bring up to within plus or minus 10% of the voltage B) Low voltage specified motor. Measure voltage at the lifting motor in terminal block power input.
- Page 33 A) Brake needs replacement A) Replace brake assembly B) Low voltage B) Determine cause of low 9. Motor brake noise or voltage and bring up to within chatter plus or minus 10% of the voltage (while starting chain specified on the motor. Measure hoist) voltage at the lifting motor in terminal block power input.
-
Page 34: Drawings And Part List
8. Drawings and Parts List 8-1 Assembly drawings and part list MODEL: DU-903 - Assembly Drawing Page 34... - Page 35 MODEL: DU-903 - Parts List NAMEPLATE 1 FIXING SPRING GEAR RING BOLT GEAR GEAR HOUSING MOTOR COVER FIXING SPRING GEAR BRAKE SET BEARING FIRST SECTION GEAR SHAFT BRAKE PAWL SET ROTOR BEARING AIR GUIDING IRON COVER OIL SEAL OIL SEAL SNAP RING SCREW GEAR...
- Page 36 MODEL: DU-904 - Assembly Drawing Page 36...
- Page 37 MODEL: DU-904 - Parts List NAMEPLATE 1 POWER CONNECTOR SOCKET BOLT SCREW BOLT MOTOR COVER SWITCH CONNECTOR SOCKET CROSS TYPE SHEET BEARING SCREW BOLT ROTOR SWITCH CONNECTOR CHAIN GUIDER AIR GUIDING IRON COVER POWER CABLE SET SNAP RING SNAP RING GASKET OIL SEAL THIRD SECTION GEAR...
-
Page 38: Electrical System Drawings And Part List
8-2 Electrical system drawings and part list MODEL: DU-903/DU-904 - Electrical System Drawings Page 38...
Need help?
Do you have a question about the DU904 and is the answer not in the manual?
Questions and answers