Table of Contents
Advertisement
Quick Links
Advertisement
Table of Contents

Related Manuals for Household Essentials Iron 'n Fold 18300

Summary of Contents for Household Essentials Iron 'n Fold 18300
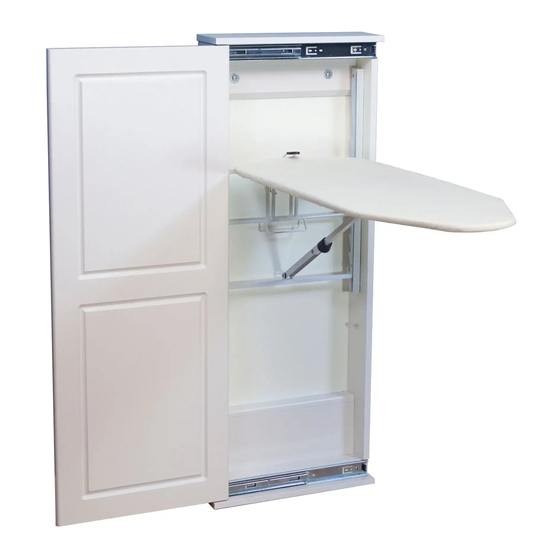
- Page 1 Iron ‘n Fold ® Cabinet Ironing Board 18300 PATENT NO. 9,119,467...
- Page 2 If you are missing parts, please do not return to place of purchase; call Household Essentials® at 800-922-5524 / 314-428-5657 and we will expedite replacement parts. Note: It is recommended that 2 people complete this installation.
- Page 3 SELECT A LOCATION 1. Select your installation location, for example a laundry room, walk in closet, bedroom or another room of your choice. 2. Ensure there is enough room for the door to slide open completely. Note: 36” wall space is need to accommodate the cabinet and sliding door. 3.
- Page 4 CHANGING THE DOOR If you are happy with the door sliding to the left then skip this step. Note: It is recommended that 2 people complete this installation. 1. Slide the door completely open. 2 Using a Phillips head screw driver, remove the 4 screws from the bottom slide and then 4 screws from the top slide (figure 1).
- Page 5 INSTALLING THE CABINET IRONING BOARD 1. Place the Iron ‘n Fold® into the desired position, snug against the wall. (figure 1) Note: Maintain a hand on the cabinet until installed to avoid the unit falling forward. 2. Slide the cabinet door open and lift the board, making sure the black stability cap (figure 2A) slides firmly into place (figure 2B).
- Page 6 DETERMINE THE APPROPRIATE BOLT TO USE FOR EACH PILOT HOLE 1. Drill a small pilot hole at the two marked locations. 2. If a Stud was NOT Hit: A “BUTTERFLY” (A) bolt and washer should be used in the hole. 3.
- Page 7 INSTALLING THE COVER 1. To install cover/pad lift the ironing board into place. 2. Place the nose pocket over the nose of the board and pull into place. 3. Finish by fitting over the end of the board. This cover features a one piece construction, with a thick fiber pad, bungee cord binding and nose pocket that allows for an easy installation and perfect fit.
- Page 8 8/2017...
Need help?
Do you have a question about the Iron 'n Fold 18300 and is the answer not in the manual?
Questions and answers