Table of Contents
Advertisement
Quick Links
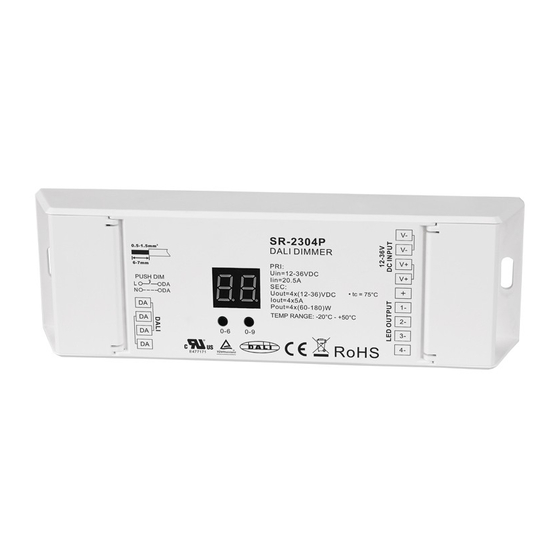
Universal series DALI dimmer
Important: Read All Instructions Prior to Installation
Function introduction
DC Power input
Digital display
V+
DALI Controller
V-
V+
V-
DA
DA
0-6
0-9
DA
DA
2 groups DALI
Manual set button
signal input & output
Product Data
Input
Output
Output
No.
Remarks
Voltage
Current
Power
1
4x5A
Constant voltage
12-36VDC
4x(60-180)W
2
4x350mA
Constant current
12-36VDC
4x(4.2-12.6)W
3
4x650mA
4x(7.8-23.4)W
Constant current
12-36VDC
4
12-36VDC
4x700mA
4x(8.4-25.2)W
Constant current
• Complies to DALI standards IEC 62386-102, IEC 62386-207
• Match all DALI system in the market
• Manual /automatically DALI address setting
• DALI address digital indicate
• Four channels, can set addresses from one to four.
• To work with power repeater to expand output power unlimitedly.
• Waterproof grade:IP20
Safety & Warnings
• DO NOT install with power applied to device.
• DO NOT expose the device to moisture.
Operation
Set DALI Address Manually Via Buttons
1.1. Press and hold down any of the two buttons until numeric digital display flashes, then release the button.
1.2. Click any of the two buttons once to select a digit, click again to change the digit until the desired DALI
address appears. Click first button to set "tens" position and second button to set "units" position. The address
can be set from 00~63.
1.3. Then press and hold down any of the 2 buttons until the numeric digital display stops flashing to confirm the
setting.
Note: DALI address can be manually assigned from 00-63-FF, by factory defaults, no DALI address is
assigned for the dimmer, and the display shows
dimmer to factory defaults.
09.2303B.04078
CH 1:R output
CH 2:G output
CH 3:B output
CH 4:W output
DALI
Dimming
Ambient
Size(LxWxH)
Consumption
Range
Temperature
178x46x22mm
-20℃ ~ +50℃
2mA
0.1%-100%
178x46x22mm
-20℃ ~ +50℃
2mA
0.1%-100%
178x46x22mm
2mA
0.1%-100%
-20℃ ~ +50℃
178x46x22mm
2mA
0.1%-100%
-20℃ ~ +50℃
. Setting DALI address as
will reset the
Set DALI Address Quantity
1.1.
Press and hold down both of the two buttons until numeric digital display flashes, then
release the button.
1.2.
Click first button to select "1A", "2A", "3A" or "4A" which means 1 address, 2 addresses, 3
addresses or 4 addresses.
1.3.
Then press and hold down any of the 2 buttons until the numeric digital display stops
flashing to confirm the setting.
For example, when we set address to 22:
1
2
When select 1A, all four channels will be the same address 22.
When select 2A, channel 1 & 3 will be the same address 22, channel 2 & 4 will be the same
address 23.
When select 3A, channel 1, 2, 3 will be address 22, 23, 24 respectively, and channel 4 address is
also 24.
When select 4A, channel 1, 2, 3, 4 will be address 22, 23, 24, 25 respectively.
DALI Address Assigned by DALI Masters
DALI address can also be assigned by DALI Master controller automatically, please refer to user manuals of
compatible DALI Masters for specific operations.
Note: The digital display will show
When the DALI master is assigning addresses.
Wiring diagram
V+
12V/24V/36V
CV PSU
V-
V+ V-
V+
DALI Controller
V-
V+
V-
DALI Master
DA
DA
0-6
0-9
DA
DA
V+
DALI Controller
V-
V+
V-
DA
DA
0-6
0-9
DA
DA
V+
DALI Controller
V-
V+
V-
DA
DA
0-6
0-9
DA
DA
Conformity & Standards
• Radio Frequency Interference according to EN 55015:2013
• Immunity standard according to EN 61547:2009
• TÜV Rheinland marked, CE marked
L
N
AC Power
G
50/60Hz
V+
V+
If Connect with RGBW LED Strip
R-
R-
G-
G-
B-
B-
W-
W-
V+
V+
If Single Color LED Strip
1-
V-
2-
V-
3-
V-
4-
V-
V+
V+
WW
WW
If Connect with Dual Color LED Strip
CW
CW
WW
WW
CW
CW
Advertisement
Table of Contents

Need help?
Do you have a question about the Universal Series and is the answer not in the manual?
Questions and answers