Table of Contents
Advertisement
Available languages
Available languages
Quick Links
Advertisement
Table of Contents

Related Manuals for Tectro R232TC


Summary of Contents for Tectro R232TC
- Page 1 R232TC INSTRUCCIONES DE USO OPERATING MANUAL > ISTRUZIONI D’USO...
- Page 2 ATTENTION F Utiliser uniquement un combustible liquide conforme aux arrêtés du 18/7/2002 et du 25/06/2010 • Pour remplissage: voir manuel d’utilisation • Ne pas utiliser en continu. D Verwenden Sie nur zugelassenes Heizpetroleum entsprechend DIN 51603-1 • Vor dem Befüllen des Brennstoffbehälters bitte die Gebrauchsanweisung lesen.
- Page 4 Estimado Cliente: Le felicitamos por la compra de su estufa portátil. Usted acaba de comprar un producto de calidad, que le dará plena satisfacción durante muchos años, a condición de que lo utilice debidamente. Por lo tanto, lea primero este manual del usuario, para una vida útil máxima de su estufa.
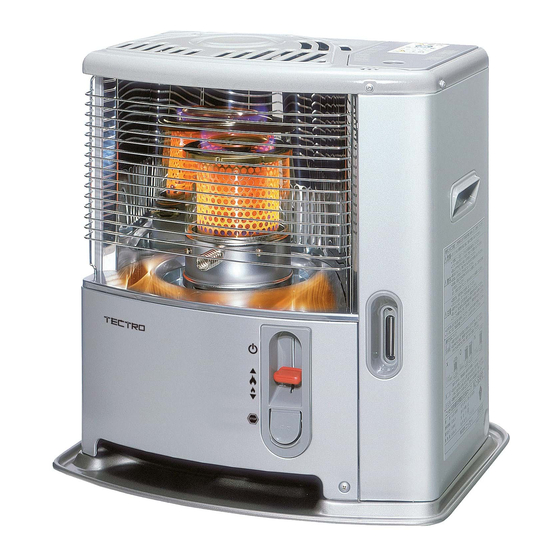
- Page 5 EL USO A GRANDES RASGOS PIEZAS IMPORTANTES Estos son a grandes rasgos los pasos a seguir para la utilización de su estufa portátil. Para su correcta Botón de apagado utilización, le remitimos al MANUAL (pág. 43 y siguientes). Botón regulador Botón de encendido Retire todo el material de embalaje (vea capítulo A, fig.
- Page 6 LO QUE DEBE SABER PREVIAMENTE VENTILAR SIEMPRE SUFICIENTEMENTE Cuando se apague la estufa (manual o automáticamente) hay que esperar 15 minutos antes de volver a encenderla. Para evitar cualquier daño al aparato, no intente forzar el encendido de la estufa durante ese tiempo. Lea detenidamente este manual de usuario antes de usar el aparato y consérvelo para poder consultarlo en el futuro.
- Page 7 La garantía no cubre los daños y/o el malfuncionamiento de la estufa debido al uso de un combustible otro que aceite de parafina de alta calidad sin agua. Consulte siempre al distribuidor más cercano sobre el combustible apropiado para su estufa. Solamente el combustible apropiado le garantiza un uso...
- Page 8 Coloque las pilas en su alojamiento L situado en la parte posterior de la estufa (fig. G). Observe los polos + y -. El suelo debe ser sólido y nivelado, compruébelo. Desplace la estufa si no está bien nivelada. No intente corregir esta posición, colocando libros u otros objetos debajo.
- Page 9 Antes de encender la estufa, controle siempre si la cámara de combustión D está bien recta, moviendola con ayuda del asa E un poco a la izquierda y derecha (fig. F). Esto se efectuará sin ninguna dificultad. Si la cámara de combustión está...
- Page 10 LA ESTUFA SE APAGA LENTAMENTE. E El depósito extraíble está vacío. Vea capítulo B. E El depósito inferior contiene agua. Consulte a su distribuidor. E La parte superior de la mecha se ha endurecido o tiene humedad. Deje que la estufa queme todo el combustible. Use un combustible adecuado. E Usted utiliza combustible envejecido.
- Page 11 No extraiga Usted mismo piezas de la estufa. Para eventuales reparaciones, consulte siempre a su distribuidor. Antes de efectuar cualquier revisión, deje que la estufa se enfríe. A L M A C E N A M I E N T O ( f i n d e l i n v i e r n o ) Llegado el fin del invierno, le recomendamos que antes de guardarla, deje que la estufa queme todo el combustible existente en el depósito.
-
Page 12: Condiciones De Garantia
E S P E C I F I C A C I O N E S T E C N I C A S R 232 TC Encendido eléctrico Combustible parafina Capacidad (kW)* Volumen apropiado del espacio (m3)** 35-80 Consumo de combustible (l/hora)* 0.250 Consumo de combustible (g/hora)* Duración de combustión por depósito (hora)*... - Page 13 14 SUGERENCIAS PARA UN USO SEGURO 100cm Se deberá vigilar a los niños para asegurar que no jueguen con el 20cm 50cm aparato. No transportar la estufa cuando esté encendida o esté aún caliente, ni tampoco llenarla de combustible, ni efectuar trabajos de mantenimiento.
- Page 14 CAMBIAR LA MECHA ENSURE THAT THE HEATER IS OFF AND COMPLETELY ANTES DE COMENZAR A CAMBIAR LA MECHA, LA ESTUFA TIENE QUE COOL BEFORE STARTING TO REPLACE THE WIC K. ESTAR APAGADA Y COMPLETA -MENTE FRÍA. 1. Press the shutoff button ①, lower the wick, take out the refueling tank ⑨, 1.
- Page 15 10. Ajuste la perilla roja a la palanca de ajuste de la mecha. Incline hacia abajo 10. Fit the control knob to the wick adjusting lever. Tilt down the weight of the el peso del dispositivo de extinción automática para casos de volcamiento tipover automatic extinguishing device and make sure the wick drops quickly.
- Page 16 Dear Sir, Madam, Congratulations on your purchase of this heater. You have purchased a quality product, which will serve you for many years to come. This, of course, provided you use the heater correctly. Please read these Directions for Use first, to ensure the maximum lifetime for your heater.
-
Page 17: General Directions For Use
GENERAL DIRECTIONS FOR USE MAIN COMPONENTS Below you will find the main steps to be taken for using your heater. For more details, please refer to OFF - button the MANUAL (pages 67 ff.). Wick adjustment knob Remove all packaging materials (refer to Section A, Fig. A). Ignition button Fill the removable tank I and wait 30 minutes before you ignite the heater (refer to Section B, Fig. -
Page 18: What You Need To Know In Advance
WHAT YOU NEED TO KNOW IN ADVANCE ALWAYS MAKE SURE THAT THERE IS SUFFICIENT VENTILATION When the heater has switched off (manually or automatically) it may not be restar- ted for 15 minutes. In order to prevent damage to the device, please do not force the ignition of the heater during this period. -
Page 19: Installing The Heater
Always refer to your local dealer for the right fuel for your heater. MANUAL E E E E E E INSTALLING THE HEATER Carefully remove your heater from the box and check the contents. In addition to the heater you also need to have: E a transportation cap E these directions for use Keep the box and the packaging materials (Fig. -
Page 20: Filling Fuel
The floor should be firm and completely level. Reposition the heater, when it is not level. Do not correct the situation by placing books or other goods under the heater. Your heater is now ready for use. FILLING FUEL Fill the removable tank in a suitable place since there can always be some spillage. Follow the procedure below: Make sure that the heater is switched off. -
Page 21: Switching Off The Heater
Gently pressdown the wick adjustment knob until it stops at ignition position. ( Fig. K ) Gently pressdown the wick adjustment knob until it stops at ignition position. Slowly release the knob as soon as a flame is visible in the combustion ( Fig. -
Page 22: Maintenance
Contact your dealer. E The wick height is not correct. Contact your dealer. THE HEATER SLOWLY EXTINGUISHES E The removable tank is empty. See Section B. E The lower reservoir is contaminated by moist. Contact your dealer. E The wick has hardened on the upper side. Burn the heater until all fuel is used (Section G). - Page 23 Let the heater cool down first, before you start any maintenance or service work. STORAGE (END OF THE HEATING SEASON) We recommend that you burn up all the fuel in the fuel tank at the end of the heating season and store the heater properly. Follow the procedure on the next page: Ignite the heater outside the living room and let it burn until all fuel is used.
-
Page 24: Specifications
SPECIFICATIONS R 232 TC Ignition electrical Fuel paraffin Capacity (kW)* Suitable space (m3)** 35-80 Fuel consumption (l/hr)* 0.250 Fuel consumption (g/hr)* Burning time per tank (hr)* 12.5 Capacity removable tank (litres) Weight (kg) width 404 Dimensions (mm) (including base plate) depth 330 height 403 Required batteries... -
Page 25: Tips For Safe Use
14 TIPS FOR SAFE USE Children should be supervised to ensure that they do not play with the 100cm appliance. 20cm 50cm Do not move the heater when it is burning or still hot. Do not refill nor service the heater when it is burning or still hot. Position the front of the heater at a minimum distance of 1.5 metres from walls, curtains, and furniture. - Page 26 REPLACEMENT OF THE WICK ENSURE THAT THE HEATER IS OFF AND COMPLETELY ENSURE THAT THE HEATER IS OFF AND COMPLETELY COOL BEFORE COOL BEFORE STARTING TO REPLACE THE WIC K. STARTING TO REPLACE THE WICK. 1. Press the shutoff button ①, lower the wick, take out the refueling tank ⑨, 1.
- Page 27 10. Fit the control knob to the wick adjusting lever. Tilt down the weight of 10. Fit the control knob to the wick adjusting lever. Tilt down the weight of the the tipover automatic extinguishing device and make sure the wick drops tipover automatic extinguishing device and make sure the wick drops quickly.
- Page 28 Egregio Signore, Gentile Signora, Ci congratuliamo con Lei per l’acquisto di una stufa portatile. Lei ha acquistato un prodotto di qualità, da cui trarrà grande soddisfazione per molti anni, naturalmente sempre a patto che Lei adoperi la stufa in modo corretto. Per tale motivo, al fine di garantire la massima durata delle stufe portatili, Le consigliamo di leggere con attenzione le istruzioni prima dell’uso.
-
Page 29: Componenti Principali
OSSERVAZIONI COMPONENTI SULL’USO GENERALE PRINCIPALI Qui di seguito vengono descritte in generale le Pulsante di operazioni da compiere per l’uso delle stufe portatili. spegnimento Per maggiori dettagli si prega di fare riferimento alle istruzioni d’uso (da pagina 79 in poi). Manopola Pulsante di Togliere tutti i materiali dell’imballaggio... -
Page 30: Osservazioni Generali
OSSERVAZIONI GENERALI VENTILARE SEMPRE SUFFICIENTEMENTE Quando la stufa viene spenta (manualmente o automaticamente) questa non può essere riaccesa nei 15 minuti successivi. Per prevenire danni all’apparecchiatura si prega di non forzare l’accensione della stufa. Prima di usare l’apparecchiatura, leggere attentamente il presente manuale e con- servarlo come riferimento futuro. -
Page 31: Installazione Della Stufa
paraffina di alta qualità, esente da acqua. Consultare sempre il rivenditore a Lei più vicino per la scelta del combustibile adat- to alla stufa. MANUALE E E E E E E INSTALLAZIONE DELLA STUFA Estrarre con cautela la stufa dalla scatola e controllare il contenuto. Oltre alla stufa, devono essere presenti i seguenti componenti: E un tappo per il trasporto E le istruzioni d’uso... - Page 32 Adesso la stufa è pronta per l’uso. RIFORNIMENTO DEL COMBUSTIBILE Non riempire il serbatoio estraibile nello spazio abitativo, ma in un luogo più adatto (una parte di combustibile può sempre fuoriuscire). Compiere le seguenti operazioni: Assicurarsi che la stufa sia spenta. Aprire il coperchio ed estrarre il serbatoio dalla stufa (fig.
-
Page 33: Spegnimento Della Stufa
Gently pressdown the wick adjustment knob until it stops at ignition position. ( Fig. K ) Gently pressdown the wick adjustment knob until it stops at ignition position. Dopo l’accensione della stufa controllare sempre che la camera di combustione D Slowly release the knob as soon as a flame is visible in the combustion ( Fig. - Page 34 LA STUFA SI SPEGNE LENTAMENTE. E Il serbatoio estraibile è vuoto. Cfr. il capitolo B. E Nel serbatoio inferiore vi è dell’umidità. Rivolgersi al rivenditore. E Lo stoppino è indurito sulla parte superiore. Fare bruciare la stufa fino a che non vi è...
- Page 35 IMMAGAZZINAGGIO (FINE DELLA STAGIONE FREDDA) Alla fine della stagione fredda si consiglia di tenere accesa la stufa facendo in modo che si esaurisca tutto il combustibile in essa presente e poi di immagazzinarla in un luogo sicuro. A tale proposito compiere le seguenti operazioni: Accendere la stufa al di fuori dello spazio abitativo e lasciarla bruciare fino ad esaurimento del combustibile.
-
Page 36: Condizioni Della Garanzia
SPECIFICHE R 232 TC Accensione elettrica Combustibile petrolio Capacità (kW)* Spazio riscaldabile (m3)** 35-80 Consumo di combustibile (l/ora)* 0.250 Consumo di combustibile (g/ora)* Autonomia (ora)* 12.5 Capacità serbatoio estraibile (litri) Peso (kg) larghezza 404 Dimensioni (mm) (con piastra inferiore) profondità 330 altezza 403 Batterie necessarie 3V D.C. - Page 37 14 CONSIGLI PER UN USO SICURO Occorre sorvegliare costantemente i bambini per essere sicuri che non 100cm giochino con l’apparecchio 20cm 50cm Non spostare la stufa se questa è accesa o se è ancora calda. In tal caso, non riempirla di combustibile e non eseguire la manutenzione. Porre la parte anteriore della stufa ad una distanza minima di 1,5 metri da pareti, tende o mobili.
- Page 38 SOSTITUZIONE DELLO STOPPINO ENSURE THAT THE HEATER IS OFF AND COMPLETELY PRIMA DI PROCEDERE ALLA SOSTITUZIONE DELLO STOPPINO, COOL BEFORE STARTING TO REPLACE THE WIC K. LA STUFA DEVE ESSERE SPENTA E COMPLETAMENTE FREDDA. 1. Press the shutoff button ①, lower the wick, take out the refueling tank ⑨, 1.
- Page 39 10. Montare la manopola di controllo nella leva di regolazione dello stoppino. 10. Fit the control knob to the wick adjusting lever. Tilt down the weight of the Inclinare verso il basso il peso del dispositivo di spegnimento automatico tipover automatic extinguishing device and make sure the wick drops quickly. a ribaltamento e assicurarsi che lo stoppino scenda rapidamente.
- Page 40 >...
- Page 41 >...
Need help?
Do you have a question about the R232TC and is the answer not in the manual?
Questions and answers