Table of Contents
Advertisement
Quick Links
Advertisement
Table of Contents

Summary of Contents for DISAG RM IV
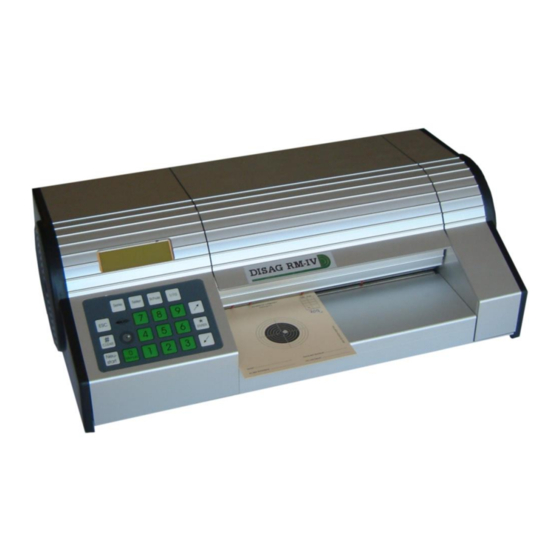
- Page 1 OPERATING INSTRUCTIONS DISAG RM IV Ring and target measuring machine...
- Page 3 Knestel Elektronik GmbH, Osterwalder Strasse 12, 87496 Hopferbach, Germany. Tel.: »0049« (0) 83 72/708-0, Fax: »0049« (0) 83 72/23 84 DISAG GmbH & Co KG, Heganger 16, 96103 Hallstadt, Germany. Tel.: »0049« (0) 951/65046, Fax: »0049« (0) 951/65049 All rights reserved.
- Page 4 Operating Instructions DISAG RM IV Operating Instructions DISAG RM IV Seite 4...
- Page 5 5.12 Key 7 : Printer enable/disable ................28 PC connection......................28 Irregularity checklist ....................29 Cleaning ........................30 Changing the ink ribbon ..................31 Maintenance and repair ..................32 Guarantee ......................32 Exclusion of guarantee ..................32 Service ........................32 Operating Instructions DISAG RM IV Seite 5...
- Page 6 DISAG RM IV General The DISAG RM IV ring and score measuring machine is a fully automatic target evaluation unit for all the usual air rifle, air pistol, small bore, gallery rifle and running target targets and bands up to 225 mm in width.
-
Page 7: Safety Instructions
Do not disconnect the mains plug from the plugbox by pulling on the cable! Do not put the DISAG RM IV in operation if the mains cable is damaged or the machine housing shows any visible signs of damage. -
Page 8: Technical Data
Display 2 x 16 characters Power supply 100-240 V, 50-60 Hz Current input 1.88 A Space for your notes: ______________________________________________________________________ ______________________________________________________________________ ______________________________________________________________________ ______________________________________________________________________ ______________________________________________________________________ ______________________________________________________________________ ______________________________________________________________________ ______________________________________________________________________ ______________________________________________________________________ ______________________________________________________________________ ______________________________________________________________________ ______________________________________________________________________ ______________________________________________________________________ ______________________________________________________________________ Operating Instructions DISAG RM IV Seite 8... -
Page 9: Getting Started
The ambient temperature and the air humidity must be moderate. Temperatures under 5° C and over 40° C should be avoided both in operation and when storing the DISAG RM IV. Connection to mains power supply: Connect up the evaluation machine to the mains power supply with the supplied cable. - Page 10 ) can be selected by means of the ARROW KEYS In our example we now confirm the "AR-Target" with the ENTER key. The following appears on the display: No. of targets 10 ? Operating Instructions DISAG RM IV Seite 10...
- Page 11 A target stop to the right is to be used for better alignment of the target more especially in the case of target bands. Figure 2: Inserting the target Operating Instructions DISAG RM IV Seite 11...
- Page 12 Measureing 1 Target. The DISAG RM IV determines the position of the targets one after the other which means 10 times in the case of an air rifle band and once for single targets. As soon as this operation has been concluded the following will appear in the display:...
- Page 13 This means that already defined types of target will be recognised automatically again even after the DISAG RM IV has been switched off. A once programmed type of target will be recognised from the paper width when the target is pushed into the evaluation shaft.
-
Page 14: The Key Functions
Menue Figure 3: The keyboard The DISAG RAM IV evaluation machine is operated by means of a membrane keyboard with 20 keys. Once the machine has been set with this keyboard there is no need to press any other key to evaluate the target. - Page 15 To store a set series permanently see "machine configuration". A not completely shot series can be deleted with the CLEAR key after pressing the SERIES key. Operating Instructions DISAG RM IV Seite 15...
- Page 16 Should the signal tone be activated (see "machine configuration") the end of the series will be signalled by 2 short bleeps. Should more than 20 shots have been shot only those shots up to the complete series will be evaluated for the last target. Operating Instructions DISAG RM IV Seite 16...
- Page 17 The shots are evaluated in the given sequence from front to back and from left to right in direction in which the target is inserted. This evaluation sequence is generally valid as far as the DISAG RM IV is concerned. The scores for each target will be printed on the target in the given evaluation sequence as soon as the printer is switched on.
- Page 18 The setting can be left by means of the ESC key. The entered settings will be deleted after the machine is switched off. Please read the instructions under "machine configuration" to file the settings permanently. Operating Instructions DISAG RM IV Seite 18...
- Page 19 Should the NEW START key be pressed during a running series then a fault message will be displayed (see SERIES key). The function of the NEW START key has already been explained in the chapter on "commissioning". Operating Instructions DISAG RM IV Seite 19...
- Page 20 It is possible to set whether evaluation is to follow with or without the ten rings. Operation is appropriate to the 1/10 key but with the difference that the set values in this case are not lost when the DISAG RM IV is switched off. The ENTER key means "Yes", the CLEAR key means "No".
- Page 21 Any entry deviating from the standard series (see SERIES key) will be recognised as a special series. Entering the number 0 means "none". This entry is to be confirmed with the ENTER key. Operating Instructions DISAG RM IV Seite 21...
- Page 22 Active Here you can select the behaviour of the DISAG RM IV for the inner ten. You can select ‘active’ or ‘not active’. If you select ‘active’ an inner ten result will be marked with a small circle on the printout.
- Page 23 210.00 mm. Another entry can be made as indicated in the previous menu point by means of the CLEAR key, NUMERICAL KEYS and ENTER key. Since no decimal point can be entered just the figures are entered in their given sequence. Operating Instructions DISAG RM IV Seite 23...
- Page 24 Since no decimal point can be entered just the figures are to be entered in their given sequence. Continue scrolling with the ARROW TO THE RIGHT KEY. The following appears in the display: Operating Instructions DISAG RM IV Seite 24...
- Page 25 85.5 mm Bull's-eye dia. 112.4mm Bull's-eye dia. 40.5 mm Ring 10 dia. 10.4 mm Ring 10 dia. 4.5 mm Width of rings 1-9 each 8.0 mm Width of rings 1-9 each 4.5 mm Operating Instructions DISAG RM IV Seite 25...
-
Page 26: Remote Access
Only when the DISAG Windows RM III protocol is activated, this menueline is visible. When the remote access is activated, the DISAG RM IV can only be accessed by the PC. There are no more selections possible on the evaluation machine. All keys except the MENUE-key have no functions. -
Page 27: Service Menu
The target must not be pulled or pushed by hand once it has been taken up by the machine. The DISAG RM IV is a measuring instrument and should be also treated as such! 5.11 ARROW KEY FROM BOTTOM LEFT TO TOP RIGHT The ARROW KEY (from bottom left to top right) makes continuous scrolling possible in those sections of the program in which an arrow is shown in the display (see also Fig. - Page 28 PC connection Fig. 4: PC connection The DISAG RM IV has a RS232 connection on the back of the machine. An evaluation computer can be connected up via these interfaces. Should you require further information on data protocols you can get details in Internet under www.disag.de...
- Page 29 The inserted target Insert the correct target TARGET’ does not match with the type or select a new actual type. For Target type. example a AP target is evaluated as a SB target. Operating Instructions DISAG RM IV Seite 29...
- Page 30 DISAG RM IV Cleaning Extreme care must be taken when cleaning the DISAG RM IV ring and DFC measuring machine because it is a precision calibrated measuring instrument. As a general rule it will be sufficient to clean the machine from time to time with compressed air. The middle cover can be hinged back for cleaning.
-
Page 31: Changing The Ink Ribbon
Attach the ink ribbon to the guide shaft of the transport motor until the catch engages. Below is a small drawing covering Point 2, to clearly show how the ink ribbon is to be threaded correctly between the guide rollers. Operating Instructions DISAG RM IV Seite 31... -
Page 32: Maintenance And Repair
Service Please get in touch with your specialist dealer to service and repair the machine. As such he has the necessary documentation to be able to repair or service the DISAG RM IV professionally. Repairs after elapse of the guarantee period are subject to payment. - Page 33 E-Mail: info@disag.de Internet: http://www.disag.de Address of specialist dealer: Stamp of your specialist dealer: Space for your notes: ______________________________________________________________________ ______________________________________________________________________ ______________________________________________________________________ ______________________________________________________________________ ______________________________________________________________________ ______________________________________________________________________ ______________________________________________________________________ ______________________________________________________________________ ______________________________________________________________________ ______________________________________________________________________ ______________________________________________________________________ ______________________________________________________________________ ______________________________________________________________________ ______________________________________________________________________ ______________________________________________________________________ ______________________________________________________________________ Operating Instructions DISAG RM IV Seite 33...
- Page 34 ______________________________________________________________________ ______________________________________________________________________ ______________________________________________________________________ ______________________________________________________________________ ______________________________________________________________________ ______________________________________________________________________ ______________________________________________________________________ ______________________________________________________________________ ______________________________________________________________________ ______________________________________________________________________ ______________________________________________________________________ ______________________________________________________________________ ______________________________________________________________________ ______________________________________________________________________ ______________________________________________________________________ ______________________________________________________________________ ______________________________________________________________________ ______________________________________________________________________ ______________________________________________________________________ ______________________________________________________________________ ______________________________________________________________________ ______________________________________________________________________ ______________________________________________________________________ ______________________________________________________________________ ______________________________________________________________________ ______________________________________________________________________ ______________________________________________________________________ ______________________________________________________________________ ______________________________________________________________________ ______________________________________________________________________ ______________________________________________________________________ ______________________________________________________________________ ______________________________________________________________________ Operating Instructions DISAG RM IV Seite 34...
- Page 35 EN 61000-6-3:2011 EN 60950-1:2014 EN 50581:2013 Bevollmächtigter für die Zusammenstellung der technischen Unterlagen / Person Authorised to Compile the Technical File. Hans Hartig Hopferbach, 2015-10-21 Geschäftsführer / Managing Director Anton Knestel Operating Instructions DISAG RM IV Seite 35...
- Page 36 Operating Instructions DISAG RM IV Operating Instructions DISAG RM IV Seite 36...
Need help?
Do you have a question about the RM IV and is the answer not in the manual?
Questions and answers
jak zaprogramować AR target