Table of Contents
Advertisement
Quick Links
Advertisement
Table of Contents

Related Manuals for Mountway Aquila

Summary of Contents for Mountway Aquila
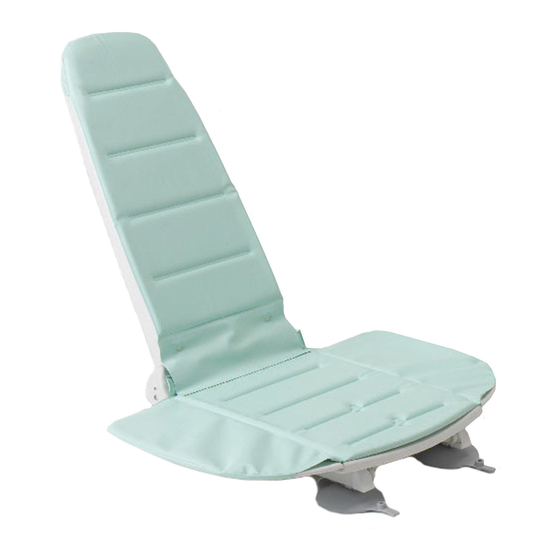
- Page 1 ™ bath lift Operating instructions...
-
Page 2: Table Of Contents
Operating Instructions Please ensure both yourself and any helpers read these instructions carefully before using your bath lift. These operating instructions should be retained for future reference. This bath lift is designed and manufactured to assist individuals in getting in and out of the bath. It should not be used for any other purpose. -
Page 3: Unpacking The Bath Lift
Diagrams for operation and explanation of use are on the fold-out diagram sheet attached to the rear of this booklet 1. Unpacking the bath lift Open the packaging and ensure the bath lift is not damaged and that all parts are included. If it has been damaged in transit, or parts are missing, contact your supplier immediately. -
Page 4: If You Have A Telecare -Enabled
• Ensure that no metal objects touch the contacts on the battery, as this will damage the battery. • Use only the Mountway charger supplied to charge the battery and for no other purpose. 3. If you have a telecare-enabled bath lift The telecare-enabled bath lift has been designed to integrate with the Tunstall Lifeline 400, 4000+ and Connect+ units. -
Page 5: Preparing The Bath For Installation
NOTE: An alarm call cannot be raised unless a Tunstall Lifeline 400, 4000+ or Connect + home unit is installed in your home and the telecare-enabled battery is programmed correctly to this home unit (see section “Programming the telecare-enabled bath lift to Tunstall Lifeline 400, 4000+ and Connect+ home units”... -
Page 6: Connecting The Hand Control
vii) Ensure the backrest hinges locate into BOTH slots, with the bottom edge of the backrest positioned in front of the two blocks (see fig 9). viii) Release the hand control cable from the cable winders on the rear of the backrest (see fig 6). ix) Hold the top of the backrest and lift upwards until the backrest rests in the fully reclined position. -
Page 7: Using The Bath Lift
• If in any doubt, recharge the battery before use (see section 2, “Charging the battery”). NOTE: The battery is for use solely with Mountway bath lifts and cannot be used to operate any other product. 7. Using the bath lift i ) To raise the bath lift, press the UP button on the hand control (see fig 12). -
Page 8: When The Bath Lift Is Not In Use
x) Once the side flaps are level with the top of the bath, remove your finger from the UP button and move sideways onto the side flap. xi) Turn whilst lifting each leg out of the bath. xii) Drain the bath. NOTE: •... -
Page 9: Cleaning
Repairs and servicing must be entrusted to a Mountway authorised dealer or engineer. The bath lift should be inspected annually by a Mountway authorised dealer or engineer, who will check that there are no loose fittings or any other evidence of mechanical damage. -
Page 10: Warranty
Intended life - battery It is essential that the operating instructions with regards to battery use and charging is adhered to. The battery life expectancy is 500 charge cycles or 1 year’s use, whichever is the soonest. We recommend the battery be replaced accordingly in order to obtain the best performance from your bath lift. -
Page 11: Technical Data
Symbol Explanation PLEASE READ THE INSTRUCTIONS BEFORE INSTALLATION OR USE. Do not bin/dispose. Serial number. Re-order number. Maximum load – lifting capacity (person). Caution! Surface hot to touch. 14. Technical data The bath lift seat is made of glass-filled polypropylene/nylon. The hand control and battery are made from ABS. - Page 12 Bath Lift Lifting capacity (person) 22 stone/140kg/308lbs Net weight (excluding battery) 9.6kg/21.16lbs Seat base weight 6kg/13.23lbs Backrest weight 3.6kg/7.94lbs Seat height UP 440mm (17.32in) Seat height DOWN 75mm (2.95in) Backrest height 690mm (27.17in) Power input 14.4V dc nominal 7A max Duty cycle No more than one bath per 15 minutes Degree of protection...
-
Page 13: Troubleshooting
15. Troubleshooting Symptom Possible Cause Solution Section Bath lift does not • Battery is flat. • Charge battery. Section 2 move. No sound • Insert battery correctly into both tracks • Battery is not Section 6 from the motor. connected to hand on hand control cradle and slide all the control. - Page 14 Symptom Possible Cause Solution Section Bath lift • Battery is not fully • Charge battery. Section 2 only moves charged. intermittently. • Excessive user load. • Do not use bath lift if you weigh over Section 14 22st/140kg/308lbs. • Bath lift has •...
- Page 15 Symptom Possible Cause Solution Section No lights appear • Insert battery correctly into both tracks • Battery is not Section 6 on hand control connected correctly on hand control and slide all the way to when buttons are to hand control. the end until it clicks.
-
Page 16: Accessories
16. Accessories The bath lift can be supplied with a wide range of optional accessories: Accessory Part No. Pommel AB248 Separates legs for maintaining correct posture or improving hygiene access. Accessory Part No. Knee wedge AB249 Supports legs, maintains correct posture or prevents sliding. Accessory Part No. - Page 17 Accessory Part No. Pelvic harness Adult - AB230 Child - AB229 Helps maintain body posture or prevents slipping Accessory Part No. Slide and swivel aid AB247 Facilitates transfer on and off the seat. Must be used with seat cover. Accessory Part No.
-
Page 18: Parts List
AB212 shown) Battery A230 Smart Charger NiMH CU-3000 Seat Unit Blocks with Fittings AB280 ® Tunstall and Lifeline are registered trademarks of Tunstall Group Limited. Mountway Limited reserve the right to alter specifications to products or packaging at any time. - Page 19 Diagram sheet...
- Page 20 Figures Hand control Side flap Seat unit Side flap protectors Backrest assembly Front suction feet Charging cradle Tracks Charger Light indicator Battery...
- Page 21 Telecare-enabled battery Lifeline Connect+ Red light Red button alarm Red button Green cancel key Integral bath handle Side plap protector Actuator Actuator casing Cable winders Backrest...
-
Page 22: Front Suction Feet
Seat Sucker release handle Base Frame Front suction feet Backrest Clamp Actuator Actuator end FULLY retracted Actuator end NOT FULLY retracted... -
Page 23: B Side Flap
Top of backrest Hinge Seat unit slot Seat unit blocks Integral bath handle Side flap protector Side flap... - Page 24 Battery Tracks Hand control Hand control Battery status indicator Down...
- Page 25 Cable winder Cable winder with retainer clip Hand control Rear of base frame Sucker release handle...
- Page 26 © Mountway Limited 2011 ML1031 01: 04/11 Tafarnaubach Ind. Est. Tredegar NP22 3AA UK tel +44 (0)1495 723300 fax +44 (0)1495 723360 freephone 0800 014 1852 e-mail mail@mountway.co.uk www.mountway.com...
Need help?
Do you have a question about the Aquila and is the answer not in the manual?
Questions and answers