Table of Contents
Advertisement
Available languages
Available languages
Quick Links
Digitales Teleskop DigiTele PRO
Artikelnummer: DNT000009
Bedienungsanleitung
Bitte lesen Sie diese Bedienungsanleitung vor der Installation und Inbetriebnahme komplett durch und
bewahren Sie die Bedienungsanleitung für späteres Nachlesen auf. Wenn Sie das Gerät anderen Personen
zur Nutzung überlassen, übergeben Sie auch diese Bedienungsanleitung.
Importeur: dnt Innovation GmbH
Maiburger Straße 29 · 26789 Leer · Germany
www.dnt.de
1
Advertisement
Chapters
Table of Contents

Summary of Contents for DNT DigiTele PRO
- Page 1 Digitales Teleskop DigiTele PRO Artikelnummer: DNT000009 Bedienungsanleitung Bitte lesen Sie diese Bedienungsanleitung vor der Installation und Inbetriebnahme komplett durch und bewahren Sie die Bedienungsanleitung für späteres Nachlesen auf. Wenn Sie das Gerät anderen Personen zur Nutzung überlassen, übergeben Sie auch diese Bedienungsanleitung.
-
Page 2: Table Of Contents
Inhalt Funktion ......................3 Bestimmungsgemäßer Einsatz, Lieferumfang ..........4 Betriebs-, Wartungs- und Sicherheitshinweise ..........4 Übersicht, Beschreibung ................6 Bedienung .....................7 5.1 Inbetriebnahme .....................7 Akku laden, SD-Karte einlegen ..............7 Displaysymbole .....................8 Ein- und Ausschalten, Bildschirm ausklappen ..........8 5.2 Grundeinstellungen/Menüfunktionen .............9 Sprache auswählen ..................9 SD-Karte formatieren ..................9 Datum einstellen ..................10 Einzelbildauflösung einstellen ..............10 Videoauflösung einstellen ................11... -
Page 3: Funktion
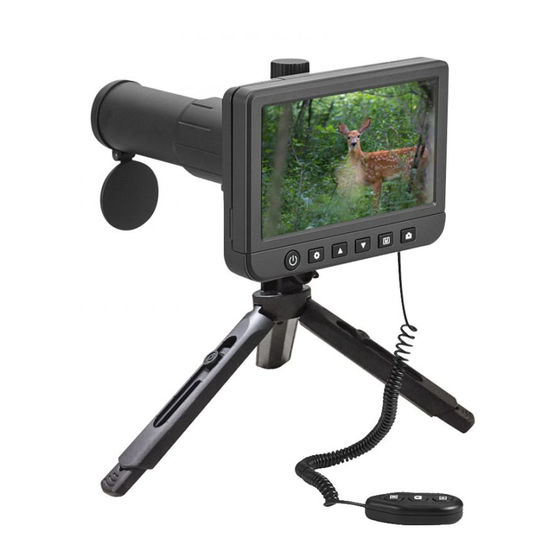
1. Funktion Das digitale Teleskop dient zu Beobachtungsaufgaben aus großer Entfernung bis zu mehreren hundert Metern, z. B. bei Tierbeobachtungen oder Sportveranstaltungen. Da- bei wird durch die bis zu 50fache Vergrößerung eine sehr hohe Bildauflösung erreicht. Das Beobachtungsbild kann sowohl auf dem großen, ausklappbaren 12,7-cm-Farb- bildschirm dargestellt als auch auf einer microSD-Speicherkarte gespeichert werden. -
Page 4: Bestimmungsgemäßer Einsatz, Lieferumfang
Hinweis: Beachten Sie bei Aufnahmen die Persönlichkeits- und Urheberrechte und halten Sie die dafür geltenden gesetzlichen Bestimmungen ein. Lieferumfang: - Digitales Teleskop DigiTele PRO - Kabelfernbedienung - 5-V-USB-Netzteil - USB-Kabel für Netzteil- und PC-Anschluss - Videokabel, Klinkenstecker 3,5 mm auf 1x Cinch/RCA... - Page 5 - Verpackungsmaterial nicht achtlos liegen lassen! Plastikfolien/-tüten, Styroporteile etc. können für Kinder zu einem gefährlichen Spielzeug werden. - Die Geräte sind kein Spielzeug. Sie dürfen nicht im Zugriffsbereich von Kindern aufbewahrt oder betrieben werden. - Starke mechanische Beanspruchungen wie Stoß, Druck oder Vibration sind zu vermeiden.
-
Page 6: Übersicht, Beschreibung
4. Übersicht, Beschreibung Ein-/Aus-Taste Set-up-Taste Belichtungstaste Belichtungstaste Wiedergabetaste Aufnahmetaste Fokus-Einstellung Videoausgang (FBAS, PAL/NTSC) microSD-Kartenslot 10 HDMI-Ausgang 11 Zoomtaste 12 USB-Port für Akku-Laden (5 V/USB) und PC-Verbindung 13 Ladeanzeige 14 Anschluss für Kabelfernbedienung 15 Wahltaste Foto/Video/Wiedergabe Fernbedienung 16 Zoomtaste Fernbedienung 17 Aufnahmetaste Fernbedienung 18 Wiedergabetaste Fernbedienung... -
Page 7: Bedienung
5. Bedienung 5.1 Inbetriebnahme Akku laden - Vor der ersten Benutzung laden Sie den internen Akku mit dem mitgelieferten Ladegerät. - Verbinden Sie dazu den USB-Port (12) des Geräts über das mitgelieferte USB-Kabel mit dem 5-V-USB-Ladeausgang des Ladegeräts und stecken Sie dieses in eine Netzsteckdose. -
Page 8: Displaysymbole
Displaysymbole Einzelbild-Modus (Foto-Mode) Video-Modus Belichtungseinstellung 01:27:06 Verbleibende Aufnahmezeit bzw. Einzelbildanzahl je nach Auflösung 1080HD Gewählte Auflösung microSD-Karte erkannt Akku-Ladezustand (3x blau = voll, leeres Symbol = entladen) Die Symbole im Display werden 10 s nach der letzten Tastenbetätigung abgeschaltet. Ein- und Ausschalten, Bildschirm ausklappen - Drücken Sie die Ein-/Aus-Taste (1) ca. -
Page 9: Grundeinstellungen/Menüfunktionen
5.2 Grundeinstellungen/Menüfunktionen - Wählen Sie das Menü des Geräts mit der Taste an. Jetzt erscheint die erste Menüseite, das Symbol ist blau hinterlegt. - Die zweite Menüseite erreichen Sie durch nochmaliges Drücken der Taste jetzt wechselt das Menü zur zweiten Seite: Hinweis: Aus allen Untermenüs können Sie mit der Taste wieder zurück in... -
Page 10: Datum Einstellen
- Jetzt werden alle eventuell bereits vorhandenen Daten auf der Speicherkarte bzw. dem internen Speicher gelöscht und die Karte/der Speicher wird für den Gebrauch formatiert. - Wollen Sie die Karte jetzt doch nicht löschen und formatieren, wählen Sie statt „OK“ die Option „Abbrechen“ und bestätigen die Auswahl mit der Taste Datum einstellen - Wählen Sie die zweite Menüseite an: - Hier wählen Sie mit den Pfeiltasten... -
Page 11: Videoauflösung Einstellen
Videoauflösung einstellen - Wählen Sie mit der Taste Videoaufnahme ( ) an. - Wählen Sie dann das Menü des Geräts mit der Taste an. Jetzt erscheint die erste Menüseite, das Symbol ist blau hinterlegt. - Hier wählen Sie mit den Pfeiltasten /... -
Page 12: Belichtungskorrekturwert Einstellen
Belichtungskorrekturwert einstellen Mit dieser Einstellung können Sie eine Belichtungskorrektur je nach Aufnahme- situation vornehmen. - Wählen Sie mit der Taste Einzelbildaufnahme ( ) aus. - Wählen Sie dann das Menü des Geräts mit der Taste an. Jetzt erscheint die erste Menüseite, das Symbol ist blau hinterlegt. -
Page 13: Loop-Aufnahme
bestätigen die Auswahl mit der Taste - Jetzt wählen Sie mit den Pfeiltasten / die gewünschte Option an und bestätigen die Auswahl mit der Taste Loop-Aufnahme Mit dieser Einstellung können Sie festlegen, wie lang einzelne Videofiles sein dürfen. Nach Ablauf der eingestellten Zeit beendet das Gerät dann selbstständig die Videoaufnahme. -
Page 14: Tv-Norm Einstellen
Auswahl mit der Taste - Jetzt wählen Sie mit den Pfeiltasten / die gewünschte Option an und bestätigen die Auswahl mit der Taste TV-Norm einstellen - Wählen Sie die zweite Menüseite an: - Hier wählen Sie mit den Pfeiltasten / die Zeile „TV-Modus“ an und bestätigen die Auswahl mit der Taste - Im Einstellmenü... - Page 15 - Im Einstellmenü wählen Sie nun mit den Pfeiltasten / die gewünschte Option (Abbrechen = Abbruch, individuelle Einstellungen bleiben erhalten) an und bestä- tigen die Auswahl mit der Taste...
-
Page 16: Bedienung/Aufnahme/Abspielen
5.3 Bedienung/Aufnahme/Abspielen Fokus- Bild scharfstellen (Fokussieren) Einstellrad - Wenn das Gerät auf einem Stativ montiert ist und Sie das Beobachtungsobjekt anvisiert haben, stellen Sie das Bild mit dem Fokus-Einstellrad (7) scharf. Zoomfunktion - Wenn das Gerät auf einem Stativ montiert ist und Sie das Beobachtungsobjekt an- visiert haben, können Sie das Bild digital zoomen und so Details noch detaillierter... -
Page 17: Einzelbilder/Videos Aufzeichnen
Einzelbilder/Videos aufzeichnen - Wenn Sie das Bild scharfgestellt haben, können Sie mit der Taste zwischen Videoaufnahme ( ), Einzelbildaufnahme ) oder Abspiel wählen. - Mit der Aufnahmetaste (6, ) starten (und bei Videoaufnahme stoppen) Sie die Aufnahme. - Alternativ können Sie den Modus und den Aufnahmestart/die Fotoaufnahme auch mit den entsprechenden Tasten (15/17) der Kabelfernbedienung ausführen, nach-... -
Page 18: Aufnahmen Löschen
Aufnahmen löschen - Wählen Sie mit der Taste das Abspiel () an. - Wählen Sie dann mit den Pfeiltasten / die gewünschte Aufnahme an (Video nicht starten!) und drücken Sie die Taste . Es erscheint der Dialog „Löschen/ Schutz“. Hier wählen Sie mit den Pfeiltasten / die gewünschte Option an und drücken anschließend die Taste - Jetzt erscheint die Abfrage, ob die gewählte Aufnahme („Löschungen z.Z.“) oder alle Aufnahmen auf der Speicherkarte („Alle“) gelöscht werden sollen. -
Page 19: Aufnahmen Auf Einen Pc Kopieren
5.4 Aufnahmen auf einen PC kopieren - Schließen Sie das Gerät über das mitgelieferte USB-Kabel an Ihren PC an und schalten Sie das Gerät ein. - Jetzt erscheint die microSD-Karte des Geräts als zusätzlicher Massenspeicher des Rechners (auf dem Bildschirm des Geräts erscheint „Massenspeicher“ als Hinweis, jetzt können keine Aufnahmen getätigt werden), und Sie können die Aufnahmen ansehen, löschen oder auf den Rechner kopieren. -
Page 20: Fehlerhinweise
6. Fehlerhinweise Kein Bild auf dem Display. - Akku ist leer → laden. - Gerät hat sich automatisch ausgeschaltet. - Bei Wiedergabe und Anschluss eines Bildschirms an den FBAS-/HDMI-Ausgang bleibt das Display abgeschaltet. Gerät erkennt Speichermedium nicht. - Speichermedium defekt oder nicht exakt eingelegt. Kein Bild, unscharfes Bild, keine Details. -
Page 21: Pflege Und Wartung
7. Pflege und Wartung - Reinigen Sie das Gerät nur mit einem weichen, trockenen Leinentuch. Bei starken Verschmutzungen kann dieses leicht angefeuchtet sein. Reinigen Sie das Gerät nicht mit lösungsmittelhaltigen Reinigungsmitteln! Das Gerät ist danach sorgfältig mit einem Tuch zu trocknen. Darauf achten, dass keine Feuchtigkeit in das Geräteinnere gelangt. -
Page 22: Konformitätserklärung
9. Konformitätserklärung Hiermit erklärt die dnt Innovation GmbH, Maiburger Straße 29, 26789 Leer, Deutsch- land, dass sich das Gerät „Digitales Teleskop DigiTele PRO“ in Übereinstimmung mit den grundlegenden Anforderungen und den übrigen ein- schlägigen Bestimmungen der Richtlinie 2014/30/EU befindet. Die Konformitätserklärung kann unter folgender Adresse gefunden werden: www.dnt.de... - Page 23 Digital telescope DigiTele PRO Article number: DNT000009 User manuel Please read these instructions before installing and commissioning complete and retain the instructions for later use. If you leave the device to other persons for use, pass these instructions.
- Page 24 Content Function ......................25 Intended use, scope of delivery..............26 Operating, maintenance and safety instructions ...........26 Overview, description ..................28 Operation ....................29 5.1 Installation ....................29 Charge battery, insert SD card ..............29 Display symbols ..................30 Switch on and off, fold out the screen ............30 5.2 Basic settings/menu functions ..............31 Choose a language ..................31 Format the SD card ..................31...
-
Page 25: Function
1. Function The digital telescope is used for observation tasks from a far distance up to several hundred meters, e.g. for wildlife viewing or sporting events. A very high image reso- lution is achieved through the up to 50x magnification. The observation image can be displayed on the large, fold-out 12.7 cm color screen or saved on a microSD memory card. -
Page 26: Intended Use, Scope Of Delivery
When recording, observe the personal rights and copyrights and comply with the applicable legal provisions. Scope of Delivery: - Digital telescope DigiTele PRO - Cable remote control - 5 V USB power supply - USB cable for power supply and PC connection - Video cable, jack plug 3.5 mm to 1x Cinch/RCA... - Page 27 - Do not leave packaging material lying around carelessly! Plastic films/bags, polys- tyrene parts etc. can become a dangerous toy for children. - The devices are no toys. They must not be kept or operated in the access area of children.
-
Page 28: Overview, Description
4. Overview, description On/off button Set-up button Exposure button Exposure button Play button Record button Focus setting Video output (CVBS, PAL / NTSC) MicroSD card slot 10 HDMI output 11 Zoom button 12 USB port for battery charging (5 V/USB) and PC connection 13 Charge indicator 14 Connection for cable remote control 15 Photo/video/playback remote control selection button... -
Page 29: Operation
5. Operation 5.1 Commissioning Charge the battery - Before using for the first time, charge the internal battery with the supplied power adapter. - To do this, connect the USB port (12) of the device to the 5 V-USB-charging-output of the power adapter using the supplied USB cable and plug it into a mains socket. - Leave the device switched off while charging. -
Page 30: Display Symbols
Display Symbols Single image mode (photo mode) Video-Mode Exposure setting 01:27:06 Remaining recording time or number of frames depending on the resolution 1080HD Selected resolution microSD card recognized Battery charge status (3x blue = full, empty symbol = discharged) The symbols in the display are switched off 10 s after the last key was pressed. Switch on and off, fold out the screen - Press the on/off button (1) for approx. -
Page 31: Basic Settings/Menu Functions
5.2 Basic settings/menu functions - Select the device menu with the button . Now the first menu page appears, the symbol is highlighted in blue. - You reach the second menu page by pressing the button again . Now the menu changes to the second page: Note: From all submenus you can use the... -
Page 32: Set The Date
select the „Internal memory“ or „SD card“ line and confirm your selection with button - Now select the line „OK“ with the arrow buttons and confirm the selection with button. - Now any existing data on the memory card or internal memory will be deleted and the card/memory will be formatted for use. -
Page 33: Set Video Resolution
Set video resolution - Use the button to select the video recording ( - Then select the menu of the device with the button. Now the first menu page appears, the symbol is highlighted in blue. - Use the arrow buttons / to select the line „Resolution“... -
Page 34: Set Exposure Compensation Value
Set exposure compensation value With this setting you can make an exposure correction depending on the shooting situation. - Use the button to select single image recording ( - Then select the menu of the device with button. Now the first menu page appears, the symbol is highlighted in blue. -
Page 35: Loop Recording
- Now select the desired option with the arrow buttons / and confirm the selection with the button. Loop recording With this setting you can determine how long individual video files may be. After the set time has elapsed, the device automatically ends the video recording. - Use the button to select the video recording (... -
Page 36: Set Tv Standard
with the button. Now the first menu page appears, the symbol is highlighted in blue. - Use the / arrow buttons to select the „HDR“ line and confirm your selection with the button. - Now select the desired option with the arrow buttons / and confirm the selection with the button. -
Page 37: Restore Factory Settings
Restore factory settings - Select the second menu page: - Use the arrow buttons / to select the line „Standard setting“ and confirm the selection with the button. - In the settings menu, use the / arrow buttons to select the desired option (cancel = cancel, individual settings are retained) and confirm the selection with the... -
Page 38: Operation/Recording/Playback
5.3 Operation / recording / playback Focus the image - If the device is mounted on a tripod and you have sighted the observation object, focus the image with the focus setting wheel (7). Zoom function - If the device is mounted on a tripod and you have sighted the observation object, you can digitally zoom the image and thus show details in even more detail. -
Page 39: Record Single Images/Videos
Record single images/videos - When you have focused the image, you can use the button to choose bet- ween video recording ( ), single image recording ( ) or playback. - Use the record button (6, ) to start (and stop with video recording) the re- cording. -
Page 40: Delete Recordings
Delete recordings - Use the button to select the play (). - Then use the / arrow buttons to select the desired recording (do not start the video!) And press the button. The „Delete / Protection“ dialog appears. Here, use the arrow buttons / to select the desired option and then press the button. -
Page 41: Copy Recordings To A Pc
5.4 Copy recordings to a PC - Connect the device to your PC using the USB cable provided and switch on the device. - The device‘s microSD card now appears as an additional mass storage device on the computer („Mass storage“ appears on the device screen as an indication that no recordings can now be made), and you can view, delete or copy the recordings to the computer. -
Page 42: Error Notices
6. Error notices No picture on the display. - Battery is empty charge. - The device switched off automatically. - The display remains switched off when a screen is played back and connected to the CVBS / HDMI output. Device does not recognize storage medium. -
Page 43: Technical Specifications
Dnt Innovation GmbH, Maiburger Strasse 29, 26789 Leer, Germany, hereby declares that the device „DigiTele PRO digital telescope“ is in accordance with the basic requirements and the other relevant provisions of Directive 2014/30 / EU. The declaration of conformity can be found at the following address: www.dnt.de... -
Page 44: Disposal
Email: support@dnt.de 1st English edition 04/2021 Documentation © 2021 dnt Innovation GmbH All rights reserved. No part of this user manual may be reproduced or reproduced in any form without the written consent of the publisher. It is possible that these operating instructions still have typographical defects or typographical errors.
Need help?
Do you have a question about the DigiTele PRO and is the answer not in the manual?
Questions and answers