Table of Contents
Advertisement
Quick Links
Advertisement
Table of Contents

Subscribe to Our Youtube Channel
Summary of Contents for TEC Thermocool
- Page 1 USER MANUAL...
-
Page 2: Table Of Contents
Contents Page Number ____________________ 2 1 INSTRUCTIONS FOR SAFETY AND USE _________________ 2 RECYCLING INSTRUCTIONS - OUR ENVIRONMENT POLICY ____________________ 3 INSTALLING THE APPLIANCE______________________________________________ 5 4 ADAPTATION TO DIFFERENT TYPES OF GAS _______________________________ 12 5 FINAL OPERATIONS ____________________________________________________ 6 DESCRIPTION OF THE CONTROLS ON THE FRONT PANEL____________________ 7 USING THE HOB________________________________________________________ 8 USING THE OVEN ______________________________________________________ 9 ELECTRONIC PROGRAMMER (ON CERTAIN MODELS ONLY) __________________... -
Page 3: Instructions For Safety And Use
Presentation 1 INSTRUCTIONS FOR SAFETY AND USE THIS MANUAL IS AN INTEGRAL PART OF TH E APPLIANCE. THEREFORE IT MUST BE KEPT IN ITS ENTIRETY AND IN AN ACCESS IBLE PLACE FOR THE WHOLE WORKING LIFE OF THE COOKER. WE ADVISE YOU TO READ THIS MANUAL AND ALL THE INFORMATION IT CONTAINS CAREFULLY BEFORE USING TH E COOKER. - Page 4 Presentation THE USE OF THIS APPLIANCE IS NOT PERMITTED TO PEOPLE (INCLUDING CHILDREN) OF REDUCED PHYSICAL AND MENTAL ABILITY, OR LACKING IN EXPERIENCE IN THE USE OF ELECTRICAL APPLIANCES, UNLESS THEY ARE SUPERVISED OR INSTRUCTED BY ADULTS OR PEOPLE RESPONSIBLE FOR THEIR SAFETY. INSTALL THE APPLIANCE SO THAT WHEN OPENING DRAWERS AND DOORS OF UNITS POSITIONED AT THE LEVEL OF THE HOB THER E IS NO POSSIBILITY OF MAKING CONTACT WITH PANS POSITIONED ON TOP OF IT.
-
Page 5: Recycling Instructions - Our Environment Policy
The environment – Instructions for recycling 2 RECYCLING INSTRUCTIONS - OUR ENVIRONMENT POLICY Our household appliances are only packaged using non-pollutant, environment-friendly, recyclable materials. Please help by disposing of the packaging correctly. You can obtain the addresses of collection, recycling and disposal centres from your retailer or from the competent local organisations. Never leave all or part of the packaging lying around.Your old appliance also needs to be disposed of correctly.Important: deliver the appliance to the local agency authorised for the collection of household appliances no longer in use.Correct disposal enables intelligent recovery of valuable materials. -
Page 6: Installing The Appliance
Instructions for the installer 3 INSTALLING THE APPLIANCE The appliance must be installed by a qualified technician and according to the standards in force. Depending on the type of installation, it belongs to class 1 (Fig.A) or to class 2, subclass 1 (Fig.B-C). This appliance may be installed next to walls, one of which must be higher than the appliance, at a minimum distance of 50 mm from the side of the appliance, as shown in drawings A and B relative to the installation classes. - Page 7 Instructions for the installer 3.1 Electrical connection Make sure the voltage and the cross-section of the power supply line match the specifications indicated on the identification plate positioned on the backside of the oven. Do not remove this plate for any reason If the appliance is connected to the power supply network by means of a fixed connection, install a multipolar cut-out device on the power supply line, in compliance with installation regulations, located near the appliance and in an easily reachable position.
- Page 8 Instructions for the installer Do not shut lid down when the burner Works: Metallic objects such as knives, forks, spoons and lids should not be placed on the hob surface since they can get hot. The door or the outer surface may get hot when the appliance is operating. ...
- Page 9 Instructions for the installer ELECTRICAL CONNECTION This appliance must be installed by a qualified person in accordance with the latest edition of the national regulations in the destination country and in compliance with the manufacturer instructions *The appliance does not incorporate any means for disconnection from power supply. Means for disconnection from the supply mains having a contact separation in all poles that provide full disconnection under overvoltage category III conditions must be incorporated in the fixed wiring in accordance with the wiring rules.
- Page 10 Instructions for the installer Near terminal block there is an electric scheme that You have to use when connecting the power cord ( only for terminals for permanent connection by means of flexible cord models (not provided) ) Warning: Before obtaining access to terminals, all supply circuits must be disconnected Use only ordinary polyvinyl chloride sheathed cord (code designation 60227 IEC 53) IMPORTANT: The wires in mains lead are coloured in accordance with the following code:...
- Page 11 Instructions for the installer 3.3 Extraction of the combustion products The combustion products may be extracted by means of hoods connected to a natural draught chimney whose efficiency is certain or via forced extraction. An efficient extraction system requires precision planning by a specialist qualified in this area and must comply with the positions and distances indicated by the regulations.
- Page 12 Instructions for the installer 3.4.3 Connection to LPG gas Use a standards-compliant pressure regulator and carry out the connection to the gas cylinder in accordance with the regulations in force. Make sure that the supply pressure complies with the values indicated in the paragraph “3.2/3.3 Burner and nozzle characteristics table”.
-
Page 13: Adaptation To Different Types Of Gas
Instructions for the installer 4. ADAPTATION TO DIFFERENT TYPES OF GAS Before performing any operations requiring access to powered parts, switch off the power supply to the appliance. In the case of operation with other types of gas the burner nozzles must be changed and the minimum flame adjusted on the gas taps. - Page 14 Instructions for the installer Technical specifications Explanation of the Gas/electric cookers models: MODEL COMPONENT PLÇTG P= chicken grill Burner number Hotplate number L=Lamp Ç =Ignition up oven 0= spooling 1= electric oven down oven T=Turbo Fan + T. heating element 0=spooling 1= electric oven 2= gas oven...
- Page 15 Instructions for the installer 4.3 Arrangement of the burners on the hob 1. Auxiliary 1. Auxiliary 1. Auxiliary 2. Semi-rapid 2. Semi-rapid 3- 5. Rapid2. Semi-rapid 3- 5. Rapid 3- 5. Rapid 6. Electric hob 2. Semi-rapid 4.4 Oven burner adjustment (only for models with a gas oven) To adjust the oven burner you need to open the oven door and carry out the following operations: ...
-
Page 16: Final Operations
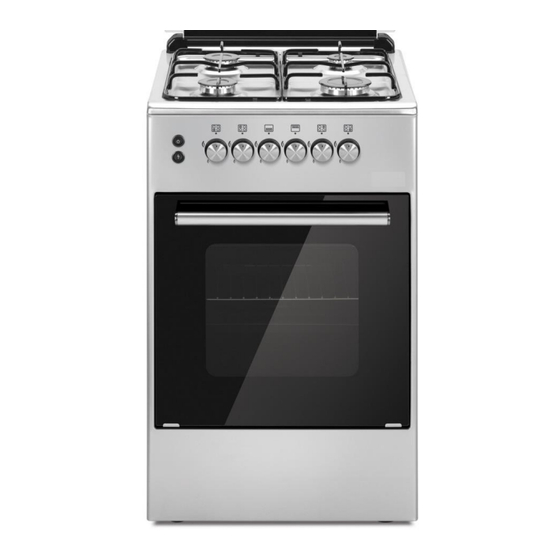
Instructions for the installer 5 FINAL OPERATIONS After replacing the nozzles, reposition the flame-spreader crowns, the burner caps and the racks Following adjustment to a gas other than the preset one, replace the gas setting label fixed to the appliance with the one corresponding to the new gas. 5.1 Regulation of the hob burner minimum for natural gas Light the burner and turn it to the minimum position Extract the... - Page 17 Instructions for the user DESCRIPTION OF FRONT PANEL CONTROLS All the control and monitoring devices are clearly in view on the front panel. The symbols used are described in the table below. FRONT RIGHT-HAND BURNER GAS OVEN THERMOSTAT REAR RIGHT-HAND BURNER OVEN LIGHT / ROTISSERIE / GRILL REAR LEFT-HAND BURNER BURNER IGNITION KNOB...
-
Page 18: Description Of The Controls On The Front Panel
Instructions for the user 6 DESCRIPTION OF THE CONTROLS ON THE FRONT PANEL All the cooker controls are grouped together on the front panel. The symbols used are described in the table below. FRONT RIGHT-HAND BURNER OVEN THERMOSTAT REAR RIGHT-HAND BURNER OVEN LIGHT / ROTISSERIE / GRILL REAR LEFT-HAND BURNER BURNER IGNITION KNOB... - Page 19 Instructions for the user GAS OVEN THERMOSTAT KNOB (ON SOME MODELS ONLY) This knob allows the gas burner inside the oven to be lit. The cooking temperature is selected by turning the knob anticlockwise to the desired setting, between Min. and 275°C.
-
Page 20: Using The Hob
Instructions for the user 7 USING THE HOB 7.1 Lighting the hob burners Before lighting the hob burners, check that the flame-spreader crowns are correctly in place with their respective burner caps, making sure that the holes A in the flame-spreaders are aligned with the igniters and thermocouples. - Page 21 Instructions for the user 7.3 Pan diameters (60X60-50x60 cm model) HOB min. and max. Ø (in cm) 1. Auxiliary 12 – 14 2. Semi-rapid 16 – 24 3. Rapid 18 – 26 WARNING When switching on the hob for the first time, or if the hob has not been used for a long time, to remove any humidity from the insulating material it should be dried out by placing the hob on position 1 for 30 minutes.
- Page 22 Instructions for the user 8 USING THE OVEN In models with an electronic programmer, before using the oven make sure that appears on the display. In models with an analogue clock and a timer knob, it should be set to 8.1 General warnings and advice Before using the oven and the grill for the first time, pre-heat to their maximum temperature (260°C for electric ovens and 275°C for gas ovens) long enough to burn away any manufacturing oily residues...
- Page 23 Instructions for the user 8.3.2 Manual ignition Open the oven door fully and turn the oven knob. Bring a lighted match close to the mouth of flame pipe A at the centre of the oven surface and press the oven knob. Once it is lit, keep the knob pressed down for a few seconds to allow the thermocouple to heat up and make sure that it has remained lit by looking through inspection hole...
- Page 24 Instructions for the user 8.5 Using the rotisserie 8.5.1 Using the rotisserie in maxi oven cookers Thread the support frame onto the second runner from the bottom so that the rod’s housing protrudes from the oven. Position the rod as shown in figure (1) and push the frame into the oven until the end of the rod lines up with the rotisserie motor's hole.
-
Page 25: Electronic Programmer (On Certain Models Only)
Instructions for the user 8.6 Storage compartment The storage compartment is in the bottom of the cooker, underneath the oven. To open it, pull on the top of the door. Never use it to store flammable materials such as rags, paper, etc.;... -
Page 26: Analogue Clock (On Certain Models Only)
Instructions for the user 12 CLEANING AND MAINTENANCE 12.1 Cleaning stainless steel and enamelled versions To keep stainless steel in good condition, it must be cleaned regularly when you are done using the cooker, after it has cooled. 12.1.1 Ordinary daily cleaning To clean and preserve the stainless steel surfaces, always use only specific products that do not contain abrasives or chlorine-based acids. - Page 27 Instructions for the user 12.2.3 Burner caps and flame-spreader crowns For easier cleaning, the burner caps and the flame spreader crowns can be removed; wash them with warm water and a non-abrasive detergent making sure to remove any encrustations and wait until they are perfectly dry.
-
Page 28: Extraordinary Maintenance
Instructions for the user 13 EXTRAORDINARY MAINTENANCE The oven may require extraordinary maintenance or replacement of parts subject to wear such as gaskets, bulbs, etc. The following instructions describe how to carry out these minor maintenance operations. Before performing any operations requiring access to powered parts, disconnect the appliance from the power supply. -
Page 29: Available Accessories
Instructions for the user 14 AVAILABLE ACCESSORIES The main oven has 4 runners for positioning trays and racks at different heights and a roof lining. The auxiliary oven has 2 runners. Oven rack: for cooking food inside dishes, small cakes, roasts or foods that require slight grilling. -
Page 30: Cooking With The Oven
Instructions for the user 15.COOKING WITH THE OVEN STATIC: As the heat comes from above and below at the same time, this system is particularly suitable for certain types of food. Traditional cooking, also known as static or thermal radiation cooking, is suitable for cooking just one dish at a time. - Page 31 Instructions for the user 15.1 Cooking advice and instructions 15.1.1 General advice We recommend preheating the oven before putting the food in. • For cooking on several levels, we recommend using a fan-assisted function to achieve uniform cooking at all heights. •...
- Page 32 CookersFunctions ECO: The Eco setting is a fast preheat function, which combines broil, fan and lower element to achieve optimum energy efficiency. Only to be used prior to selecting the main cooking mode. Top and bottom heat: This method is known as "conventional" cooking, and is suitable for dishes that require a more gentle heat, such as baking. The oven needs to be pre-heated to the required temperature, and is best suited for single items, such as large cakes.
- Page 33 Instructions for the user 15.4Cooking tables DISHES WEIGHT FUNCTION RUNNER POSITION TEMPERATURE TIME IN MINUTES °C FROM BOTTOM FIRST COURSES 3 kg Static 2 or 3 210 - 230 30-40 LASAGNE 3 kg Static 2 or 3 210 - 230 30-40 OVEN-BAKED PASTA 3 kg...
Need help?
Do you have a question about the Thermocool and is the answer not in the manual?
Questions and answers