
Summary of Contents for Imada GLK060E
- Page 1 Compact, Ergonomic Digital Torque Screwdrivers Models: GLK060E, GLK250E, GLK500E I N S T R U C T I O N M A N U A L 04/18...
-
Page 2: Table Of Contents
TORQUE MEASUREMENT TABLE OF CONTENTS INTRODUCTION ........3 LIST OF EQUIPMENT . -
Page 3: Introduction
TORQUE MEASUREMENT INTRODUCTION GLK Digital Torque Screwdrivers combine ergonomic grips, digital accuracy and five Go/No Go torque presets that alert users with an intermittent signal at 90% and a continuous signal at 100% of the preset using LED and audible alerts (presets cannot be set at less than 10% of capacity). -
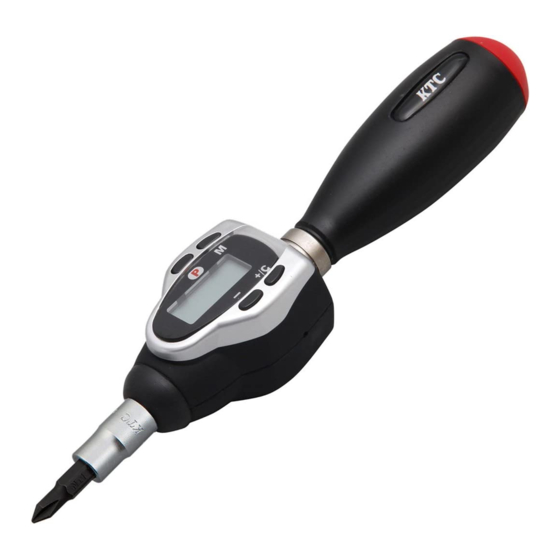
Page 4: Control Panel
TORQUE MEASUREMENT UNIT INDICATOR Displays preset and program numbers, and errors P button press and release (do not hold) to power ON, press and hold 00.0 lbf-in more than two seconds to power OFF. lbf-ft cN-m M button stores torque values and advances program functions. -
Page 5: Initial Programming
TORQUE MEASUREMENT INITIAL PROGRAMMING Program Modes With the power OFF, press and hold the M button and then press and release (do not hold) the P button. When appears on the left side of the screen, press – or +/C to cycle: P Peak mode captures peak torque A Peak mode w/auto zero reset captures peak torque and resets to... -
Page 6: Counter
TORQUE MEASUREMENT Program Leave OFF If not OFF, press – or +/C to select OFF (see page 11, for special applica- tions using the Pass/Fail counter). Press and release the M button to advance to the next setting. LEAVE OFF, SEE PAGE 11 Program Auto shutoff duration Press –... -
Page 7: General Operation
TORQUE MEASUREMENT GENERAL OPERATION 1.Peak Mode Set to peak 1 P (see page 5). 1. Press and release (do not hold) P to turn on the power. 2. The display shows ––––, the LED flashes and a beep sounds (If an error code appears see page 14). 3. -
Page 8: Real Time Mode
TORQUE MEASUREMENT 3.Real Time Mode Set the mode to real time (see page 5). 1. Press and release (do not hold) P to turn on the power. 2. The display shows ––––, the LED flashes and a beep sounds (If an error code appears see page 14). 3. - Page 9 TORQUE MEASUREMENT 4. The indicator blinks if the value has been changed and not saved. Press and hold the M button, until 12.50 lbf-in the LED flashes and the alert beeps to save the preset. The display then returns to zero with the preset indicator.
-
Page 10: Go/No Go Preset Operation
TORQUE MEASUREMENT 5. GO/NO GO Preset Operation Press and release (do not hold) P to turn on the power. After ‘0’ appears, press and release the M button to select a preset. 10.00 lbf-in Apply torque gradually and indicators appear as follows: Between 90% –... -
Page 11: Special Application Pass/Fail Counter
TORQUE MEASUREMENT For General Operation Skip this Section SPECIAL APPLICATION PASS/FAIL COUNTER Special applications may require counting fasteners correctly torqued between low and high setpoints. Counter operates in peak mode. With the power OFF, press and hold the M button and then press and release (do not hold) P. - Page 12 TORQUE MEASUREMENT For General Operation Skip this Section appears on the left-side of the dis- play. Press the – or +/C buttons to set the low limit (The indicator 9.00 lbf-in blinks when the value is changed and not yet stored). Press and hold the M button until the LED flashes and the alert beeps.
- Page 13 TORQUE MEASUREMENT For General Operation Skip this Section PASS/FAIL COUNTER OPERATION Only torque values within the low and high limits are counted. When torque is applied a appears on the left-side of 9.90 lbf-in the screen. Values under 90% of the low limit are not signaled or counted.
-
Page 14: Replacing The Battery
Turn the power OFF and ON again REPAIR & RECALIBRATION Go to www.imada.com and click on Repair/Calibration. Fill out the form to receive an RGA number. Or call and send your unit to Imada, Inc., Suite 707, 3100 Dundee Rd., Northbrook, IL 60062... -
Page 15: Specifications
Storage Temp. -20° to 60°C Battery Lithium coin battery (Panasonic CR2354 only) Battery Life Approx. 2 months (100 usages per day) RANGES Model No. ozf-in lbf-in cN-m (same as N-cm) GLK060E 0.9~85.0 0.05~5.31 0.60~60.00 GLK250E 3.5~354.0 0.22~22.13 2.5~250.0 GLK500E 7.1~708.0 0.44~44.25 5.0~500.0... - Page 16 PRODUCTS EXPRESSLY NOT COVERED BY WARRANTY: Batteries, cables, attachments, adapters, and fixtures regardless of the manufacturer of the product, that are sold or provided for by Imada are not covered by the foregoing warranties. Warranties of the respective manufacturers for such products shall apply.
Need help?
Do you have a question about the GLK060E and is the answer not in the manual?
Questions and answers