Table of Contents
Advertisement
Quick Links
Advertisement
Table of Contents

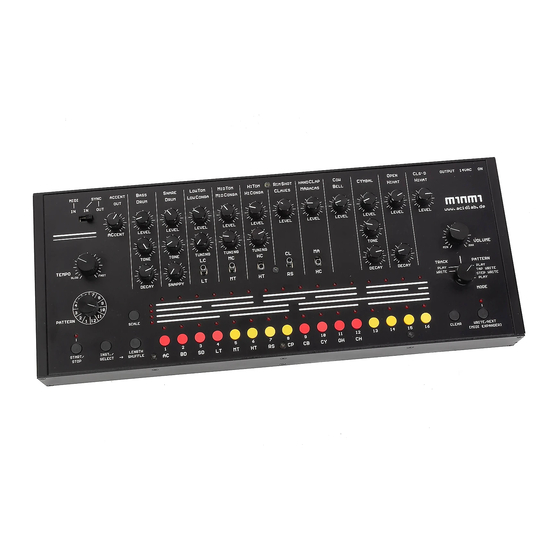
Summary of Contents for acidlab miami
-
Page 2: Table Of Contents
Introduction....................3 Instruments....................3 Parameter ranges (Tone, Decay, ... )............3 Changes to the Bass Drum: ..............3 Sequencer ....................4 Modes ....................4 Start/Stop ....................4 Pattern Group..................4 Pattern....................5 Pattern Play...................5 Pattern Chaining..................6 Pattern Copy + Paste (Pattern Play Mode) ...........7 Copy Function ..................7 Paste Function ...................7 Pattern Write ..................8 Pattern Tap-Write ..................9 Clear Instrument.................9... -
Page 3: Introduction
Go out and play your music LOUD! Instruments The sound circuitry of the Miami is identical with the 808 and has been realized using present-day components. Its sounds closely match the original 808. Parameter ranges (Tone, Decay, ... ) The parameter ranges are, with the exception of the Bass Drum, the same as those of the original 808. -
Page 4: Sequencer
The Start/Stop button works in every mode and returns the pattern to its starting point, i.e. step 1 of the current pattern. When the Miami is synchronized, the Start/Stop signal comes from the MIDI or Sync-In, and the Start/Stop button is disabled. -
Page 5: Pattern
In total, 192 patterns are available: 12 pattern groups each consisting of 16 patterns. Pattern Play The memory of a new Miami is empty and a pattern must first be programmed->see Pattern Write Mode. Patterns are played back in Pattern Play mode. -
Page 6: Pattern Chaining
The LED over the current pattern blinks to show that it is active. When a new pattern is selected, the corresponding LED is lit, but stays solid. After the last step of the current pattern, the sequencer switches to the newly selected pattern. -
Page 7: Pattern Copy + Paste (Pattern Play Mode)
Pattern Copy + Paste (Pattern Play Mode) In Pattern Play Mode, it is possible to copy patterns. Copy Function To copy a pattern, press one of the pattern buttons (1-16) while holding down the Inst/Select- button. The pattern is now saved to the buffer memory and will remain there until another pattern is selected. -
Page 8: Pattern Write
Patterns can also be copied to another Pattern Group. To do so, select the new group with the rotary switch and then use the Paste Function. Pattern Write The memory of a new Miami is empty and a pattern must first be programmed. There are two Pattern Write Modes... -
Page 9: Pattern Tap-Write
Pattern Tap-Write In Tap Write Mode it is possible to edit sequences “live” while the sequencer is running. The selection of patterns or pattern chains for editing should be done in Pattern Play mode. The upper running LED row works as in Pattern Play Mode. In the lower row, each of the LEDs above the instrument buttons (AC,BD,SD, ... -
Page 10: Clear All Instruments
Clear all Instruments All of the instruments programmed on a step can be erased by pressing the Clear button and the Inst./Select button simultaneously. If the Clear Button and the Inst./Select button are held for a longer period, all instruments will be erased from the steps the sequencer passes through during the time the buttons are held. -
Page 11: Scale Programming (Pattern Tap Write Mode)
LED is illuminated). Shuffle Programming (Pattern Tap Write Mode) The Miami has two kinds of Shuffle: The first kind of shuffle delays the even numbered steps (2, 4, 6, ...). This is similar to the common shuffle found on the 909. -
Page 12: Pattern Step Write
Keeping the Inst./Select and Length/Shuffle buttons held, you can now press the corresponding Step buttons 1-5 or 8-12 to adjust the shuffle. When shuffle is set to step 1 and step 8, no shuffle is present. If the scale is changed, the shuffle settings return to the default setting (no shuffle)! Pattern Step Write With the Mode rotary switch, you can change to Pattern Step Write Mode... -
Page 13: Selecting An Instrument
Selecting an instrument To select an instrument to program (or the Accent), hold the Inst./Select button while pressing one of the Instrument buttons. (AC, BD, ... ) When the Inst./Select Button is held down, the currently selected Instrument is indicated by the LED above the corresponding instrument button. When the Inst./Select button is released, the pattern of this instrument is displayed by the LEDs over the Step Buttons (1-16) Programming and Erasing an Instrument... -
Page 14: Pattern Length Programming (Pattern Step Write Mode)
Pattern Length Programming (Pattern Step Write Mode) By pressing the Length Button and one of the Step Buttons (1-16) simultaneously, you can choose the last step of the pattern. For example, if the Length Button and and the button at step 12 is pressed, the pattern will be 12 steps long;... -
Page 15: Shuffle Programming (Pattern Tap Write Mode)
Shuffle can only be adjusted if 4/4 time signature is selected (i.e. the lowest LED is illuminated). The Miami has two kinds of Shuffle: The first kind of shuffle delays the even numbered steps (2, 4, 6, ...). This is similar to the common shuffle found on the 909. -
Page 16: Track Play Mode
Track Play Mode The memory of a new Miami is empty and a track must first be programmed! A track is a sequence of different patterns from a pattern group. Once you have programmed one of Tracks 1-12 in Track Write Mode, you can use this mode to play the track back. - Page 17 You can select from the 16 patterns in the group using the row of buttons (1-16). The active pattern will be indicated by a blinking LED above the corresponding button, and will start to play after the end of the last pattern. The pattern will repeat continuously as in Pattern Play Mode.
-
Page 18: Synchronization
The sequencer can be synchronized to an external clock using MIDI in or Sync In. Midi Clock to Sync Out If the synchronization switch is in the MIDI-in position, the Miami’s sequencer will be slaved to the MIDI Clock of a MIDI Master connected to the MIDI-in port. -
Page 19: Midi Expander Mode
MIDI Expander Mode The Acidlab Miami can also be controlled using MIDI Note Data. To use the Miami in Midi Expander Mode, switch off the Miami using the On- Off slide switch on the right side of the rear panel. -
Page 20: Outputs
Outputs Accent Out: The Accent Out (3.5 mm mono) can be used as a Gate signal. The gate is a +12v impulse with a duration of 10ms. The Accent Out is primarily intended to be used to control an analog synthesizer with a gate input. -
Page 21: Power Supply
The Miami should only be used with the supplied AC Adapter (14VAC/300ma). Do not use other AC adapters! The Miami has an On/Off slide switch on the right side of the rear panel. Replacement AC Adapters can be ordered from acidlab.de or directly from Conrad Elektronik, part number 51003-12.
Need help?
Do you have a question about the miami and is the answer not in the manual?
Questions and answers