Table of Contents
Advertisement
The following features are available in
this PDF document.
Quick Keyword Search
Enter the keyword in the search box
and hit the search button
Quick Jump between
Chapters
Click the title of a specific chapter on
the Contents to jump to it
*Reading software such as Adobe Reader is
needed to support the functions above.
Advertisement
Table of Contents

Related Manuals for Zhiyun SMOOTH - Q3

Summary of Contents for Zhiyun SMOOTH - Q3
- Page 1 The following features are available in this PDF document. Quick Keyword Search Enter the keyword in the search box and hit the search button Quick Jump between Chapters Click the title of a specific chapter on the Contents to jump to it *Reading software such as Adobe Reader is needed to support the functions above.
- Page 2 SMOOTH - Q3 U s e r Gu id e...
-
Page 3: Table Of Contents
Contents Product List ■ Product List ····················································································1 Get to Know SMOOTH-Q3 ■ Get to Know SMOOTH-Q3 ·····························································2 Battery Charging Instruction ■ Battery Charging Instruction ····························································3 Installation and Balance Adjustment ■ Mounting the Phone ·······································································4 Balancing the Phone·······································································8 Indicator Lights and Buttons Description ··········································9 Stabilizer Mode Description ·····························································10 How to Use ■... - Page 4 Motor Fine-Tuning ···········································································21 SMOOTH-Q3 Firmware Upgrade ····················································21 Product Specifications ■ Disclaimer and Warnings ■ Reading Tips ··················································································25 Warnings························································································25 Safe Operation Guidelines ······························································26 Warranty Card ■ Warranty Period ··············································································27 Warranty Exclusions ········································································27 Warranty Claim Procedure ·······························································27 Contact Card ■...
- Page 5 Product List Before using this product, please check carefully that all the following items are included in the product package. In case that any item is found missing, please contact ZHIYUN or your local selling agent. SMOOTH-Q3 × 1 Tripod × 1...
-
Page 6: Get To Know Smooth-Q3
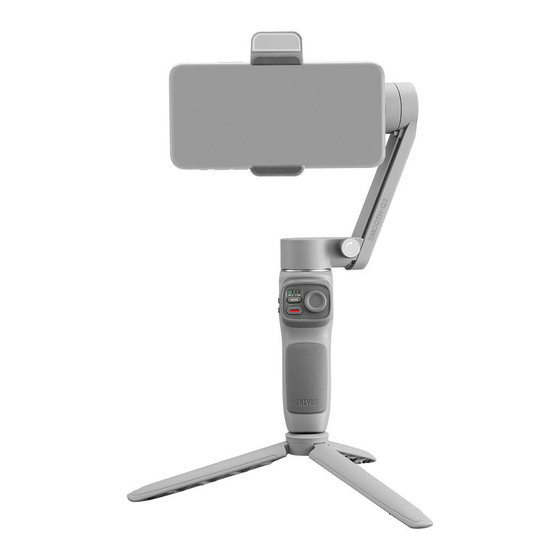
Get to Know SMOOTH-Q3 Get to Know SMOOTH-Q3 1.Fill Light 12.Power Button 2.Phone Clamp 13.Type-C Charging/Firmware Update 3.Indicator Lights Port 4.MODE Button 14.Trigger Button` 5.Zoom Rocker 15.Wrist Strap Hole 6.Handle 16.1/4" Threaded Hole 7.Vertical Arm Screw 17.Roll Axis Motor 8.Joystick 18.Roll Axis Fixing Buckle 9.Photo/Video 19.Pan Axis Motor... -
Page 7: Battery Charging Instruction
Battery Charging Instruction Battery Charging Instruction SMOOTH-Q3 is equipped with built-in battery. When using SMOOTH-Q3 for the first time, please fully charge the batteries to activate them and to ensure the proper function of the stabilizer. Charging method: Use provided Type-C cable to connect the power adapter (not included in the package, 5V2A rated power adapter recommended) to the charging port on the stabilizer. -
Page 8: Installation And Balance Adjustment
Installation and Balance Adjustment Mounting the Phone 1. Loosen the vertical arm screw counterclockwise. 2. To ensure good contact with the contact points, pull the pan axis motor to the bottom of the vertical arm while holding the roll and pan axes motors until you hear a "click"... - Page 9 Installation and Balance Adjustment The vertical arm cannot be completely locked by vertical arm screw. The screw is used to adjust the smoothness of the slide slot.
- Page 10 Installation and Balance Adjustment 3. Rotate the tilt axis arm along the outer edge shown in the image. Please rotate in the correct direction shown in the image to prevent the fixing buckle of the tilt axis from damaging. 4. Rotate the phone clamp 90° clockwise to the position shown in the image. (The direction shown in the image is for when the phone clamp is tightened)
- Page 11 Installation and Balance Adjustment When putting the stabilizer back into the box, please rotate the phone clamp to the storage state as shown in the image. Storage state Phone clamp tightened There are fixing buckles for the tilt axis and the roll axis. Please rotate in the correct direction to prevent the fixing buckle from damaging.
-
Page 12: Balancing The Phone
Installation and Balance Adjustment Balancing the Phone When the phone is in landscape mode, adjust the position of the phone left or right until the phone is steady and is at almost level with the ground. When the phone is in portrait mode, move the phone clamp left or right until the phone is steady and is at almost level with the ground. -
Page 13: Indicator Lights And Buttons Description
How to Use Indicator Lights and Buttons Description ① Power Button Four flashing green indicator lights indicate that • Single press to check the battery level of the the battery level is at 75-100%. stabilizer ④ MODE Button • Press and hold for 3 seconds to power on/off •... -
Page 14: Stabilizer Mode Description
How to Use Stabilizer Mode Description Single or double press the MODE button to switch between modes. Lock Mode Default Follow Mode Pan Follow Mode Double press Point of View Vortex Mode Mode Single press Pan Follow Mode (PF): The tilt and roll axis motors are locked and the pan axis follows the movement of the stabilizer handle. - Page 15 How to Use Lock Mode (L): The three motors are all locked and won't follow the movement of the stabilizer handle. Push the joystick up/down and left/right to control the tilt axis and pan axis. Tilt Axis Roll Axis Pan Axis Follow Mode (F): The roll axis motor is locked.
- Page 16 How to Use Point of View Mode (POV): The three motors all follow the movement of the stabilizer handle. Push the joystick up/down and left/right to control the tilt axis and pan axis. Tilt Axis Roll Axis Pan Axis Vortex Mode (V): The three motors all follow the movement of the stabilizer handle.
- Page 17 How to Use PhoneGo Mode (GO) Press and hold the trigger button The camera pans and tilts following the movement of the stabilizer at fast speed while the roll axis is locked. Joystick will not function. Tilt Axis Roll Axis Pan Axis Motors circled in red will follow the movement of the stabilizer, while motors circled in grey are locked.
-
Page 18: Switch Between Landscape Mode & Portrait Mode
How to Use Switch Between Landscape Mode & Portrait Mode Triple press the trigger button. Landscape Mode Portrait Mode Fill Light Adjustment Rotate the fill light when needed. The maximum rotate angle is 180. Fill Light ① Please rotate in the correct direction. ②... -
Page 19: Manual Angle Lock
How to Use Manual Angle Lock Under pan follow mode, lock mode and follow mode, rotate the smartphone to a certain angle by hand for 2 seconds and release it. The smartphone will be fixed at that angle. Can only adjust the tilt axis and the pan axis. Please rotate the device with the proper amount of strength. -
Page 20: How To Use The App
How to Use the App Download the App Scan the QR code on the left (Android 7.0 and above or iOS 10.0 and above) or search "ZY Cami" in the App Store or Google Play to download the app. ① Users can make better use of the various functions of the SMOOTH-Q3 with the dedicated "ZY Cami"... -
Page 21: Main App Features
Main App Features Video and photo taking SmartFollow SMART Mode ZY Cami Editor ZY Cami Timelapse Firmware Upgrade For more feature introductions of ZY Cami App, please visit the official website of ZHIYUN (www.zhiyun-tech.com) and check the video tutorials of SMOOTH-Q3. -
Page 22: Calibration And Firmware Upgrade
Calibration and Firmware Upgrade When to Calibrate the Stabilizer Please calibrate the stabilizer when necessary. Calibration Reason How to calibrate 1. A slight deviation is found in the tilt angle of the smartphone in level position after power-on. 2. A slight deviation is found in the roll angle of the smartphone Stabilizer auto- in level position after power-on. -
Page 23: Six-Side Calibration
WIN10 systems) 2. Connect SMOOTH-Q3 to the computer. 3. Power on SMOOTH-Q3 and enter standby mode. 4. Open "Zhiyun Gimbal Tools", click "Open" and click "IMU Calibration". Follow the prompt to place SMOOTH-Q3 correctly for calibration. calibration ① Please refer to the six-side calibration steps below. After the calibration is completed, please restart the stabilizer. - Page 24 Calibration and Firmware Upgrade STEP 1 STEP 2 STEP 3 STEP 4 STEP 5 STEP 6...
-
Page 25: Smooth-Q3 Firmware Upgrade
Calibration and Firmware Upgrade SMOOTH-Q3 Firmware Upgrade You can use "Zhiyun Gimbal Tools" or "ZY Cami" App to upgrade the firmware of SMOOTH-Q3. When upgrading the firmware, extend the SMOOTH-Q3 to ensure that there is good contact with the contact points before performing the upgrade. -
Page 26: Product Specifications
Product Specifications Product model:SM113 Min. Standard Max. Remark Operation Voltage 6.5V 7.4V 8.4V Operation Current 70mA 2500mA Charging Voltage 4.5V 5.5V Charging Current 1200mA Following Deviation in ±0.01° ±0.04° Static State Following Deviation in ±0.05° ±0.1° ±0.3° Motion State Tilt Mechanical Range -260°... - Page 27 25 ℃ . The actual charging time varies with environmental factors. Besides, the lower the temperature, the longer the charging time. All the data in this guide is gathered from internal experiments of ZHIYUN laboratories. Under different scenarios, data is different to some extent. Please refer...
-
Page 28: Disclaimer And Warnings
Guilin Zhishen Information Technology Co., Ltd (hereinafter referred to as "ZHIYUN") reserves all rights for final explanation on this instruction and other documents related to SMOOTH-Q3. The information is subject to update without notice. -
Page 29: Safe Operation Guidelines
Disclaimer and Warnings Safe Operation Guidelines WARNING: 1. Never allow the product to come into contact with any liquid. Never immerse the product in water or make it get wet. Never use the product in the rain or a humid environment. -
Page 30: Warranty Card
1. Customers are entitled to replacement or free repair service in case of quality deficits found in the product within 15 days upon receipt of the product. 2. Customers are entitled to free repair service from ZHIYUN for any product proven defective in material or workmanship that results in product failure during normal consumer usage and conditions within the valid warranty period, which is 12 months counting from the date of selling. -
Page 31: Contact Card
Contact Card Website Weibo Vimeo Google+ Facebook Facebook (Zhiyun Support) (Zhiyun Tech) Youku Youtube Wechat Instagram... - Page 32 This product is confirmed to meet quality standards and permitted for sale after strict inspection. QC Inspector: For full product information, please visit ZHIYUN's official website: Content on www.zhiyun-tech.com is subject to update without notice. ZHIYUN ™ is a trademark of ZHISHEN All product names or brands referred to hereunder may be trademarks or registered trademarks of their respective holders.
Need help?
Do you have a question about the SMOOTH - Q3 and is the answer not in the manual?
Questions and answers