Advertisement
M
M U U F F F F L L E E R R I I N N S S T T R R U U C C T T I I O O N N S S
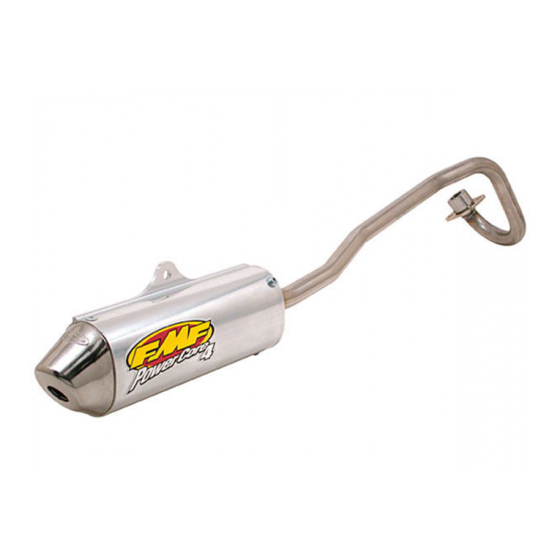
Thank you for purchasing the FMF Titanium 4 exhaust for your CRF50/XR50. We have spent
countless hours of design work and testing to insure you receive the highest quality product on the market
today.
Your Titanium 4 exhaust has been developed using the latest design, testing and manufacturing
technologies. It is manufactured from military grade titanium with a titanium TIG welded mid pipe and
header, modular endcap and uses space age sound-absorbing packing material.
The Titanium 4 exhaust is designed to broaden your existing powerband and give you an all around
power increase with substantial weight savings.
Please read all instructions thoroughly before installation. Failure to follow all installation instructions completely will void any
FMF warranty implied or otherwise. FMF Racing will not be held responsible for problems derived from improper installation and/or improper
usage.
Before you begin installing this product, be sure you are wearing eye protection and gloves. You should have a complete
understanding of how to remove and replace your stock exhaust. If you do not, you should have it installed by a professional mechanic. Keep
all OEM parts when removing your stock exhaust, as some parts may be utilized with the FMF exhaust depending on your particular
application.
P A R T S S U P P L I E D
(1) Short Strap Bracket
(1) Rubber Bracket Sleeve
(1) 8mm x 60mm Rear Bracket Bolt
1>
Remove the seat and rear plastic side panels to gain access to the exhaust.
2>
Slightly loosen and remove the nuts holding on the header flange at the front of the motor. Keep for later use.
3>
While holding the muffler, loosen and remove the rear OEM muffler bolt.
4>
Gently remove the exhaust. Make sure to keep and re-use the OEM exhaust port gasket. and replace as
needed.
5>
Install the rubber sleeve onto the strap bracket so that the rubber is facing inward. Make sure the outer lip
is over the bracket edge fully. No rubber should be in the area where the bracket tabs pinch together.
6>
Clean the exhaust port where the header slips in with contact cleaner.
7>
Lightly coat the header with hi-temp silicon to aid sealing.
2 0 0 4 C R F 5 0 / 0 0 - 0 3 X R 5 0
Check out our website www.fmfracing.com for more information.
(1) 19mm x 25mm Bracket Spacer
(1) 70mm Exhaust Spring
P R E - I N S TA L L AT I O N
12mm Wrench
Vise Grip Pliers
Contact Cleaner
R E M O V A L
OEM = Original Equipment Manufacturer
18033 S. Santa Fe Ave
Rancho Dominguez, CA 90221-5514
PH: 310-631-4363 FX: 310-900-5699
www.fmfracing.com
T O O L S R E Q U I R E D
WD-40®
Hi-temp Silicon
Spring Puller Tool
[07-04 / #000445]
Advertisement
Table of Contents

Summary of Contents for FMF Titanium 4
- Page 1 If you do not, you should have it installed by a professional mechanic. Keep all OEM parts when removing your stock exhaust, as some parts may be utilized with the FMF exhaust depending on your particular application.
- Page 2 This limited guarantee is in lieu of all other guarantees or warranties implied or expressed. Buyer assumes all risk for any and all damage caused to himself, a third party and/or property by virtue of failure of this product. We make no warranty as to products distributed by FMF Racing, expressed or implied from our suppliers or 3rd party vendors.
Need help?
Do you have a question about the Titanium 4 and is the answer not in the manual?
Questions and answers