
Summary of Contents for Prinzing ESC300
- Page 1 OPERATING INSTRUCTION ESC300 Electronic Control Comfort Read this operating instruction with care before commissioning!
- Page 2 Phone: +49 (0) 7336 - 961018 or E-mail: service-et@prinzing.eu For spare parts orders: Phone: +49 (0) 7336 - 9610-0 • Fax: +49 (0) 7336 - 961050 • E-mail: entmistung@prinzing.eu Postal address: Peter Prinzing GmbH - Siechenlach 2 - 89173 Lonsee-Urspring, Deutschland Or contact your local dealer.
-
Page 3: Table Of Contents
1.3. Used characters and symbols ......................... 7 1.4. Defi nition: ................................ 7 1.5. Overview components of the electronic control Comfort ESC300 ..............8 1.6. Functions of the electronic control Comfort ..................... 9 Assembling and connection .......................... 10 2.1. Assembling the control ESC300 ........................10 2.2. - Page 4 Operation with the ESC300 ..........................43 7.1. Manual operation with the electronic control ESC300 .................. 43 7.2. Automatic operation with the electronic control ESC300 ................44 7.2.1 Automatic operation by schedule (Timer) ...................... 44 7.2.2 Automatic operation by frost mode ....................... 45 7.3.
- Page 5 Information to the authorized person for issuing this declaration: Peter Prinzing, Manager Signature: Date: 20-11-2014 Data name: esc300-2-v12a_EN ESC300 (swv-1.06) Author: Heiko Lange Pages: © P. Prinzing GmbH - 89173 Lonsee-Urspring (Germany) * Option / depends on design Service: +49 (0) 7336 - 961018...
-
Page 6: Before Using
The „Electronic Control Comfort“ is only allowed to be used, to control drive winches for wire rope dung removal systems. It is not allowed to use the comfort control for other operation purposes. Without a written approval of the Peter Prinzing GmbH, it is not allowed to use the electronic control Comfort with other motor types or drive winches as stated in the techni- cal data or an using which not correspondents with the stipulations. -
Page 7: Used Characters And Symbols
The move of the scraper happens stepwise (drive - pause - drive - pause - and so on) Date: 20-11-2014 Data name: esc300-2-v12a_EN ESC300 (swv-1.06) Author: Heiko Lange Pages: © P. Prinzing GmbH - 89173 Lonsee-Urspring (Germany) * Option / depends on design Service: +49 (0) 7336 - 961018... -
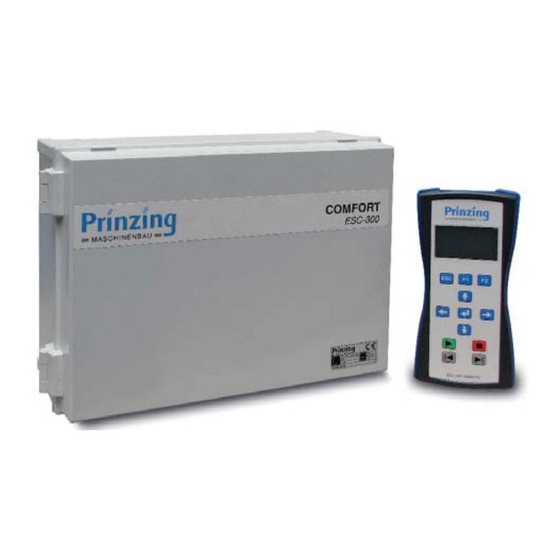
Page 8: Overview Components Of The Electronic Control Comfort Esc300
- up to 2x board relay to extend the control with one alley with each 2 drive winches ESC300 EXT-radio >>> external transmitter- and receiver module for the communication between the Remote and the Control, wired. To strengthen the des radio signal, it is possible to connect max. 2 radio modules (in series or parallel) ESC300 Remote >>>... -
Page 9: Functions Of The Electronic Control Comfort
Teaching = Manual learning of a program cycle by order input (forward - backward - stop) on the remote during the scraper drive. Date: 20-11-2014 Data name: esc300-2-v12a_EN ESC300 (swv-1.06) Author: Heiko Lange Pages: © P. Prinzing GmbH - 89173 Lonsee-Urspring (Germany) * Option / depends on design Service: +49 (0) 7336 - 961018... -
Page 10: Assembling And Connection
- Into the feed line has to be mounted a main switch in a striking distance to the control. - The charge module with the remote can be mounted independent to the position of the control ESC300 (e.g. in the stall). -
Page 11: Assembling The Charge Esc300
Assembling and connection 2.2. Assembling the charge ESC300 Mount the Charge in the radio range of the ESC300. Fix the Charge by the 4 fi xing holes in the box. Insert the cable for the power supply from below. On the Charge the Remote fi xed and load. -
Page 12: Assembling Example For The Control And Its Components
Milking parlour Engineering room Control ESC300 and main switch, for alley 4...6 you need an additional control EXP300 ESC300 Charge with ESC300 Remote (accessible position in the stall for the operator) External radio module (height > 2,5 m) External push button* e.g. for the function „drive“... -
Page 13: Electrical Connection
- The power supply for the entire control has to be lead over a shared main switch. - It is not allowed to connect the feed line of the EXP300 directly to the ESC300. Connect the feed line of the EXP300 with the main switch, or use a conduit box. -
Page 14: Cable Types, Line Length And Cable Cross Section
300 m. The controls release cable of the safety shutdown board to the ESC300 will be integrated into the emergency stop line circuit and must be, according to this, considered for the maximum line length of the emergency stop. -
Page 15: Connection Of The Electronic Control - Esc300
The power supply for the expansion module EXP300 happens, parallel to the ESC300, by the main switch in the feed line. The feed line for the EXP300 will be therefore connected parallel to the feed line of the ESC300 on the main switch. -
Page 16: Connection Of The Charging Station Esc300 Charge
You need the charging station Charge to charge and store the Remote, and will be connected, independent of the control ESC300 to the power supply For the Charge you need a connection voltage of 230 V / 1~. Connect the charging station ESC300 Charge: 1. -
Page 17: Safety
Only after deletion of the danger situation you can restart the operation and the system! Date: 20-11-2014 Data name: esc300-2-v12a_EN ESC300 (swv-1.06) Author: Heiko Lange Pages: © P. Prinzing GmbH - 89173 Lonsee-Urspring (Germany) * Option / depends on design Service: +49 (0) 7336 - 961018... -
Page 18: Danger Areas Of The Dung Removal System
- Replace damaged fuses by one of the same value Date: 20-11-2014 Data name: esc300-2-v12a_EN ESC300 (swv-1.06) Author: Heiko Lange Pages: © P. Prinzing GmbH - 89173 Lonsee-Urspring (Germany) Service: +49 (0) 7336 - 961018 * Option / depends on design... -
Page 19: Unattended Operation (Automatic) Of The Dung Removal System
The respective starting command has to be set and started by the person who is responsible for the control ESC300. The following starting commands for an unattended operation are possible:... -
Page 20: The Radio Controlled Remote Esc300
E > Starts the forward motion during the teaching of P3 + P4 (Forw.) Date: 20-11-2014 Data name: esc300-2-v12a_EN ESC300 (swv-1.06) Author: Heiko Lange Pages: © P. Prinzing GmbH - 89173 Lonsee-Urspring (Germany) Service: +49 (0) 7336 - 961018 * Option / depends on design... -
Page 21: How To Use The Remote Esc300
To avoid interruptions by an empty battery, charge the remote always before commissioning and programming completely! - If the batteries of the remote are empty, the remote has to be in the charging station (ESC300 Charge) to operate with the control. -
Page 22: Display Messages During The „Operation Mode
Display of connected alley = alley off - = alley active ..Date: 20-11-2014 Data name: esc300-2-v12a_EN ESC300 (swv-1.06) Author: Heiko Lange Pages: © P. Prinzing GmbH - 89173 Lonsee-Urspring (Germany) Service: +49 (0) 7336 - 961018 * Option / depends on design... -
Page 23: Display Messages During The „Setting Mode
- Press ESC to end an action or to change one level back in the menu Date: 20-11-2014 Data name: esc300-2-v12a_EN ESC300 (swv-1.06) Author: Heiko Lange Pages: © P. Prinzing GmbH - 89173 Lonsee-Urspring (Germany) * Option / depends on design Service: +49 (0) 7336 - 961018... -
Page 24: Commissioning
(see page 5.1. Switch on the control 1. Switch “ON” the main switch of the control ESC300 the control starts, the green LED on the front side of the control is blinking 2. Switch on the remote Press any button on the remote. -
Page 25: Switch Off Or On Again The Alleys
5.3. Switch off or on again the alleys The electronic control is detecting automatically, how many alley modules (ESC300 relais) are connected with the „ESC300 Control“.Every alley which is connected with the „ESC300 Control“ will be shown on the display (fi g: 25/1). -
Page 26: Chose Motor Type (Nominal Capacity)
When the commissioning is completely done, the control ESC300 with its programs P1 + P2 is operable (see chapter operation). ATTENTION Changes on the set parameters or incomplete or... -
Page 27: Do The Motor Test (Rotating Direction)
Date: 20-11-2014 Data name: esc300-2-v12a_EN ESC300 (swv-1.06) Author: Heiko Lange Pages: © P. Prinzing GmbH - 89173 Lonsee-Urspring (Germany) * Option / depends on design Service: +49 (0) 7336 - 961018... - Page 28 Scraper is standing in the walkway (wrong) Scraper is in home position (right) Date: 20-11-2014 Data name: esc300-2-v12a_EN ESC300 (swv-1.06) Author: Heiko Lange Pages: © P. Prinzing GmbH - 89173 Lonsee-Urspring (Germany) Service: +49 (0) 7336 - 961018 * Option / depends on design...
-
Page 29: Programs On The Control
- teaching for P3 + P4 29/3 Program choice set in menu frost program Date: 20-11-2014 Data name: esc300-2-v12a_EN ESC300 (swv-1.06) Author: Heiko Lange Pages: © P. Prinzing GmbH - 89173 Lonsee-Urspring (Germany) * Option / depends on design Service: +49 (0) 7336 - 961018... -
Page 30: Program 1 (P1) - Description
5.6.2 Program 1 (P1) - description Program 1 (P1) is the basic program on the ESC300 and contains no additional setting options for the scraper drive. For the fi rst using and after a reset program 1 is programmed on factory setting. -
Page 31: Program 3+4 (Teaching) - Description
(suggestion: last stop approx. 2 m before end of the alley/end stop) Date: 20-11-2014 Data name: esc300-2-v12a_EN ESC300 (swv-1.06) Author: Heiko Lange Pages: © P. Prinzing GmbH - 89173 Lonsee-Urspring (Germany) * Option / depends on design Service: +49 (0) 7336 - 961018... - Page 32 If you need examples how to teach a program, please contact the PRINZING company. Date: 20-11-2014 Data name: esc300-2-v12a_EN ESC300 (swv-1.06) Author: Heiko Lange Pages: © P. Prinzing GmbH - 89173 Lonsee-Urspring (Germany) Service: +49 (0) 7336 - 961018 * Option / depends on design...
-
Page 33: Set Starting Times In The Schedule (Timer)
Press ESC till there is the operation mode on the display, or navigate to another menu item Date: 20-11-2014 Data name: esc300-2-v12a_EN ESC300 (swv-1.06) Author: Heiko Lange Pages: © P. Prinzing GmbH - 89173 Lonsee-Urspring (Germany) * Option / depends on design Service: +49 (0) 7336 - 961018... -
Page 34: Extended Functions
Press ESC till the operation mode will be displayed. On the display will be the symbol „drive“. Date: 20-11-2014 Data name: esc300-2-v12a_EN ESC300 (swv-1.06) Author: Heiko Lange Pages: © P. Prinzing GmbH - 89173 Lonsee-Urspring (Germany) Service: +49 (0) 7336 - 961018 * Option / depends on design... -
Page 35: Connect Signal Device For „Drive
Motor 2 6.1.1 Connect signal device for „drive“ On the control ESC300 you have got the possibility, that a signal device (signal-horn, lamp) will be driven on during the “drive”, and an optic or acoustic signal will be given. Therefor you have got the terminal clamps „cross transport“ and „error“. Depending on the seizure of the terminal clamps, you can activate a terminal clamp for the signal drive in the menu service. -
Page 36: Function Slatted Fl Oor
) (see fi g. 36/3) Operation display slatted fl oor „on“ Date: 20-11-2014 Data name: esc300-2-v12a_EN ESC300 (swv-1.06) Author: Heiko Lange Pages: © P. Prinzing GmbH - 89173 Lonsee-Urspring (Germany) Service: +49 (0) 7336 - 961018 * Option / depends on design... -
Page 37: Function Frost Mode
Date: 20-11-2014 Data name: esc300-2-v12a_EN ESC300 (swv-1.06) Author: Heiko Lange Pages: © P. Prinzing GmbH - 89173 Lonsee-Urspring (Germany) * Option / depends on design Service: +49 (0) 7336 - 961018... -
Page 38: Set The Parameters For The Frost Mode
38/2 Menu „frost mode“ Parameters for the frost mode Date: 20-11-2014 Data name: esc300-2-v12a_EN ESC300 (swv-1.06) Author: Heiko Lange Pages: © P. Prinzing GmbH - 89173 Lonsee-Urspring (Germany) Service: +49 (0) 7336 - 961018 * Option / depends on design... -
Page 39: Set The Frost Mode For An Alley
Press ESC till the operation mode will be displayed, or navigate to another menu item. Date: 20-11-2014 Data name: esc300-2-v12a_EN ESC300 (swv-1.06) Author: Heiko Lange Pages: © P. Prinzing GmbH - 89173 Lonsee-Urspring (Germany) * Option / depends on design Service: +49 (0) 7336 - 961018... -
Page 40: Set The Obstacle Detection
Press ESC till the operation mode will be displayed, or navigate to another menu item. Date: 20-11-2014 Data name: esc300-2-v12a_EN ESC300 (swv-1.06) Author: Heiko Lange Pages: © P. Prinzing GmbH - 89173 Lonsee-Urspring (Germany) Service: +49 (0) 7336 - 961018 * Option / depends on design... -
Page 41: Parking Position
When using the function slatted fl oor (On), you can additionally set and use the parking position in the menu item „settings ahead“. Date: 20-11-2014 Data name: esc300-2-v12a_EN ESC300 (swv-1.06) Author: Heiko Lange Pages: © P. Prinzing GmbH - 89173 Lonsee-Urspring (Germany) * Option / depends on design Service: +49 (0) 7336 - 961018... -
Page 42: Start The Cross Transport Automatically
6.6. Start the cross transport automatically In the programs P2...P4 you have the possibility, to start a cross transport (or similar)automatically by a potential-free contact „cross drive“ on the ESC300. The starting impulse can be chosen for forward- and backward move. The duration of the starting impulse can be defi... -
Page 43: Operation With The Esc300
Operation with the ESC300 Operation with the ESC300 Before you start the operation with the control ESC300 you have to assure the following points. - The system is completely mounted incl. all safety arrangements. - The system was set up corresponding all legal statutory and operational provisions. -
Page 44: Automatic Operation With The Electronic Control Esc300
Operation with the ESC300 7.2. Automatic operation with the electronic control ESC300 In the AUTOMATIC, the start of the scraper happens automatically... - corresponding a set time in the schedule (timer) - corresponding a set temperature when frost mode is active... -
Page 45: Automatic Operation By Frost Mode
Consider the allowed line lengths and -types (see page 14).. Date: 20-11-2014 Data name: esc300-2-v12a_EN ESC300 (swv-1.06) Author: Heiko Lange Pages: © P. Prinzing GmbH - 89173 Lonsee-Urspring (Germany) * Option / depends on design Service: +49 (0) 7336 - 961018... -
Page 46: Service
Do only change the parameters when you know about the consequences of your act. Date: 20-11-2014 Data name: esc300-2-v12a_EN ESC300 (swv-1.06) Author: Heiko Lange Pages: © P. Prinzing GmbH - 89173 Lonsee-Urspring (Germany) Service: +49 (0) 7336 - 961018 * Option / depends on design... -
Page 47: Change The Learned Breaking Current
You will reach an optimal result for the breaking current with the automatic learning program. Date: 20-11-2014 Data name: esc300-2-v12a_EN ESC300 (swv-1.06) Author: Heiko Lange Pages: © P. Prinzing GmbH - 89173 Lonsee-Urspring (Germany) * Option / depends on design Service: +49 (0) 7336 - 961018... -
Page 48: Change Parameter Program 2 (P2)
„error overload“. Date: 20-11-2014 Data name: esc300-2-v12a_EN ESC300 (swv-1.06) Author: Heiko Lange Pages: © P. Prinzing GmbH - 89173 Lonsee-Urspring (Germany) Service: +49 (0) 7336 - 961018 * Option / depends on design... - Page 49 Press ESC till the operation mode will be displayed or navigate to another menu item. Date: 20-11-2014 Data name: esc300-2-v12a_EN ESC300 (swv-1.06) Author: Heiko Lange Pages: © P. Prinzing GmbH - 89173 Lonsee-Urspring (Germany) * Option / depends on design Service: +49 (0) 7336 - 961018...
-
Page 50: Display System Information
Press ESC till the operation mode will be displayed or navigate to another menu item. Date: 20-11-2014 Data name: esc300-2-v12a_EN ESC300 (swv-1.06) Author: Heiko Lange Pages: © P. Prinzing GmbH - 89173 Lonsee-Urspring (Germany) Service: +49 (0) 7336 - 961018 * Option / depends on design... -
Page 51: The Signal Output „Cross Transport" And „Error
51/4 Menu „service“ - selection for the „signal drive“ Date: 20-11-2014 Data name: esc300-2-v12a_EN ESC300 (swv-1.06) Author: Heiko Lange Pages: © P. Prinzing GmbH - 89173 Lonsee-Urspring (Germany) * Option / depends on design Service: +49 (0) 7336 - 961018... -
Page 52: The Tension Control
(main switch OFF) 52/3 File structure on the SD-card Date: 20-11-2014 Data name: esc300-2-v12a_EN ESC300 (swv-1.06) Author: Heiko Lange Pages: © P. Prinzing GmbH - 89173 Lonsee-Urspring (Germany) Service: +49 (0) 7336 - 961018 * Option / depends on design... -
Page 53: Insert/Extract The Sd-Card
Service 8.6.1 Insert/extract the SD-card 1. Switch off the main switch of the control, open ESC300 2. Insert the SD-card into the card slot with the labelling to the left 3. Push the SD-card slightly down, till it snaps into place To extract the SD-card press it slightly down >>>... -
Page 54: Load Parameters (Import)
(factory pro- vided) when importing data. Date: 20-11-2014 Data name: esc300-2-v12a_EN ESC300 (swv-1.06) Author: Heiko Lange Pages: © P. Prinzing GmbH - 89173 Lonsee-Urspring (Germany) Service: +49 (0) 7336 - 961018 * Option / depends on design... -
Page 55: Logging On The Sd-Card
Switch off the control before changing the SD-card (Main switch OFF) By the help of a prepared SD-card a software update on the ESC300 can be done. For the software update you need: - an empty SD-card (max. 2 GB-card. No SDHC/SDXC cards!) - a current update fi... -
Page 56: Failure And Error Deletion
2. read message and note down if necessary 3. press ENTER Date: 20-11-2014 Data name: esc300-2-v12a_EN ESC300 (swv-1.06) Author: Heiko Lange Pages: © P. Prinzing GmbH - 89173 Lonsee-Urspring (Germany) Service: +49 (0) 7336 - 961018 * Option / depends on design... -
Page 57: Error Codes
- set date and time (see page date off too long Date: 20-11-2014 Data name: esc300-2-v12a_EN ESC300 (swv-1.06) Author: Heiko Lange Pages: © P. Prinzing GmbH - 89173 Lonsee-Urspring (Germany) * Option / depends on design Service: +49 (0) 7336 - 961018... -
Page 58: Info Messages (Display Glows Yellow)
- check radio contact (symbol), - lower the distance to the radio receiver Date: 20-11-2014 Data name: esc300-2-v12a_EN ESC300 (swv-1.06) Author: Heiko Lange Pages: © P. Prinzing GmbH - 89173 Lonsee-Urspring (Germany) Service: +49 (0) 7336 - 961018 * Option / depends on design... -
Page 59: Further Errors
- use new SD-card (max. 2 GB) - deactivate write protection Date: 20-11-2014 Data name: esc300-2-v12a_EN ESC300 (swv-1.06) Author: Heiko Lange Pages: © P. Prinzing GmbH - 89173 Lonsee-Urspring (Germany) * Option / depends on design Service: +49 (0) 7336 - 961018... -
Page 60: Batteries On The Remote - Care And Replacement
Battery case - with fastening screws INFO Batteries do not belong in household waste! Date: 20-11-2014 Data name: esc300-2-v12a_EN ESC300 (swv-1.06) Author: Heiko Lange Pages: © P. Prinzing GmbH - 89173 Lonsee-Urspring (Germany) Service: +49 (0) 7336 - 961018 * Option / depends on design... -
Page 61: Factory Provided (Reset)
Press ESC till you are in the operation mode or navigate to another menu item. Date: 20-11-2014 Data name: esc300-2-v12a_EN ESC300 (swv-1.06) Author: Heiko Lange Pages: © P. Prinzing GmbH - 89173 Lonsee-Urspring (Germany) * Option / depends on design Service: +49 (0) 7336 - 961018... -
Page 62: Factory Provided Parameters
Cross transport forw. Cross transport back. Duration cross 1...9999 transport Date: 20-11-2014 Data name: esc300-2-v12a_EN ESC300 (swv-1.06) Author: Heiko Lange Pages: © P. Prinzing GmbH - 89173 Lonsee-Urspring (Germany) Service: +49 (0) 7336 - 961018 * Option / depends on design... -
Page 63: Disassembly And Disposal
These batteries will be accepted free of charge. Date: 20-11-2014 Data name: esc300-2-v12a_EN ESC300 (swv-1.06) Author: Heiko Lange Pages: © P. Prinzing GmbH - 89173 Lonsee-Urspring (Germany) * Option / depends on design Service: +49 (0) 7336 - 961018... -
Page 64: Technical Data
General information These technical data apply for the type ......ESC300 Measurements ESC300 (B x H x T) without screwing ... . . 500 x 400 x 220 mm Measurements EXP300 (B x H x T) without screwing . -
Page 65: Explorer Menu Esc300
12. Explorer menu ESC300 Explorer menu ESC300 Date: 20-11-2014 Data name: esc300-2-v12a_EN ESC300 (swv-1.06) Author: Heiko Lange Pages: © P. Prinzing GmbH - 89173 Lonsee-Urspring (Germany) * Option / depends on design Service: +49 (0) 7336 - 961018... - Page 66 Explorer menu ESC300 Date: 20-11-2014 Data name: esc300-2-v12a_EN ESC300 (swv-1.06) Author: Heiko Lange Pages: © P. Prinzing GmbH - 89173 Lonsee-Urspring (Germany) Service: +49 (0) 7336 - 961018 * Option / depends on design...
Need help?
Do you have a question about the ESC300 and is the answer not in the manual?
Questions and answers