
Summary of Contents for FLARM FLARM V3+Mm
- Page 1 Fly with far-sightedness www.swiss-bat.ch External FLARM / PowerFLARM™ Display V3+Mm .for Powered aircraft. Manual V3+Mm Software Version 3.7 May 2015 (a) Manual external FLARM Display V3+Mm...
- Page 2 This external display when attached to FLARM can only detect and alert the presence of another moving aircraft if the aircraft is equipped either with FLARM-compatible systems, ADS-B-OUT (1090ES) on 1090MHz or an interrogated transponder Mode C or S. As FLARM main device neither interrogates nor operates as a transponder the displayV3+ as well cannot be detected by TCAS or air traffic control.
-
Page 3: Table Of Contents
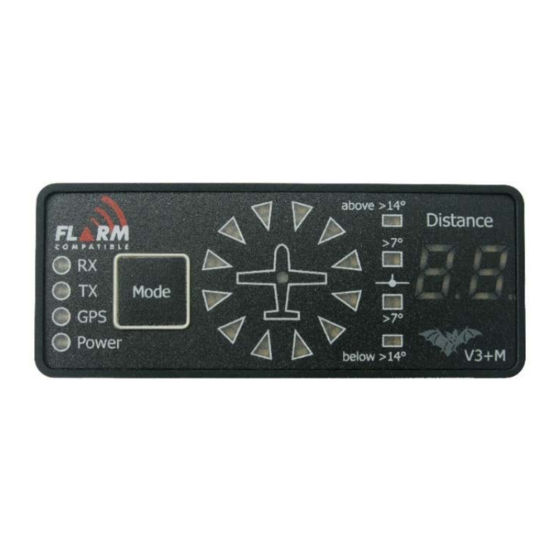
Status indicators…………………………………………………………………………………………….. “Mode” Button ……………………………………………………………………………………………... Operation modes……………………………………………………………………………………………….. Nearest-Mode………………………………………………………………………………………………. Warning-Mode……………………………………………………………………………………………… Traffic Functions.……………………………………………………………………………………………… Airplane warning…………………………………………………………………………………………… Forecasting Traffic .………………………………………………………………………………………… Transponder object indication…………………………………………………………………………….. Fixed-obstacles warning…………………………………………………………………………………. Indicator Mute-mode..……………………………………………………………………………………. Maintenance……………………………………………………………………………………………………. Software updates...…………………………………………………………………………………………. Technical data………………………………………………………………………………………………….. Frequently asked questions..………………………………………………………………………………… Page 3 Manual external FLARM™ / PowerFLARM™ Display V3+Mm... -
Page 4: Display
External FLARM™/ PowrFLARM™ with Software-version 3.7 Display The “External Display for FLARM – Version V3+M” is a step-by-step display unit and operator control module for FLARM ; functions and operations are generally identical with the original. Due to the frame size of the step-by-step display, the V3+ can be installed in small and/or full instrument panels –... - Page 5 The volume can be adjusted into 4 levels. The signal can be muted for a 5-minute period in order to consciously eliminate acoustic noise while thermal-circling with other glider aircraft. For more detailed instructions refer to the chapter “Operation”. Page 5 Manual external FLARM™ / PowerFLARM™ Display V3+Mm...
-
Page 6: Installation
Afterwards the adhesive sticker can be easily removed by hand – do not use any solvents on the display to avoid penetration and possible damage to display. Adhesive sticker sets for new installations are available from the distributor. Page 6 Manual external FLARM™ / PowerFLARM™ Display V3+Mm... -
Page 7: Screw Attachment
“non-stabilized” battery supply available on their interface. This enables the peripheral device’s power supply through simple wiring. Non-stabilized means the FLARM-device supply is connected without voltage control and without internal fuse protection to the interface. Strictly adhere to the manufacturer’s references regarding the connection and fuse protection of the mainframe. -
Page 8: Wiring To "Flarm
Other variations… The connection options are versified, apart from the displays to FLARM which can be connected to PDA or navigation computers. If uncertain with connections, consult the manuals of the FLARM -devices or contact their distributor. Tip: The Y-adapter RJ12 (3 jacks) and RJ45 (2 jacks / 1 plug) are normally found as commercial phone accessories;... -
Page 9: Configuration
In order to change the next parameter the button must be pressed for a period of 1-2 s. To leave the setup mode and/or an activation of new adjustments the button must be pressed longer than 3 s or FLARM, including the display, must be restarted (cut power supply and power up again). Parameter No. - Page 10 If it is built in, for example hidden in fuselage, it can create disturbances, when the acoustic alarms (buzzers) sound off from behind – the display has its own built-in signal, hence the signal of the FLARM can then be switched off.
-
Page 11: Start-Up
Normally only the Power LED flashes and the GPS-LED blinks until the system orientates itself and defines its actual position. NOTE: After installation an inspection must be made to ensure that the displayV3+ and FLARM main device do not interfere with any mechanical, electrical, electronic (radio) or magnetic (compass) system. -
Page 12: Status Indicators
Power illuminated constantly during operation. The Power-LED blinks when voltage is below 8 VDC as FLARM will not function with low voltage. Communication failure: If data communication is interrupted with the mainframe (no data received for more than 3 seconds) the status-LED’s will show as follows:... -
Page 13: Operation Modes
When an airplane is received, a clicking sound will begin as a reference. As soon as FLARM confirms the airplane as a threat it will automatically change to “Warning”-Mode. When the threat has disappeared it returns back to “Nearest”-Mode. - Page 14 1, 2 or 3 LED’s flash depending on the threat level, the external display V3+ always shows only one LED. Recently it is possible to show the warnings on the V3+ analog to the FLARM indicators. Information to enable this function “Compatibility Mode” is found in the chart “Configuration”.
-
Page 15: Forecasting Traffic
Forecasting Traffic In Nearest-Mode the nearest received aircraft is shown– as long as no warning is required. Objects without predictable threat which are recognized by FLARM are indicated on the V3+M display in yellow and without any sound. The indicator does not flash, but updates itself every second; therefore by several received objects a flashing- like indication effect is possible. -
Page 16: Fixed-Obstacles Warning
Indicator “Mute-mode” Independent from the actual operation mode a temporary indicator and buzzer mute-mode can be chosen: After a double click FLARM suppresses for a 5-minute period all visual and acoustic traffic, fixed-obstacle and threat information. The suppression is confirmed with a decreasing sound sequence. With an additional double click this suppression- function is immediately terminated and reconfirmed by an increasing sound sequence. -
Page 17: Maintenance
Only in exceptional cases is the update of the display consequent to a FLARM update mandatory. As a rule FLARM updates are compatible with current peripheral devices –... -
Page 18: Frequently Asked Questions
“Configuration”) The “adjusted” volume level is not saved as setting; after start-up the buzzer is always set on “loud”. -> This function operates intentionally for safety reasons; at the beginning of each flight day FLARM must be adequately audible. The buzzer can be intentionally adjusted afterwards to a lower volume level or even disabled completely. - Page 19 Display V3+Mm External FLARM™/ PowrFLARM™ with Software-version 3.7 Notes: Page 19 Manual external FLARM™ / PowerFLARM™ Display V3+Mm...