Advertisement
Instruction leaflet
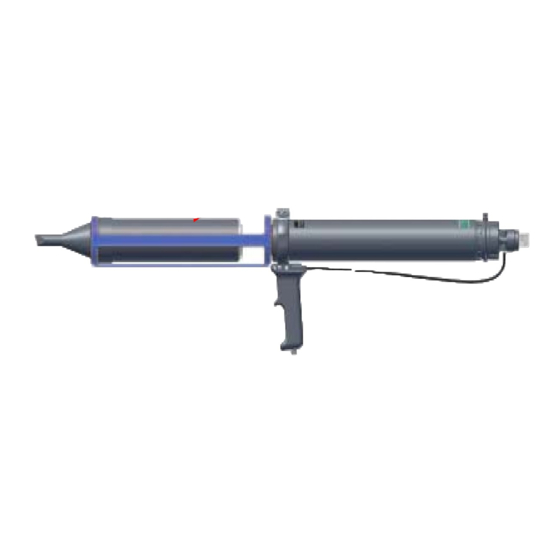
The Cox Ultrapoint AIR is designed to apply mortars and tile grouts efficiently and cleanly. Its powerful action pumps the
mortar deep into joints to minimise voids for maximum joint strength.
(A) Nozzle
(F) Operating Trigger
Safety
1.
Read and understand instructions before using this product
2.
Keep instruction safe for future reference
3.
Wear eye protection and hearing protection when using pneumatic tools
4.
Disconnect this applicator from air supply (F) when filling or cleaning it.
The air supply to this product must not exceed 145psi (10 Bar)
Caution
Operation
5.
Connect product to air supply; press Operating Trigger (C) and Air Return Button (A); this will cause the rod and
plunger assembly to move to the rear of Barrel.
6.
Remove Barrel from frame.
7.
Disconnect air supply (F)
8.
Fill Barrel with Mortar/Grout (see mixing instruction overleaf)
9.
Replace Barrel in frame, ensure Barrel is placed over Plunger assembly
10.
Reconnect air supply (F).
11.
Depress Operating Trigger to dispense Mortar/Grout (flow rate can be adjusted by turning the Air Flow
Adjustment Knob (B)).
(B) Barrel
(E) Air Connection
(C) Air Return Button
(D) Air Flow Adjustment Knob
Advertisement
Table of Contents

Summary of Contents for COX Ultrapoint AIR
- Page 1 Instruction leaflet The Cox Ultrapoint AIR is designed to apply mortars and tile grouts efficiently and cleanly. Its powerful action pumps the mortar deep into joints to minimise voids for maximum joint strength. (A) Nozzle (B) Barrel (C) Air Return Button (F) Operating Trigger (D) Air Flow Adjustment Knob (E) Air Connection Safety Read and understand instructions before using this product Keep instruction safe for future reference Wear eye protection and hearing protection when using pneumatic tools Disconnect this applicator from air supply (F) when filling or cleaning it. The air supply to this product must not exceed 145psi (10 Bar) Caution Operation Connect product to air supply; press Operating Trigger (C) and Air Return Button (A); this will cause the rod and plunger assembly to move to the rear of Barrel. Remove Barrel from frame. Disconnect air supply (F) Fill Barrel with Mortar/Grout (see mixing instruction overleaf) Replace Barrel in frame, ensure Barrel is placed over Plunger assembly Reconnect air supply (F). Depress Operating Trigger to dispense Mortar/Grout (flow rate can be adjusted by turning the Air Flow ...
- Page 2 Recommended Mortar Mix 1 part cement ½ part hydrated lime (optional) Plasticiser to supplier’s instructions 5 parts sieved builder’s sand. Good mixing is critical, using a Cox mixing paddle is strongly recommended. Mix for 4 or 5 minutes to achieve a smooth, buttery mixture free of lumps. If mixing in a container, ensure that there is no unmixed material in the corners. Adding more water is no substitute for good mixing. Add the plasticiser to the water rather than the other way round. Pouting water into the plasticiser can produce too much froth. Applying the material The Ultrapoint AIR works like any pneumatic sealant applicator, flow rate can be adjusted by turning the Air Flow Adjustment Knob (B) on the rear of the product. Use the Black Nozzle for pointing and the Grey Nozzle for grouting (mortars are too coarse to flow through the grey nozzle). If the gun blocks, then remove Barrel (steps 5‐6 from previous page); empty contents and try re‐mixing. If product will not flow properly; this may be due to: Incomplete mixing Insufficient plasticiser in mix Sharp sand or gravel in the mix Sand and cement premix separating in the bag (ensure when using pre‐bagged mix, that dry materials are mixed properly Nozzle opening to fine. Avoid mortar contaminating the gun by regularly rinsing the rod and plunger assembly, always wash barrel and nozzle thoroughly after use. Adjusting the plunger The plunger is adjustable for wear. Tightening the nuts will squeeze the rubber to tighten its fit in the Barrel. ...
Need help?
Do you have a question about the Ultrapoint AIR and is the answer not in the manual?
Questions and answers