Table of Contents
Advertisement
Quick Links
CR-100
General Installation
Installation of the CR-100 can be divided into the following four
areas:
• Connect Video Sources and Outputs
• Connect Controllers
• Connect LAN
• Power Up
Connect Video Source & Outputs
Connect HDMI Devices
Note: HDMI input and HDMI output are HDCP compliant.
To connect HDMI Input:
Using a HDMI video cable, connect the CR-100 HDMI input
connector to a HDMI output connector on a HDMI video source.
To connect HDMI Output:
Using a HDMI video cable, connect the CR-100 HDMI output
connector to a HDMI output connector on a HDMI video source.
Connect Touch Screens & Electronic Whiteboards
For USB Touch Screens, connect all video sources before
connecting the USB cable and extension to the USB port.
For any touch screen, be sure to calibrate the touch screen on
start up. See "Calibrating CR-100 Controllers" on page 2 for
the calibration process.
Connect USB Devices
Connect the device(s) to any USB port on the CR-100. The
system supports up to 4 USB 3.0 devices and 1 USB B device.
Connect Other Controllers
The following categories of controllers can be used with the
CR-100:
• Keyboard
• Touch Screens/Electronic Whiteboards
• Tablets
• Mouse devices
IMPORTANT: Be sure to power down the CR-100 before
connecting or disconnecting any controllers.
The CR-100 will automatically detect the installed controllers
upon power up. If you change controllers or add a new
controller, you need to power down, install the new controller(s),
then power up.
Power Up
NOTE: In order for the CR-100 to properly sync with the video
signals, the sources should be turned on first.
1. Plug the power cord into the back of the CR-100 and then
into any grounded outlet.
2. Plug the power cords from any video source(s), controller(s),
and display(s) into any grounded outlet.
3. Turn on each of the connected units, and then press the
power button on the front panel of the CR-100.
After a moment, a CR-100 splash screen will appear, followed by
the initializing of the ports, and ending with a copyright message.
After the startup process, a marker overlay will appear, displaying
any previously created markers.
NOTE: To bypass port initialization, press ESC during startup.
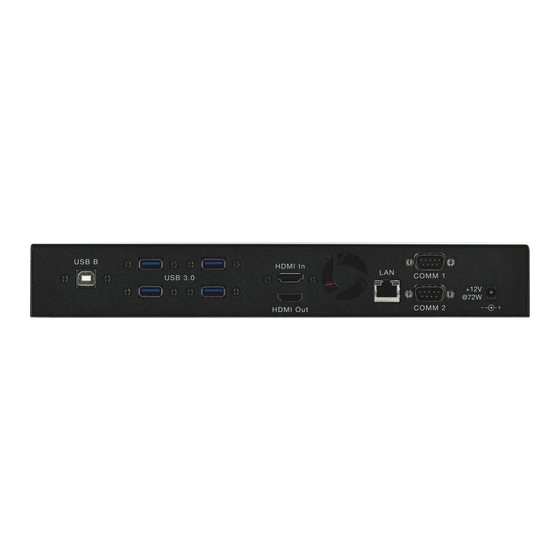
Front Panel of CR-100
QUICK START GUIDE
© 2019, Williams AV LLC MAN 253A
Advertisement
Table of Contents

Related Manuals for Pointmaker CR-100

Summary of Contents for Pointmaker CR-100
- Page 1 HDMI output connector on a HDMI video source. 1. Plug the power cord into the back of the CR-100 and then Connect Touch Screens & Electronic Whiteboards into any grounded outlet.
- Page 2 For Additional Information Touch Screen (or Whiteboard): Tap the screen over the option you want to select. This manual is a quick start guide for getting your CR-100 up- Mouse: Click on the item. and-running. Most features and customization options are not documented in this manual.
Need help?
Do you have a question about the CR-100 and is the answer not in the manual?
Questions and answers