Advertisement
Quick Links
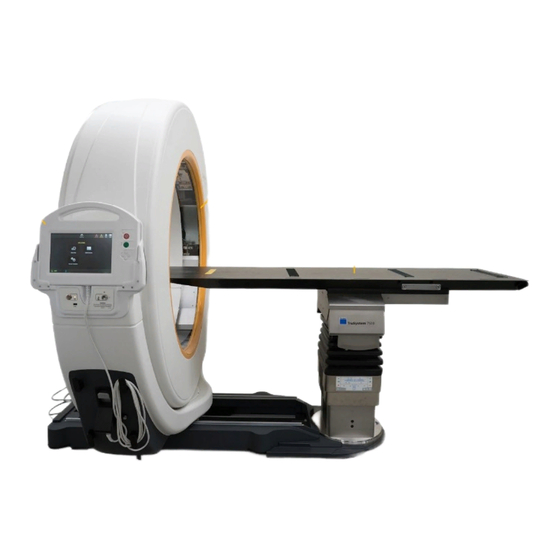
MOVE, PARK AND STORE AIRO
...............................................................................................................................................................................................................................................
...............................................................................................................................................................................................................................................
Hardware: Airo
a s
Transport
Page 1-16
Note: This guide does not replace the user manuals.
REMOVE TABLE TOP
• Ensure the table top is removed.
POWER ON AIRO
• Insert the key and switch on the system by rotating
the key to the On position d.
• Press the Start a button.
The yellow indicator light s illuminates.
d
TRANSPORT
• Select Transport from the Choose Mode screen
on the pendant.
• Alternatively, select Transport on the pendant by
pressing Menu a > Transport .
a
LATCH AIRO
• Ensure the gantry is at the end of the rail, away from
the table column.
• Rotate the gantry and align it with the base.
Ensure the latch is locked.
• Push the gantry towards the table column until it also
latches with the base.
NOTE:
Ensure that the gantry does not come into
contact with the table column during alignment.
Advertisement

Related Manuals for Mobius airo2

Summary of Contents for Mobius airo2
- Page 1 MOVE, PARK AND STORE AIRO ................................................................................................Hardware: Airo REMOVE TABLE TOP • Ensure the table top is removed. POWER ON AIRO • Insert the key and switch on the system by rotating the key to the On position d. •...
- Page 2 RAISE AIRO • Disconnect all power and network cables. • Raise Airo onto its wheels by pressing Up a on the pendant until the front facing camera window is visible. NOTE: If the camera view is not visible, check that all power and network cables are disconnected.
- Page 3 PRE-SURGERY MAINTENANCE ................................................Before scanning, ensure the area is safe for X- Hardware: Airo ray exposure. STEP 1 • Select Scan a on the Choose Mode screen. • Press the Down button s to lower the base on to the floor into final surgery position. •...
- Page 4 DAILY TASK 2 - EMERGENCY STOP TEST - STEP 2 • Remove the pendant and move to a safe area. • Press and hold the Scan button and wait for the gantry to move and beep tone to start. • While holding the Scan button down, press the E- Stop button on the pendant, ensuring the beeping Scan tone stops within 0.5 seconds and the gantry stops...
- Page 5 OR SETUP (LUMBAR-THORACIC) ................................................Ensure the area is safe for X-ray exposure. Hardware: Airo BEFORE SCANNING • Ensure the navigation system is connected. • Avoid crossing a patient’s eyes with the positioning laser. Ensure that: • Markers on Airo are visible to the camera. •...
- Page 6 Page 6-16 Note: This guide does not replace the user manuals.
- Page 7 OR SETUP (CERVICAL SPINE) ................................................Ensure the area is safe for X-ray exposure. Hardware: Airo BEFORE SCANNING • Ensure the navigation system is connected. • Avoid crossing a patient’s eyes with the positioning laser. Ensure that: • Markers on Airo are visible to the camera. •...
- Page 8 OPERATING POSITION 3 - CLOSE PROXIMITY • Move gantry f to the end of the rail and away from the patient. • Keep the patient in the original scanning position. • Reposition the camera a. • Ensure the equipment and medical staff are all correctly positioned: Anesthesiologist s, monitor d, surgeon g.
- Page 9 OR SETUP (CRANIAL) ................................................Ensure the area is safe for X-ray exposure. Hardware: Airo BEFORE SCANNING • Avoid crossing a patient’s eyes with the positioning laser. Ensure that: • Markers on Airo are visible to the camera. • Staff have left the room or are shielded. •...
- Page 10 Page 10-16 Note: This guide does not replace the user manuals.
- Page 11 TRANSFER TABLE TO COLUMN ................................................Hardware: Airo STEP 1 • Set the shuttle to the zero (neutral) position. • Set the 5th wheel pedal a to freewheel • s to Set the brake pedal unbraked • Ensure that the Airo gantry is away from the column so that it does not collide with the wheels.
- Page 12 Page 12-16 Note: This guide does not replace the user manuals.
- Page 13 SCAN PATIENT ................................................Hardware: Airo and Curve STEP 1 - CURVE SETUP • Start Curve Navigation System. • Select your software application on Curve : - Within Cranial Navigation Select Register > Automatic Registration Airo - Within Spine & Trauma Navigation Select Register >...
- Page 14 STEP 5 • Select the examination region and scanning mode (e.g., Spine > Lumbar > Helical ). • Select Next. NOTE: Tube current modulation is only available in helical scan mode. STEP 6 Select your scan parameters under: • Kernel •...
- Page 15 FINALIZE SCAN ................................................Before scanning, ensure the area is safe for X- Hardware: Airo and Curve ray exposure. SCOUT SCAN - STEP 1 • Carry out a collision check, ensuring the drape and the patient’s arms are clear of the bore. •...
-
Page 16: Verify Registration
Brainlab. No part of this guide may be reproduced or translated without the express written Mobius Imaging, LLC Brainlab AG For further information, please refer to permission of Brainlab. Phoenix Park, 2 Shaker Road, Bldg F, Suite 100, Olof-Palme-Str.
Need help?
Do you have a question about the airo2 and is the answer not in the manual?
Questions and answers