
Related Manuals for Inovytec Ventway Sparrow


Summary of Contents for Inovytec Ventway Sparrow
- Page 1 User Manual Ventway Sparrow Emergency and transport ventilator VWSP-100 Civil Model VWSP-100MR Civil Model VWSP-900 Robust Model VWSP-900 Robust Model Document Number: VWSP-500-11...
- Page 2 Inovytec Medical Solutions Ltd. Inovytec Medical Solutions Ltd. reserves the right to change or improve its products and accompanying technical literature without specific notice of changes or improvements.
- Page 3 FDA Tracking Requirements U.S. Federal Law (21 CFR 821) requires the tracking of ventilators. Under this law, owners of this ventilator must notify Inovytec Medical Solutions Ltd. if this product is received; lost, stolen, or destroyed; donated or resold; or otherwise distributed to a different organization.
-
Page 4: Table Of Contents
8.5. S ..................... 37 YMBOLS USED IN THE SYSTEM 8.6. S ........................38 YSTEM NDICATORS 8.6.1. Battery Status ......................38 8.6.2. indicators ........................39 8.6.3. Alarms .......................... 39 9. Getting Started with Ventway Sparrow ................. 40 Page 4 of 144... - Page 5 Ventway Sparrow User Manual 9.1. C ........41 ONNECTING ENTILATOR PATIENT CIRCUIT ENDOTRACHEAL TUBE FACEMASK 9.2. D ........................ 43 ISCONNECT PATIENT 9.3. P ........................44 ATIENT EIGHT 9.4. V ........................45 ENTILATION 9.5. V ......................46 ENTILATION ARAMETERS 9.6. N ..............
- Page 6 Ventway Sparrow User Manual 15.4. B ....................96 ACKUP ENTILATION 15.4.1. Backup Ventilation in CPAP ..................96 15.4.2. Backup Ventilation before starting patient ventilation ..........97 15.5. IMV VC (CPR) ........................99 15.6. CPR ..........................101 15.7. S PEEP V ......................
- Page 7 Ventway Sparrow User Manual 23.21. V ) .......... 140 ENTILATION DURING STANDBY DUE TO PATIENT INSPIRATORY EFFORT 23.22. S -UP D ................... 141 TART URING ENTILATION 23.23. M ..................... 143 ISCELLANEOUS LARMS 24. Appendix – Menu Hierarchy ....................144 Page 7 of 144...
- Page 8 Inovytec distributor, please contact your distributor directly to report the problem. Note: If this ventilator has not been purchased directly from Inovytec, please ensure that it has been purchased from an authorized distributor of Inovytec. To obtain a list authorized distributors, contact Inovytec info@Inovytec.com.
-
Page 9: About This User Manual
Ventway Sparrow User Manual 1. ABOUT THIS USER MANUAL This User Manual provides the information necessary to operate and maintain the Ventway Sparrow ventilator. PLEASE READ THIS USER MANUAL BEFORE OPERATING THE SYSTEM. If any part of this User Manual is not clear, contact Customer Support for assistance. -
Page 10: Glossary And Abbreviations
Ventway Sparrow User Manual 1.2. GLOSSARY AND ABBREVIATIONS Item Description Apnea Temporary cessation of breathing Breaths Per Minute CPAP Continuous Positive Airway Pressure Liters per minute I:E Ratio Inspiratory Expiratory ratio duration Mandatory Breath Ventilator initiated breath Minute Volume Non-Invasive Ventilation... -
Page 11: Overview Of System
EMS environment in which the ventilator is used. Note: The Ventway Sparrow is able to work with an MR scanner at a maximum power of three tesla. As a precaution, locate the ventilator as far as possible from the coils – at least one meter. -
Page 12: Conditions For Use
5 kg (11 lb.), who require the following types of ventilatory support: SIMV - VC (PS) or CPAP. The Ventway Sparrow lung ventilator is intended for emergency use and during transportation. It may be used for invasive or noninvasive ventilation presets. -
Page 13: Contraindications
Ventway Sparrow User Manual 3.2. CONTRAINDICATIONS • Depending on the legal status of DNR, DNAR or DNACPR instructions in your location, use of this device may be contraindicated. Consult your legal advisor for specific guidelines in this respect. • Acute Pneumothorax 3.3. -
Page 14: Safety
• Degree of mobility: Portable 4.2. EMC COMPLIANCE The unit has Class B compliance. The Ventway Sparrow is suitable for the electromagnetic environment of typical commercial or hospital settings. During the immunity testing described below the Ventway Sparrow continued to provide uninterrupted delivery of tidal volume, respiratory rate, PIP, and PEEP within the device specifications. -
Page 15: Emissions
Ventway Sparrow User Manual 4.2.1. EMISSIONS Electromagnetic Emissions The Ventway Sparrow is intended for use in the electromagnetic environment of hospitals and EMS environments . The user should assure that it is used in such an environment. Emission Tests Compliance Electromagnetic Environment –... -
Page 16: Immunity
IEC 61000-4-8 Conducted RF 3 Vrms IEC 61000-4-6 6 V rms in ISM and The Ventway Sparrow is suitable for the amateur radio bands electromagnetic environment of typical Radiated RF IEC commercial or hospital settings. 61000-4-3... -
Page 17: Safety Instructions
Portable RF communications equipment (including peripherals such as antenna cables and external antennas) should be used no closer than 30 cm (12 inches) to any part of the Ventway Sparrow System, including cables specified by the manufacturer. Otherwise, degradation of the performance of this equipment could result. - Page 18 Ventway Sparrow User Manual Warnings The exhaled volume of the patient can differ from the measured exhaled volume due to leaks around the mask. The device shall not be used in a hyperbaric chamber. The device shall not be used with nitric oxide and explosive or highly flammable gas mixtures.
- Page 19 The Patient Circuit should be changed after 24 hours of continuous use. Use only the original Inovytec Patient Circuit. Confirm that the expiration date, found on the Patient Circuit packaging bag, has not been reached.
- Page 20 Cautions Repairs should be undertaken only by personnel trained or auth- orized by Inovytec Medical Solutions Ltd. Do not modify this equip- ment without authorization from Inovytec Medical Solutions Ltd. The device may not operate correctly if used or stored outside the relevant temperature or humidity ranges, as described in the per- formance specifications.
- Page 21 Ventway Sparrow User Manual Cautions During NIV (Non-Invasive Ventilation) the user should use a capnograph in order to monitor the CO level of the patient. Covering the ventilator is prohibited. Ensure that no Latex or natural rubber parts are in patient pathways.
- Page 22 The user or any technical personnel who are not formally authorized by Inovytec Medical Solutions Ltd. should not open the device under any circumstances. Opening the device could damage the unit and will void the warranty provided by Inovytec Medical Solutions Ltd.
-
Page 23: System Components
Ventway Sparrow User Manual 5. SYSTEM COMPONENTS 5.1. UNPACKING THE DEVICE Package contents Ventway Sparrow ventilator Battery pack - Inside ventilator battery compartment User Manual and device documentation Power supply Page 23 of 144... -
Page 24: Ventilator - Front Panel
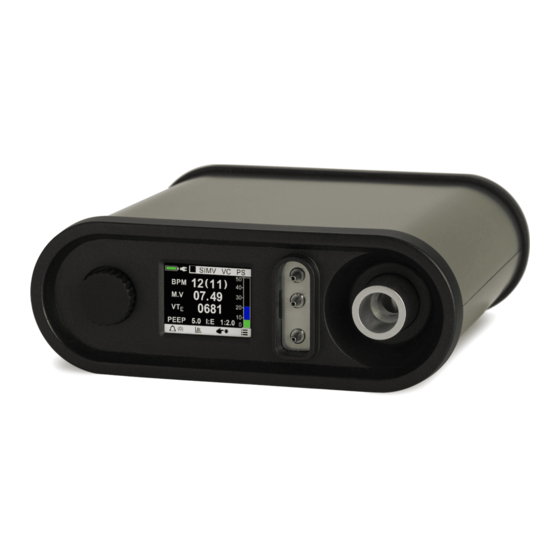
Ventway Sparrow User Manual 5.2. VENTILATOR – FRONT PANEL Front Panel: (1) control knob, (2) display, (3) control and sensing tubes port, (4) patient port 5.3. VENTILATOR – REAR PANEL Rear Pane: (1) Air/Low pressure oxygen inlet, (2) Power supply connector, (3) USB... -
Page 25: Patient Circuit
Ventway Sparrow User Manual 5.4. PATIENT CIRCUIT Diagram of patient circuit Patient circuits specifications Adult Pediatric Nominal overall length 180 / 240 cm 180 / 240 cm Internal volume 690 / 920 CC 318 /424 CC Inspiratory Resistance to flow 2.7 cmH... - Page 26 Ventway Sparrow User Manual Warning: All parts of the patient circuit are single-use. Discard after use. Handle carefully to avoid cross-contamination. Warning: Do not use antistatic or electrically conductive hoses or tubing in the ventilator breathing system. Page 26 of 144...
-
Page 27: Pneumatic Section - Theory Of Operation
Ventway Sparrow User Manual 5.5. PNEUMATIC SECTION – THEORY OF OPERATION Page 27 of 144... - Page 28 Ventway Sparrow User Manual Explanation of Diagram Solenoid valves exhaust – scavenging of gas residue from the solenoids, passed to inlet to prevent oxygen buildup inside the enclosure. Manifold assembly – encapsulates all electromechanical control elements, membranes, valves and air tubes in one compact element.
- Page 29 Ventway Sparrow User Manual Inspiratory (1) vs. Expiratory (2) cycle During the inspiratory cycle, the exhalation valve membrane is closed, allowing the gas from the ventilator to be diverted to the patient. Once the inspiration cycle is complete, the membrane opens, allowing the gas from the patient to be exhaled through the exhalation valve.
-
Page 30: Connecting The Ventilator
Ventway Sparrow User Manual 6. CONNECTING THE VENTILATOR 6.1. FRONT PANEL CONNECTIONS 1 Pressure and flow measurement port 2 Pressure measurement port 3 Expiratory valve port – control tube 4 Ventilator gas outlet 6.2. REAR PANEL CONNECTIONS 1. Air inlet/Oxygen supply connector – Air inlet/ oxygen connector to Oxygen Mixer (see Section 12.1.1.1. -
Page 31: Power On/Off And Display Startup Screen
Ventway Sparrow User Manual 7. POWER ON/OFF AND DISPLAY STARTUP SCREEN 7.1. NORMAL START To start the system, press and hold the Power On/Off button on the back panel for 3 seconds. Back panel indicating the Power On/Off button 7.2. QUICK START In an emergency situation, Quick Start allows you to start the ventilator immediately, using preset default options. - Page 32 Ventway Sparrow User Manual After selection is confirmed by selecting the check mark and pressing the control knob, specify the Patient Type: Patient Type screen Now the ventilator will operate in Backup mode: Ventilator running after Quick Start For information on Backup Mode, see Section 15.4. Backup Ventilation Mode.
-
Page 33: Shutting Down The System
Ventway Sparrow User Manual 7.3. SHUTTING DOWN THE SYSTEM To shut down the system, press and hold the Power On/Off button on the back panel for 3 seconds. Back panel indicating the Power On/Off button A confirmation screen will display, allowing the user to confirm the... -
Page 34: Startup During Ventilation
Ventway Sparrow User Manual 7.4. STARTUP DURING VENTILATION If power is lost during ventilation and the ventilator is turned on within 2 minutes, automatically start with ventilation, and a DISCONNECT alarm of unexpected shutoff will be displayed on the screen. -
Page 35: Navigating The Gui Screens
Ventway Sparrow User Manual 8. NAVIGATING THE GUI SCREENS 8.1. SELECTING SCREEN OPTIONS To navigate between the screen options, turn the control knob on the left side of the device. When the desired option has been marked by positioning the marker... -
Page 36: Confirming Or Cancelling A Message
Ventway Sparrow User Manual 8.4. CONFIRMING OR CANCELLING A MESSAGE When a message is displayed by the system that allows a confirm or cancel response, you can reject or confirm it: Press Cancel ( ) to reject the action, or press Confirm ( ) to accept the action. -
Page 37: Symbols Used In The System
Ventway Sparrow User Manual 8.5. SYMBOLS USED IN THE SYSTEM Back Next screen Language Graphs (Flow / Pressure) Confirm Cancel Silence an alarm for two minutes Manual breath Main Menu Home Button Page 37 of 144... -
Page 38: System Indicators
Ventway Sparrow User Manual 8.6. SYSTEM INDICATORS The top left corner of the display shows battery status and system indicators. 8.6.1. BATTERY STATUS No battery, external power source used Non-rechargeable battery, no external power source Non-rechargeable battery, external power source connected... -
Page 39: Indicators
Ventway Sparrow User Manual 8.6.2. INDICATORS Patient trigger detected Patient cough detected Note: If a cough is detected, the ventilator will ignore patient triggers for one second. Pressure sensors are currently being zeroed Note: While zeroing sensors, the ventilator will not detect patient triggers. -
Page 40: Getting Started With Ventway Sparrow
Note: An emergency quick start can be performed if necessary. See Section 7.2. Quick Start. The first screen showing the Ventway Sparrow logo allows the user to identify whether the display is working properly. Connect the measurement and control tube adapter to the front panel connector, as shown here. -
Page 41: Connecting Ventilator, Patient Circuit, Endotracheal Tube/Facemask
Ventway Sparrow User Manual 9.1. CONNECTING VENTILATOR, PATIENT CIRCUIT, ENDOTRACHEAL TUBE/FACEMASK Note: The following procedures are identical for both Adult and Pediatric use. First connect the ventilator tube to the ventilator gas outlet: Then connect the tube connector of measurement... - Page 42 Ventway Sparrow User Manual Always use an anti-bacterial humidity and moisture exchanger (HME) filter between the patient and the patient circuit, as shown below. 1. HME (Humidity and Moisture Exchanger) filter 2. Exhalation valve cover 3. One-way directional valve 4. Ventilation tube 5.
-
Page 43: Disconnect Patient
Ventway Sparrow User Manual 9.2. DISCONNECT PATIENT Initial screen Normal procedure after turning on the ventilator is to verify that the patient is disconnected, then press OK on this initial screen. The system will activate the blower to verify the correct operation of the device and various compon- ents (e.g. -
Page 44: Patient Weight
Ventway Sparrow User Manual If the self test fails, the user is advised to check the following: • No Oxygen Mixer connected to the ventilator • No oxygen reservoir • Dirty/obstructed inlet filter • Pressure and control tube connected properly (kinks, disconnec- tion or rupture of the tubes) •... -
Page 45: Ventilation Mode
Ventway Sparrow User Manual 9.4. VENTILATION MODE Select the initial choice of ventilation mode. This can be changed later. See Section 15. Ventilation Methods for details about each ventilation mode. Ventilation Mode screen After ventilation mode is selected, select Invasive or Non-invasive Mode:... -
Page 46: Ventilation Parameters
Ventway Sparrow User Manual 9.5. VENTILATION PARAMETERS The Ventilation Parameters screen displays the relevant patient information, updated on a real-time basis: Manual Breath Graph Alarms Menu Ventilation Parameters screen • Select BPM to change the breaths per minute delivered. • Select VTe to change the desired VTi. -
Page 47: Numerical Representation Of Breath Parameters
Ventway Sparrow User Manual 9.6. NUMERICAL REPRESENTATION OF BREATH PARAMETERS The measured and computed values that are displayed in the system are calculated using the filtering and smoothing techniques described below. Patient pressure is displayed to the user by a bar (graphic refreshing frequency is 10 Hz). - Page 48 Ventway Sparrow User Manual The latest PEEP is displayed to the user, and is updated per each breath, as the pressure measured at the end of expiration. PIP is displayed to the user by a bar graph. It is the highest level of pressure applied to the lungs during inhalation.
-
Page 49: Pressure And Flow Graphs
Ventway Sparrow User Manual 9.7. PRESSURE AND FLOW GRAPHS This display shows the graphs of the pressure (in units of cm H O) over time, and flow (in units of LPM) vs. time. Rotation of the knob will switch between flow and pressure graphs. -
Page 50: Main Menu
Ventway Sparrow User Manual 10. MAIN MENU The Main Menu screen allows the user to view and set various system values. The Main Menu is accessed by selecting on the bottom of the screen: ALARM SETTINGS Access the Main Menu... -
Page 51: Main Menu/New Patient (Disconnect Patient Screen)
Ventway Sparrow User Manual 10.1. MAIN MENU/NEW PATIENT (DISCONNECT PATIENT SCREEN) This screen allows the user to restart existing ventilation parameters, e.g. when ventilating a new patient. Disconnect Patient screen 10.2. MAIN MENU/VENT PARAMS These screens allow the user to set the patient weight, ventilation mode, and other ventilation parameters. -
Page 52: Main Menu/Vent Params/Trigger Sensitivity
Ventway Sparrow User Manual 10.2.1. MAIN MENU/VENT PARAMS/TRIGGER SENSITIVITY Set the trigger sensitivity for the pressure measurements. Trigger Sensitivity screen Caution: When closed suction catheterization is performed, patient trigger sensitivity must be turned to "off". Caution: During transport ventilation, when the patient is... -
Page 53: Main Menu/Vent Params/Patient Weight
10.3.1. BOOT FAIL ALARM Caution: Boot Fail Alarm The Boot Fail screen appears if the system experiences an error when starting. Replace ventilator and contact Inovytec support. Error message displays here Example of Boot Fail Alarm A summary of Boot Fail alarms is shown in Section 11.1. Boot Fail Alarms. -
Page 54: Main Menu/Advanced Settings
Ventway Sparrow User Manual 10.4. MAIN MENU/ADVANCED SETTINGS The Advanced Settings menu screen is shown below. Advanced Settings menu These options are explained in the following sections. 10.4.1. MAIN MENU/ADV SETTINGS/LOAD DEFAULT Set all parameters to their default values by the set weight. -
Page 55: Main Menu/Adv Settings/Brightness
Ventway Sparrow User Manual 10.4.2. MAIN MENU/ADV SETTINGS/BRIGHTNESS Change the brightness of the display. In Robust mode there is an option to lower brightness and volume. 10.4.3. MAIN MENU/ADV SETTINGS/ALARM VOLUME Change the volume of all sound cues of the system. -
Page 56: Main Menu/Adv Settings/Tech Mode
Ventway Sparrow User Manual 10.4.5. MAIN MENU/ADV SETTINGS/TECH MODE Tech mode allows the setting of the time, total hours of operation, and provides a system self-test function. Tech Mode screens 10.4.5.1. MAIN MENU/ADV SETTINGS/TECH MODE/SET TIME Set the system date and time. - Page 57 Ventway Sparrow User Manual After entering the key, the Calibration Type screen will display: Choosing Pressure, a yellow screen appears: The Calibration screen will display: Calibration screen Page 57 of 144...
- Page 58 Ventway Sparrow User Manual Then the Patient Type screen displays: Choose the patient type, before calibrating You will be asked if you want to reset the volume calibration. Under Tech mode, the user may perform volume calibration by choosing the calibration screen.
- Page 59 Ventway Sparrow User Manual Volume Calibration: For both VTi and VTe, the length of pushing/pulling the syringe handle fully should be approximately one second while never passing a flow of +- 50 lpm. IIf either one of the above-mentioned conditions is not met, the device will not take into account the last push/pull and will not display it on the screen.
- Page 60 Ventway Sparrow User Manual 10.4.5.3. MAIN MENU/ADV SETTINGS/TECH MODE/WORK HOURS Work Hours screen This screen shows the total ventilation hours performed by the ventilator. Page 60 of 144...
- Page 61 Ventway Sparrow User Manual 10.4.5.4. MAIN MENU/ADV SETTINGS/TECH MODE/SELF TEST When you select the Self Test option, the following screen appears: Warning screen preparatory to Self Test After you disconnect the patient, press to continue: Self Test screen (press on...
- Page 62 Ventway Sparrow User Manual 10.4.5.4.1. MAIN MENU/ADV SETTINGS/TECH MODE/SELF TEST /FLOW AND PRESSURE While the test is in progress, a progress bar displays: Self test progress bar When the test is complete, a test result screen displays. If the test PASSED:...
- Page 63 Ventway Sparrow User Manual 10.4.5.4.2. MAIN MENU/ADV SETTINGS/TECH MODE/SELF TEST /CVT Follow the instructions on the screen for the Circuit Verification Test: CVT screen Use a cap to seal off the patient transducer valve: • Press the navigation knob on the ventilator front panel to begin the test.
- Page 64 Ventway Sparrow User Manual The following information is displayed: • PRESS. CHECK: Pressure is over 60 [cmH • PRESS. TIME: Time to reach pressure of 40 [cmH • FLOW CHECK: Flow is over 120 [lpm]. • FLOW TIME: Acceleration time of blower to 100 [lpm].
- Page 65 Ventway Sparrow User Manual In the VVT process, the ventilator is checked for: • System alarm – audio • Patient pressure measurement and pressure performance • Blower pressure measurement • Transducer tubes leak • Motor speed measurement • Two solenoid valves •...
- Page 66 Ventway Sparrow User Manual Rp20 attached to the transducer The expected result is that all solenoids are working properly, as shown below: Solenoid test result screen Page 66 of 144...
- Page 67 Ventway Sparrow User Manual 10.4.5.4.4. MAIN MENU/ADV SETTINGS/TECH MODE/SELF TEST /BLOWER TEST This option turns on the blower and allows changing its speed using the rotator. Pressing the knob will stop the blower. 10.4.5.4.5. MAIN MENU/ADV SETTINGS/TECH MODE/SELF TEST /SCREEN TEST The screen will switch colors between red, green and blue with white markers for the edges of the screen.
- Page 68 Note: Press BACK to exit log or SCROLL the rotator knob to continue viewing the log. 10.4.5.6. MAIN MENU/ADV SETTINGS/TECH MODE/EXPORT LOG This screen allows exporting log files to a Windows PC, using a program provided by Inovytec called “Ventway Manager”. Export log screen Page 68 of 144...
- Page 69 The serial number is also shown on this screen. Software version screen 10.4.5.8. MAIN MENU/ADV SETTINGS/TECH MODE/SW UPDATE This screen allows updating the software of the ventilator using a Windows PC program provided by Inovytec called “Ventway Manager”. Software update screen Page 69 of 144...
- Page 70 Ventway Sparrow User Manual 10.4.5.9. MAIN MENU/ADV SETTINGS/TECH MODE/SYSTEM MODE This screen sets a system mode for the ventilator. This field shouldn’t be changed unless instructed to do so by Inovytec. System mode screen 10.4.5.10. MAIN MENU/ADV SETTINGS/TECH MODE/ALTITUDE The altitude above sea level is shown on the bottom of the second Tech Mode submenu.
-
Page 71: Warnings And Alarms
Ventway Sparrow User Manual 11. WARNINGS AND ALARMS This section provides information about alarms, and examples of typical system messages. 11.1. BOOT FAIL ALARMS A Boot Fail alarm is displayed on a blue screen and indicates that the device has not started properly. -
Page 72: Summary Of Alarm Types
Ventway Sparrow User Manual 11.2. SUMMARY OF ALARM TYPES The following table summarizes the various types of alarms. Alarm type Value Range/Display User Respiratory rate High: 12-70 bpm Adjustable Low: 1-20 bpm Apnea 10-120 seconds Leak 10-100% Low Tidal Volume Delivered... -
Page 73: Summary Of Alarm Levels
Ventway Sparrow User Manual 11.3. SUMMARY OF ALARM LEVELS s are defined with three levels of importance: Alarm • High: Five beeps every two seconds • Medium: Three beeps every five seconds • Low: One beep one time only. Not shown in list of active alarms. -
Page 74: Warning Example
Ventway Sparrow User Manual 11.4. WARNING EXAMPLE Here is an example of a warning message: Warning message 11.5. ALARM EXAMPLE A typical alarm appears as follows: Example of an alarm Note: Press the Silence alarm sign to acknowledge the message and silence the alarm. -
Page 75: Characteristics Of Alarm Indicator Lights
Ventway Sparrow User Manual 11.6. CHARACTERISTICS OF ALARM INDICATOR LIGHTS High level alarm appears as follows: Indicator color for high level alarm is red. Flashing frequency = 2 Hz. Duty cycle = Example of high level alarm Medium level alarm appears as follows: Indicator color for medium level alarm is yellow. -
Page 76: Alarm Signal Sound Pressure Level Range
Ventway Sparrow User Manual 11.7. ALARM SIGNAL SOUND PRESSURE LEVEL RANGE Alarm level Volume Sound pressure level High High 76.8 73.3 Medium High 69.8 67.1 High 66.2 65.1 Note: When multiple alarms appear they are visually seen on screen (each at appearance order). -
Page 77: Battery Status Alarms
Ventway Sparrow User Manual 11.8. BATTERY STATUS ALARMS Low battery: Battery empty: Over temperature: Battery charge protection: Page 77 of 144... -
Page 78: Default Parameters
12.1.1. OXYGEN SUPPLY When a high-pressure oxygen source that is connected to an Oxygen Mixer is not available, the Ventway Sparrow ventilator can accept oxygen from a low- pressure oxygen source such as a reservoir bag connected to a flow meter. - Page 79 Ventway Sparrow User Manual 12.1.1.1. CONNECTING THE AIR INLET TO THE OXYGEN MIXER The Oxygen Mixer is connected to the device as shown below. The Oxygen Mixer connector is specially threaded to fit securely on top of the air/oxygen inlet.
-
Page 80: Recommended Devices For Monitoring Of Oxygen
Ventway Sparrow User Manual 12.1.2. RECOMMENDED DEVICES FOR MONITORING OF OXYGEN Company Name Product Model Precision Medical PM5900 Oxygen Monitor Maxtec MaxO ME® ENVITEC MySign®O Caution: Use of the low-pressure oxygen system at concen- trations above 60% is NOT recommended, as higher values combined with varying minute volume due to spontaneous breathing of the patient may cause inadvertent PEEP. -
Page 81: Additional Recommended Legally Marketed Components / Accessories
Ventway Sparrow User Manual 12.1.3. ADDITIONAL RECOMMENDED LEGALLY MARKETED COMPONENTS / ACCESSORIES Please use these recommended components / accessories or any other equivalents. Component / Company Name Product Model Accessory Antibacterial INTERSURGICAL, CLEAR-THERM MICRO and HME filter INC. HME, MODEL... -
Page 82: Alarm Default Parameters: 5 Kg To 70+ Kg
Ventway Sparrow User Manual 12.2. ALARM DEFAULT PARAMETERS: 5 KG TO 70+ KG Alarm Weight Parameter 10kg 15kg 20kg 30kg 40kg 50kg 60kg 70+ kg Pressure Alarm (cm Pressure Limit (cm H High Rate (BPM) Low Rate (BPM) High Min. -
Page 83: Labels And Symbols
Ventway Sparrow User Manual 13. LABELS AND SYMBOLS 13.1. LABELS A number of internationally recognized symbols are found on the labels. These relate to safety requirements and standards and are described below. VWSP-100 Civil Model VWSP-900 Robust Model Page 83 of 144... - Page 84 Ventway Sparrow User Manual VWSP-100MR Civil Model VWSP-900 MR Robust Model Page 84 of 144...
-
Page 85: Symbols
Ventway Sparrow User Manual 13.2. SYMBOLS The following table explains the meaning of each symbol on the label. Symbol Meaning Consult instructions for use Manufacturer European approval mark Authorized representative in the European Community Serial Number Catalogue Number Batch code... -
Page 86: Cleaning And Disinfecting
Ventway Sparrow User Manual 14. CLEANING AND DISINFECTING Caution: The system is approved for IP45 in operation mode with oxygen enrichment. To avoid damage to the instrument or patient cable, be careful of liquid spillage while cleaning. Caution: Do not expose the instrument, patient cable or sensors to sprays, or any other type of solvents. -
Page 87: Ventilation Methods
Ventway Sparrow User Manual 15. VENTILATION METHODS 15.1. SIMV-VC (PS) FLOW CHART In SIMV-VC, the patient is supplied with the set tidal volume VT during the mandatory breaths. The mandatory breaths are synchronized with the patient’s own breathing attempts. Mandatory breaths are prevented from being applied during spontaneous expiration, by providing that a patient- triggered mandatory breath can only be triggered within a trigger window. - Page 88 Ventway Sparrow User Manual 6. If no spontaneous breathing attempt is detected during the inspiratory trigger window, the machine-triggered mandatory breath is applied. The mandatory tidal volume (VT) results from the pressure difference between PEEP and Pinsp, the lung mechanics and the breathing effort of the patient.
- Page 89 Ventway Sparrow User Manual Note: Through the entire ventilation cycle, we need to test that: • The patient is still connected (no de- crease in PEEP pressure) • Expiratory flow is undisturbed (pressure has decreased – nothing is blocking the ex.
-
Page 90: Cpap - Spontaneous Breathing Mode
Ventway Sparrow User Manual 15.2. CPAP – SPONTANEOUS BREATHING MODE During the spontaneous ventilation modes, the patient carries out the majority of the breathing effort. The pressure support ventilation level PS can be adjusted. The default PSV level is 18 cm H As long as the patient’s airways are below the PEEP + PSV level, the ven-... - Page 91 Ventway Sparrow User Manual Page 91 of 144...
- Page 92 Ventway Sparrow User Manual CPAP Backup ventilation Note: BPM is based on patient weight and other parameters. Page 92 of 144...
-
Page 93: Simv-Pc
Ventway Sparrow User Manual 15.3. SIMV-PC In SIMV-PC (Pressure Control ventilation), the patient’s tidal volume is determined by setting upper and lower pressure levels, and is dependent upon overall pulmonary compliance and resistance. The user defines a number of mandatory breaths in which the ventilator provides a constant pressure set during the inspiratory phase. - Page 94 Ventway Sparrow User Manual Page 94 of 144...
- Page 95 Ventway Sparrow User Manual Page 95 of 144...
-
Page 96: Backup Ventilation Mode
Ventway Sparrow User Manual 15.4. BACKUP VENTILATION MODE Note: Backup will not occur when the user inserts weight, selects a ventilation mode and does not press OK. In this situation, a trig- ger is received from the patient and the respiration is performed according to the ventilation mode. -
Page 97: Backup Ventilation Before Starting Patient Ventilation
Ventway Sparrow User Manual • BPM value is patient weight-based. • Resuming to CPAP ventilation will be possible either by patient trigger, or user switching back to CPAP or SIMV - VC - PS manually, through the "MENU" option on the main screen. - Page 98 Ventway Sparrow User Manual 4. After 3 breaths, the patient weight is evaluated by using TV average of the last 3 breaths: TV[cc] Patient weight [kg] Below 50 50-69 70-99 100-119 120-179 180-239 240-299 300-359 Over 359 5. The table shown above shows the estimated patient weight, based on the volume reached during quick mode method.
-
Page 99: Imv Vc (Cpr)
Ventway Sparrow User Manual 15.5. IMV VC (CPR) In IMV-VC (CPR), as in the normal SIMV-VC (PS), the patient is supplied with the set tidal volume VT during the mandatory breaths. The only difference in this setup, is that patient triggering is switched to OFF. - Page 100 Ventway Sparrow User Manual Page 100 of 144...
-
Page 101: Cpr
Ventway Sparrow User Manual 15.6. CPR This setup delivers constant pressure into the patient airways. The pressure can be adjusted by changing the blower power level field (values range from 1 to 4) and by adjusting the external PEEP control knob on the patient transducer. -
Page 102: Setting The Peep Value
Ventway Sparrow User Manual 15.7. SETTING THE PEEP VALUE When setting the PEEP value, make sure that there are no kinks in the three tubes: Tubes are free of kinks The PEEP value will be preset to 5 millibar, but this must be verified by the value shown on the ventilator screen (see final display below). - Page 103 Ventway Sparrow User Manual Note that the PEEP value will appear on the display: Caution: PEEP value is influenced by the oxygen enrichment method. For example, if we connect an Oxygen Mixer for O enrichment, the PEEP may decrease at 3-4 cm H O.
-
Page 104: Service And Maintenance
Inovytec Medical Solutions Ltd. must not open the Ventway Sparrow device under any circumstances. Opening the Ventway Sparrow device may damage the unit and will void the warranty provided by Inovytec Medical Solutions Ltd. The system requires maintenance on a routine basis of 15,000 operation hours or three years (whichever is first). -
Page 105: Troubleshooting
Ventway Sparrow User Manual 17. TROUBLESHOOTING The following table lists some typical conditions that may occur when using the system. Condition Possible Cause Recommended Action Battery disconnected Not inserted Firmly insert battery in its properly place DC connector connected Power supply not... -
Page 106: Specifications
Ventway Sparrow User Manual 18. SPECIFICATIONS 18.1. DIMENSIONS AND WEIGHT Dimension Measurement Width 165 mm Length 167 mm Height 60 mm Weight Civilian version: 1 kg with batteries Robust version: 1.3 kg with batteries MR version: 1.3 kg with batteries... -
Page 107: Environmental Specifications
Max acoustic energy level 55 [dBa] 18.3. HARSH ENVIRONMENTAL CONDITIONS The Ventway Sparrow is designed to operate in extreme environments, such as ground and transport. The Ventilator continuously monitors the ambient pressure, temperature and other parameters, and compensates for these changes. -
Page 108: Operation In Extreme High / Low Temperatures
18.3.2. OPERATION IN HIGH OR LOW ALTITUDE The Ventway Sparrow is designed to operate at an altitude of -370 to 7620 meters (-1,200 to 25,000 feet). An internal altimeter measures the ambient pressure, allowing the ventilator to compensate the flow calculations for the changes in density and pressure. -
Page 109: Airborne Particulates
Altitude vs. Maximum Pressure possible 18.3.3. AIRBORNE PARTICULATES The inlet filter of the Ventway Sparrow provides protection of gas flow paths through the inlet and emergency intake ports. However, in areas where fine dust is present, it is recommended to use a disposable bac- terial/viral filter. -
Page 110: Power Supply
Ventway Sparrow User Manual 18.4. POWER SUPPLY External AC-DC Adapter Input 100 to 264 VAC, 50-60 Hz, max 1.6 A Output 16-24 VDC , 120 W Internal Battery 8 x CR123 cells for 12VDC configuration (2 x 4S1P) 4 x 18650 Li-Ion for 14.8 VDC rechargeable... -
Page 111: Ventilation Performance
Ventway Sparrow User Manual 18.5. VENTILATION PERFORMANCE Note: Measurement accuracy of calibration equipment may affect the respiratory parameters display by the following parameters: • Volume calculation: +/-2% or 20 [cc] Inspiratory and expiratory times: +/- 0.02 [s] • • Pressure: +/- 0.75% or +/- 0.1 [mbar] Note: If temperature exceeds 85°C, a temperature alarm may be... -
Page 112: Standards And Safety Requirements
Ventway Sparrow User Manual 18.6. STANDARDS AND SAFETY REQUIREMENTS The Ventway Sparrow meets the requirements of the following inter- national standards: IEC 60601-1 Medical electrical equipment — Part 1: General requirements for basic safety and essential per- formance IEC 60601-1-2 Medical electrical equipment —... -
Page 113: Cleaning And Routine Maintenance
Ventway Sparrow User Manual MIL-STD-461G Department of defense interface standard: Requirements for the control of electromagnetic interference characteristics of subsystems and equipment MIL-STD-1275 Department of defense interface standard: Characteristics of 28 volt DC input power to utilization equipment in military vehicles... -
Page 114: Batteries
Ventway Sparrow User Manual 19. BATTERIES The Sparrow can be configured with two battery options: an internal, re- chargeable battery pack, and an internal non-rechargeable battery pack. The battery should be charged or replaced when not in use. For long storage periods, the battery should not be inserted into the battery compartment of the ventilator. -
Page 115: Parts And Accessories
This section outlines information for ordering and shipment of replace- ment parts for the Ventway Sparrow. All equipment and accessories are available directly from Inovytec Medical Solutions Ltd. or from an authorized local distributor. For a Inovytec Medical Solutions Ltd. local distributor please contact Inovytec email as specified below. -
Page 116: Regulatory
Ventway Sparrow User Manual 21. REGULATORY Manufacturer: Inovytec Medical Solutions Ltd. 5 HaTidhar St., Raanana 4366507, Israel Tel: +972 9 7794135 Fax: +972 9 779 41 38 E-mail: Info@Inovytec.com Web Site: http://www.Inovytec.com Européen Agent Information: OBELIS S.A. Bd Général Wahis, 53... -
Page 117: Warranty
If shipping the device is required, pack the device and its accessories carefully to prevent shipping damage. Duration Inovytec Medical Solutions Ltd. will repair or replace, at its sole discretion, the product or any defective part, provided it is returned to Inovytec Medical Solutions Ltd. service within 30 days. -
Page 118: Appendix - Test Alarms
Ventway Sparrow User Manual 23. APPENDIX – TEST ALARMS The following instructions explain how to test all the alarms that can be activated by the system, to ensure that they are working properly. 23.1. BACKUP VENTILATION Step Procedure Action Expected Results Start a new patient Message requesting to disconnect the patient. -
Page 119: Cpap Ventilation With Backup Ventilation
Ventway Sparrow User Manual 23.2. CPAP VENTILATION WITH BACKUP VENTILATION Step Procedure Action Expected Results Start up the Sparrow The software switches to the ventilation phase, weight ventilator. selection screen. Complete the patient circuit test. Set the simulator to Mode is set. The blower starts. -
Page 120: Patient Disconnect
Ventway Sparrow User Manual 23.3. PATIENT DISCONNECT Step Procedure Action Expected Results Start up the Sparrow The software switches to the ventilation phase, weight ventilator. selection screen. Complete the patient circuit test. Set the simulator to Mode is set. The blower starts. -
Page 121: High Peep
Ventway Sparrow User Manual 23.4. HIGH PEEP Step Procedure Action Expected Results Start up the Sparrow ventilator. The software switches to the ventilation phase, weight selection screen. Complete the patient circuit test. Set the simulator to the patient weight Mode is set. The blower starts. - Page 122 Ventway Sparrow User Manual Step Procedure Action Expected Results menu. 14 Go to menu -> alarm settings, look at See that the PEEP setting changed to 10. the PEEP setting in the second page Page 122 of 144...
-
Page 123: Low Peep
Ventway Sparrow User Manual 23.5. LOW PEEP Step Procedure Action Expected Results Start up the Sparrow ventilator. The software switches to the ventilation phase, weight selection screen. Complete the patient circuit test. Set the simulator to the patient weight of Mode is set. - Page 124 Ventway Sparrow User Manual Step Procedure Action Expected Results Go to menu -> alarm settings, look at the See that the PEEP setting changed to 5. PEEP setting in the second page Page 124 of 144...
-
Page 125: Valve Blocked
Ventway Sparrow User Manual 23.6. VALVE BLOCKED Step Procedure Action Expected Results Start up the Sparrow The software switches to the ventilation phase, weight ventilator. selection screen. Complete the patient circuit test. Set the simulator to Mode is set. The blower starts. -
Page 126: Pressure Alarm
Ventway Sparrow User Manual 23.7. PRESSURE ALARM Step Procedure Action Expected Results Start up the Sparrow The software switches to the ventilation phase, weight ventilator. selection screen. Complete the patient circuit test. Set the simulator to Mode is set. The blower starts. -
Page 127: Minute Volume (Mv) Alarm
Ventway Sparrow User Manual 23.8. MINUTE VOLUME (MV) ALARM Step Procedure Action Expected Results Start up the Sparrow The software switches to the ventilation phase, weight ventilator. selection screen. Complete the patient circuit test. Set the simulator to the Mode is set. The blower starts. -
Page 128: Leak Alarm
Ventway Sparrow User Manual 23.9. LEAK ALARM Step Procedure Action Expected Results Start up the Sparrow ventilator. The software switches to the ventilation phase, weight selection screen. Complete the patient circuit test. Set the simulator to the patient weight Mode is set. The blower starts. -
Page 129: Tidal Volume Alarm
Ventway Sparrow User Manual 23.10. TIDAL VOLUME ALARM Step Procedure Action Expected Results Start up the Sparrow The software switches to the ventilation phase, weight ventilator. selection screen. Complete the patient circuit test. Set the simulator to Mode is set. The blower starts. -
Page 130: I:ealarm
Ventway Sparrow User Manual 23.11. I:E ALARM Step Procedure Action Expected Results Start up the Sparrow The software switches to the ventilation phase, weight ventilator. selection screen. Complete the patient circuit test. Set the simulator to the Mode is set. The blower starts. -
Page 131: Apnea Alarm
Ventway Sparrow User Manual 23.12. APNEA ALARM Step Procedure Action Expected Results Start up the Sparrow The software switches to the ventilation phase, weight ventilator. selection screen. Complete the patient circuit test. Set the simulator to Mode is set. The blower starts. -
Page 132: Power Alarm
Ventway Sparrow User Manual 23.13. POWER ALARM Step Procedure Action Expected Results Start up the Sparrow The software switches to the ventilation phase, weight ventilator. selection screen. Complete the patient circuit test. Set the simulator to Mode is set. The blower starts. -
Page 133: Low Battery Alarm
Ventway Sparrow User Manual 23.14. LOW BATTERY ALARM Step Procedure Action Expected Results Start up the Sparrow The software switches to the ventilation phase, weight ventilator. selection screen. Complete the patient circuit test. Set the simulator to Mode is set. The blower starts. -
Page 134: Battery Type Alarm
Ventway Sparrow User Manual 23.15. BATTERY TYPE ALARM Step Procedure Action Expected Results Disconnect AC power The software switches to the ventilation phase, weight and insert a selection screen. rechargeable battery. Start up the Sparrow ventilator. Complete the patient circuit test. -
Page 135: Voltage Alarm
Ventway Sparrow User Manual 23.16. VOLTAGE ALARM Step Procedure Action Expected Results Start up the Sparrow The software switches to the ventilation phase, weight ventilator. selection screen. Complete the patient circuit test. Set the simulator to Mode is set. The blower starts. -
Page 136: Temperature Alarm
Ventway Sparrow User Manual 23.17. TEMPERATURE ALARM Step Procedure Action Expected Results Start up the Sparrow The software switches to the ventilation phase, weight ventilator. selection screen. Complete the patient circuit test. Set the simulator to Mode is set. The blower starts. -
Page 137: Tube Disconnect Alarm
Ventway Sparrow User Manual 23.18. TUBE DISCONNECT ALARM Step Procedure Action Expected Results Start up the Sparrow The software switches to the ventilation phase, weight ventilator. selection screen. Complete the patient circuit test. Set the simulator to Mode is set. The blower starts. -
Page 138: Altitude Change Alarm
Ventway Sparrow User Manual 23.19. ALTITUDE CHANGE ALARM Step Procedure Action Expected Results Start up the Sparrow The software switches to the ventilation phase, weight ventilator. selection screen. Complete the patient circuit test. Set the simulator to the Mode is set. The blower starts. -
Page 139: Shutdown Alarm
Ventway Sparrow User Manual 23.20. SHUTDOWN ALARM Step Procedure Action Expected Results Start up the Sparrow The software switches to the ventilation phase, weight ventilator. selection screen. Complete the patient circuit test. Set the simulator to Mode is set. The blower starts. - Page 140 Ventway Sparrow User Manual 23.21. VENTILATION DURING STANDBY (DUE TO PATIENT INSPIRATORY EFFORT) Step Procedure Action Expected Results Start up the Sparrow The software switches to the ventilation phase, weight ventilator. selection screen. Complete the patient circuit test. Set the simulator to Mode is set.
-
Page 141: Ventilation During Standby
Ventway Sparrow User Manual 23.22. START-UP DURING VENTILATION Step Procedure Action Expected Results Start up the Sparrow ventilator. software switches ventilation phase, weight selection Complete the patient circuit test. screen. Set the simulator to the patient weight of Mode is set. The blower starts. - Page 142 Ventway Sparrow User Manual Step Procedure Action Expected Results Go back to the alarm settings screens and All the values should be the default see that all the values are back to the values. default values. Enter the menu and press “stop vent”.
-
Page 143: Miscellaneous Alarms
Ventway Sparrow User Manual 23.23. MISCELLANEOUS ALARMS There are two alarms which can only be tested by running the Ventway in a ventilation situation for many hours: 1) After every 300 hours of work, an alarm will pop-up with the following message “replace inlet filter”, along with two... -
Page 144: Appendix - Menu Hierarchy
Ventway Sparrow User Manual 24. APPENDIX – MENU HIERARCHY The diagram below shows all the menus in the Ventway Sparrow system. Page 144 of 144...
Need help?
Do you have a question about the Ventway Sparrow and is the answer not in the manual?
Questions and answers