Advertisement
Quick Links
Quick Start Guide
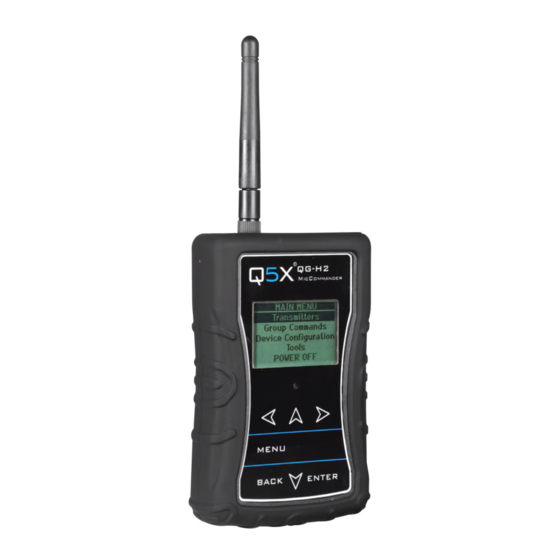
Handheld MicCommander™
This Quick Start Guide is an overview. Users are asked to
review the manual for detailed instructions.
The carrying pouch contains two parts.
Handheld MicCommander remote control (QG-H2)
•
Antenna
•
Users also need:
Q5X Digital transmitter
•
Microphone with special Lemo connector
•
Shure Axient Digital receiver
•
2 AA batteries
•
Visit www.Q5X.com/support to:
update the firmware
•
register the warranty
•
download the manuals
•
PREPARE:
Handheld MicCommander Remote Control
•
Remove the rubber cover to access the battery
chamber.
Install 2 AA batteries. Lithium is recommended for best
•
performance. Alkaline or Ni-MH are acceptable when
battery type is changed in the device configuration
menu.
Replace the rubber cover and install the antenna on the
•
top.
NEVER power the unit without the antenna in place.
•
Turn on the unit by pressing the power button on the
•
top or by plugging the USB cable.
The MicCommander will automatically shut off after
•
two minutes.
PREPARE:
QT-AD10 Transmitter
Bring the transmitter out of storage mode (minimal
•
battery draw) and into standby mode (detectable but the
UHF radio is off) using either method below:
Hold the ON/OFF button until the flashes
•
change from rapid to slow, or
Plug and unplug a powered charging cable into
•
the side of the transmitter.
Connect the microphone by pushing the mic connector
•
ends together.
Quick Start Guide part number 55-0175
PAIR:
MicCommander and Transmitter
The screen on the MicCommander displays the serial
•
number of paired transmitters. The serial number is on
the transmitter antenna or back.
•
If the desired transmitter is not listed, press the <MENU>
button to either scan for nearby transmitters or manually
add the serial number. Use the arrow buttons to navigate
the menu.
Scan: Press <ENTER> to scan. Use the down arrow to
o
select the transmitter. Use the side arrows to
review information about the transmitter. Press
<ENTER> to toggle the selection "x". Press <MENU>
to access additional search functionality. Press
<Back> to accept the addition of a transmitter to the
list.
Add: Use the down arrow to select "Add" and press
o
<ENTER>. Use the navigation arrows to enter the
serial number. Hold the arrow key for rapid scroll.
Press <ENTER> to save.
•
Select the desired transmitter and press <ENTER> to go
to the transmitter menu.
Transmitters: 1
Power
20678
OFF
ADJUST
:
Set the functions in the two transmitter menus of
the MicCommander. Screen one includes: frequency, power
on/off, battery level, mic mute/live and mic offset. To access
screen two, navigate to NEXT> and press <ENTER> to adjust
transmitter name, group, RF power, 2.4GHz channel, storage
and reboot.
•
Frequency: Highlight the frequency and press <ENTER>.
Use the directional arrows to choose the desired
frequency. Hold the arrow for rapid scroll. Press <ENTER>.
Mic-offset: If using a single transmitter, set Offset to 0 dB.
•
If there is an audible difference in the sound level
between multiple transmitters, navigate to the Offset
menu (Audio > Offset) in the transmitter to increase or
decrease the Offset in real time to match the audio levels.
RF Power: Select between 2, 10 and 20mW. A lower
•
power level will conserve battery life.
•
Storage: Navigate to NEXT> and <ENTER>. Use the down
arrow to go to STORAGE and press <ENTER>. Navigate to
highlight CONTINUE on the warning screen and <ENTER>.
25140:QT-AD10
M:0
x
Frequency:
536.500MHz
Power:
OFF
ON
OFF
Battery:
74%
Mic:
OFF
MUTE
LIVE
Mic-offset: 0dB
NEXT>
www.Q5X.com
1-519-675-6999
Scan
Add
Remove
Remove ALL
Link
Name: QT-AD10
QT-AD10
M:0
Group:
0
RF Power:
10 mW
2.4 GHz Ch:
25
<BACK STORAGE REBOOT
info@Q5X.com
Advertisement

Related Manuals for Q5X Handheld MicCommander


Summary of Contents for Q5X Handheld MicCommander
- Page 1 Scan: Press <ENTER> to scan. Use the down arrow to The carrying pouch contains two parts. select the transmitter. Use the side arrows to Handheld MicCommander remote control (QG-H2) • review information about the transmitter. Press Antenna •...
- Page 2 • Q5X Gateway (remote control) • Align the IR windows between the transmitter and the • Handheld MicCommander (QG-H2) or receiver so that the IR LED illuminates red. Network Gateway (QG-N3) • When complete, “Sync Success!” appears on the receiver.
- Page 3 IR LED illuminates red. Q5X Gateway (remote control) • When complete, “Sync Success!” appears on the receiver. • Handheld MicCommander (QG-H2) or Network Gateway (QG-N3) USE TIPS The AquaMic is waterproof to 10 meters. Audio Shure Axient Digital receiver •...
Need help?
Do you have a question about the Handheld MicCommander and is the answer not in the manual?
Questions and answers