Table of Contents
Advertisement
Available languages
Available languages
Quick Links
Advertisement
Chapters
Table of Contents

Summary of Contents for Disan Matrix Series
- Page 1 Bedienungsanleitung Istruzioni per l’uso User’s Manual MATRIX...
-
Page 2: Table Of Contents
INHALTSANGABE Einleitung ..................3 Öffnen der Verpackung ..............3 Kontrolle der Bestandteile ..............4 Konstruktionsschema ...............5 Technische Eigenschaften..............6 Montage ...................7 Montageort ..................7 Änderung der Anschlüsse von Rechts auf Links ......7 Montage der Zentrale ..............8 Verbindung mit dem Rohrnetz ............9 Verbindung mit dem Stromnetz .............9 Benutzung der Anlage ..............10 Benutzung des Zubehörs ...............10 Instandhaltung ................11... - Page 3 Das Gerät ist nicht geeignet, um von Menschen (auch Kinder), die durch physische, sensorische oder mentale Schwäche beeinträchtigt sind, sowie von Personen mit einem Mangel an Erfahrung oder Wissen verwendet zu werden, sofern sie nicht durch eine verantwortliche Person auf die Sicherheitsrisiken hingewiesen und in den fachgerechten Umgang mit dem Gerät eingewiesen wurden.
-
Page 4: Einleitung
1. Einleitung Herzlichen Glückwunsch zum Erwerb einer Disan Zentralstaubsauganlage aus der Modell- reihe Matrix. Es handelt sich hierbei um ein Verbindung aus Technologie, Bedienkomfort und Wohlbefinden. Matrix steht für kompaktes, ansprechendes Design und Leistung auf höchstem Niveau. 2. Öffnen der Verpackung Sobald das Zentralstaubsauggerät an seinem Installationsstandort eintrifft, kann das Gerät aus... -
Page 5: Kontrolle Der Bestandteile
2.1 Kontrolle der Bestandteile Alle Bestandteile der Anlage, die sich im Lieferumfang des Modells Matrix befinden sollen aus der Verpackung genommen werden: Zentralstaubsauggerät Metallplatte zur Wandbefestigung Zwei Gummimuffen zur Verbindung mit dem Rohrnetz Vier Rohrschellen zur Fixierung der Gummimuffen Papiertüte Handbuch &... -
Page 6: Konstruktionsschema
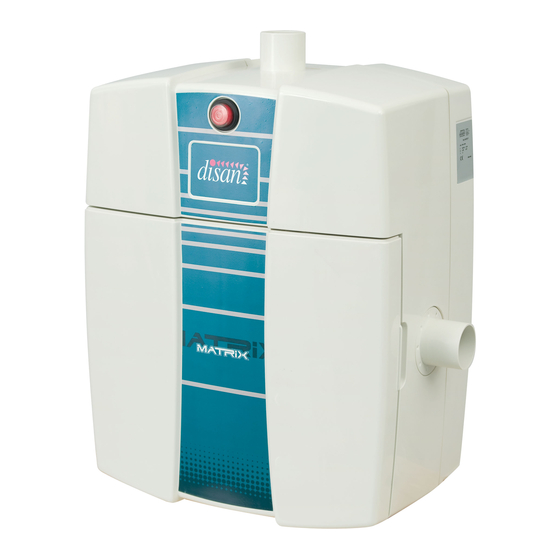
3. Konstruktionsschema Matrix PT Saugmotor HEPA - Filter Filtertüte Frontabdeckung mit Klick-System... -
Page 7: Technische Eigenschaften
4. Technische Eigenschaften Einsatzbereich Matrix - PT Fläche bis max. Rohrlänge ca. 30 max. Saugdosen Stk. Technische Daten: Motorleistung Gebläsestufen Versorgungsspannung Volt Motorschutzklasse IP55 Unterdruck mbar max. Luftmenge m3/h Airwatt @ ø 32mm Filter Papiertüte Filteroberfläche 3350 Gehäuse Kapazität Schmutzbehälter Geräuschpegel Abmaße 23x39x49,5... -
Page 8: Montage
5. Montage - ACHTUNG - DIE MONTAGE MUSS VOM FACHMANN VORGENOMMEN WERDEN 5.1 Montageort Die Installation der Zentralstaubsauganlage setzt das Vorhandensein des Rohrleitungsnetzes voraus, das vom Fachmann geplant und verlegt wurde. Auf Grund der Konstruktionsweise, der Schutzklasse IP55 und des geringen Geräuschpegels können die Geräte aus der Baureihe Matrix sowohl im Wohnungsinneren als auch im Freien installiert werden. -
Page 9: Montage Der Zentrale
5.3 Montage der Zentrale Im Lieferumfang enthalten ist eine Montageschablone, diese vereinfacht die Montage um ein Vielfaches: Für die Befestigung des Zentralstaubsauggeräts verwenden Sie die mitgelieferte Montage- platte. 1. Die Schablone wird an der für die Montage vorgesehenen Stelle an die Wand geheftet. -
Page 10: Verbindung Mit Dem Rohrnetz
Zubehör (cod. ER270) 5.4 Verbindung mit dem Rohrnetz Matrix mittels Muffe am Rohrnetz anschließen. Matrix mittels Muffe mit dem Abluftrohr verbinden. Schalldämpfer (als Zubehör erhältich) an die Abluftleitung anschließen. 5.5 Verbindung mit dem Stromnetz Bevor das Zentralstaubsauggerät an das Stromnetz angeschlossen wird, ist zu überprüfen, ob die Spannung (V) vor Ort dem Zentralstaubsaug- gerät entspricht.( siehe Typenschild ) Der Hersteller übernimmt für Sach- oder Personenschäden, die... -
Page 11: Benutzung Der Anlage
6. Benutzung der Anlage Die Bauweise des Sauggerätes gewährleistet eine maximale Lärmreduzierung und eine effi- ziente Dämmung der Motor-Geräuschentwicklung. Bei Benuzung der Anlage sind folgende Sicherheitsvorschriften zu befolgen. Beachten Sie, dass Kinder nicht unbeaufsichtigt Zugang zum Gerät haben. Führen Sie das während des Reinigungsvorganges in Verwendung befindliche Saugzu- behör nicht an Augen oder Ohren heran, vermeiden Sie das Einführen von Fingern oder der Hand. -
Page 12: Instandhaltung
Kundendienst. Jeglicher Eingriff darf nur bei vollständig still stehendem Motor und Unterbrechung der Strom- versorgung erfolgen. Disan empfiehlt eine eingehende Revision durch einen autorisierten Kundendienstbetrieb ca. alle 4-5 Jahren. 7.2 Ordentliche Wartung Vor Beginn von Wartungs- oder Reinigungsarbeiten ist sicherzustellen, das der Motor still steht und die Stromversorgung unterbrochen ist. -
Page 13: Störungssuche
8. Störungssuche (Tab. S.13) 1. Saugkraftverlust. Wenn Sie den Eindruck haben, das die Saugkraft an den Saugdosen erhe- blich abgenommen hat, prüfen Sie bitte: Die Füllmenge der Papiertüte ( siehe Pkt. Entleerung des Staubbehälters ) Und den Zustand des Hepa-Filters. 2. - Page 14 Pfeifende Dosen keine Saugleistung Unreichende Saugleistung Motor schaltet nicht ab Motor schaltet ab...
-
Page 15: Garantie
Transportkosten sind vom Kunden zu tragen. Die Garantie ist gültig, wenn der abzutrennende Garantieabschnitt vollständig und leserlich ausgefüllt innerhalb von 30 Tagen ab Kaufdatum an DISAN zurückgesandt wurde. Sämtliche oben angeführte Garantieleistung werden nur dann gewährleistet, wenn die vereinbarten Zahlungsbedingungen eingehalten wurden. Ge- richtsstand für beide Parteien ist das Amtsgericht Bozen. - Page 16 INDICE Introduzione ..................17 Disimballaggio ................17 Verifica dotazione accessori ............18 Caratteristiche costruttive ............19 Caratteristiche tecniche ..............20 Montaggio ..................21 Fissaggio della centrale ...............21 Modifica entrata da destra a sinistra .........21 Fissaggio della centrale ...............22 Collegamento alla rete tubiera ..........23 Collegamento alla rete elettrica ..........23 Utilizzo dell’impianto ..............24 Utilizzo degli accessori ..............24 Manutenzione ................25...
- Page 17 L´apparecchio non è destinato a essere usato da persone ( bambini compresi) le cui capacità fisiche, sensoriali o mentali siano ridotte, oppure con mancanza di esperienza o di conoscenza, a meno che esse abbiano potuto beneficare, attraverso l´intermediazione di una persona responsabile della loro sicurezza, di una sorveglianza o di istruzioni riguardanti l´uso dell´apparecchio.
-
Page 18: Introduzione
1. Introduzione Complimenti per aver acquistato un aspiratore DISAN ad elevato contenuto tecnologico! Possedere un aspirapolvere centralizzato DISAN significa aspirare alla massima qualità nella vita domestica e familiare anche attraverso una casa igienicamente sana, confortevole e di rapida pulizia. La serie Matrix è compatta, con un design moderno e gradevole, pratica e potente. -
Page 19: Verifica Dotazione Accessori
2.1 Verifica dotatione accessori Eseguire l`inventario di quello che avete ricevuto: Una centrale aspirante Una staffa metallica per il fissaggio a parete della centrale Due manicotti in gomma per il collegamento alla rete tubiera di aspirazione Quattro fascette metalliche per il fissaggio dei manicotti Un sacchetto carta Un manuale d`installazione, uso e manutenzione Una dima di montaggio... -
Page 20: Caratteristiche Costruttive
3. Caratteristiche costrutive Matrix PT Motore d`aspirazione filtro HEPA Sacchetto carta Sportello frontale a clip magnetico... - Page 21 4. Dati tecnici Condizioni d’impiego indicative Matrix - PT Superficie fino a lunghezza massima tubazioni ca. 30 numero prese Stk. Dati tecnici: Potenza motore Stadi turbina Tensione di alimentazione Volt Grado di protezione IP55 Depressione max mbar Portata d’aria max m3/h Airwatts @ Ø32mm Filtro...
-
Page 22: Montaggio
5. Montaggio - ATTENZIONE - QUESTE OPERAZIONI DEVONO ESSERE ESEGUITE DA PERSONALE QUALIFICATO 5.1 Luogo d’installazione L’utilizzo di una centrale aspirante presuppone l’esistenza di una rete tubiera di aspirazione ese- guita da personale qualificato che ne ha gia valutato la collocazione migliore. Di seguito riporteremo le regole principali da seguire per una corretta installazione. -
Page 23: Fissaggio Della Centrale
5.3 Fissaggio della centrale Nell’imballaggio si trova anche una dima¸ per facilitarne il montaggio a muro. Per il fissaggio della centrale aspirante alla parete si utilizza l’apposito supporto in acciaio compreso nella confezione. 1. La dima viene posizionata dove si prevede la centrale, facendola aderire sulla parete. -
Page 24: Collegamento Alla Rete Tubiera
Optional (cod. ER270) 5.4 Collegamento alla rete tubiera 1. Utilizzando il manicotto collegare la centrale al tubo di aspirazione 2. Utilizzando il manicotto collegare la centrale al tubo di scarico dell`aria 3. incollare il silenziatore sul tubo di scarico 5.5 Collegamento elettrico Prima di effettuare il collegamento elettrico verificare che il voltaggio di alimentazione corri- sponda a quello richiesta dalla centrale aspirante (vedi targhetta di identificazione) -
Page 25: Manutenzione
6. UTILIZZAZIONE Le caratteristiche di costruzione sono tali da ridurre al massimo l’emissione di rumore ed ab- battere la loro maggiore fonte costituita dal motore. Durante l’aspirazione vanno osservate le seguenti prescrizioni di sicurezza: Non esporre l’apparecchio all’uso dei bambini senza sorveglianza; Non avvicinare gli accessori d’aspirazione agli occhi o alle orecchie, ne introdurvi mani;... -
Page 26: Prescrizioni Di Sicurezza
7.1 Prescrizioni di sicurezza: - Se si teme un difetto o se le cause di malfunzionamento non sono risolvibili consultando la tabella “ricerca guasti” rivolgersi al rivenditore o installatore autorizzato. - Qualsiasi intervento va eseguito esclusivamente a macchina ferma e scollegata dall’ali- mentazione elettrica - Si consiglia un controllo periodico del filtro HEPA ed una revisione generale dell´apparecchio ogni 4/5 anni (sistema in generale e cavi) -
Page 27: Ricerca Dei Guasti
8. Ricerca guasti (Tab. pag.27) 1. Anomalia sull`aspirazione. Se l`aspirazione alla presa è debole, verificare lo stato di riempi- mento del sacchetto di carta e procedere alla sua sostituzione, e verificare la condizione del filtro HEPA. 2. Intasamento del tubo flessibile. Se l`aspirazione alla presa è buona significa che l`intasamento è... - Page 28 Fischio presa aspirante Mancanza di aspiranzione Scarsa aspirazione Motore non si spegne Motore si spegne...
-
Page 29: Garanzia
Tecnico DISAN. Il produttore si riserva di stabilire i casi in cui i pezzi difettosi ricadono nelle condizioni di sostituzione in garanzia. Le spese di montaggio e smontaggio e quelle di trasporto dei pezzi difettosi, sono a carico dell’acquirente. - Page 30 SUMMARY Introduction ................... 31 Unpacking ..................31 Control of accessories ..............32 Construction features ..............33 Technical data ................34 Installation ..................35 Place of installation ..............35 Inlet reversibility ................35 Fixing of central unit ..............36 Connection to pipe network ............37 Electrical connection ..............37 Use of central unit ................38 Use of accessories .................38...
- Page 31 The unit is not suitable to be used by people (included children) affected by physical or sensorial or mental weakness, as well as by people with a lack of experience or knowledge, unless they could benefit by an intermediate subject responsible for their security of a supervision or with proper instructions about the correct use of this unit.
-
Page 32: Introduction
1. Introduction Congratulations for purchasing a DISAN central vacuum unit of Matrix range. A combination of technology, simplicity and well-being. The Matrix range is ideal: compact, practical and really powerful. 2. Unpacking Follow the instruction printed on the cardboard box to move the central unit to the location selected for installation. -
Page 33: Control Of Accessories
2.1 Control of the accessories Check inside the box that all accessories are present: Central unit Metal fixing plate Two rubber muffs Four clamps for rubber muffs Paper bag User’s guide and Guarantee coupon Installation template 2 Screws and 2 Dowels Every central unit manufactured and packaged in our facility is standing an operational test and certified by every operation. -
Page 34: Construction Features
3. Construction scheme Matrix PT Motor HEPA Filter Disposable bag ATTENTION! Cover with quick fix Open the disposable bag completely! -
Page 35: Technical Data
4. Technical data : Field of application Matrix - PT area up to max. tube length ca. 30 max. inlet valves Stk. TECHNICAL FEATURES: Power Motor stage Inlet power supply Volt IPX Protection degree IP55 Max Vacuum mbar Max air volume m3/h Airwatt @ ø... -
Page 36: Installation
5. Installation 5.1 Place of installation The installation of central unit is following to the layout of the piping set by an appointed installer. Considering the construction’s features, the protection class IP55 and the moderate noise level, the Matrix units can be installed even outdoor. The minimal room for installation chamber is 70 x 60 cm (lxh) 5.2 Inlet reversibility... -
Page 37: Fixing Of Central Unit
5.3 Fixing the central unit Inside the packaging you will find the special installation template to easy the position and fixing, as well as the installation wall plate. 1. The template should be fixed on the wall where the central unit should be installed. -
Page 38: Connection To Pipe Network
Optional (cod. ER270) 5.4 Connection to pipe network Connect with the muff and clamps included the middle side inlet in with piping network Connect with the muff and clamps included the outlet with the exhaust line. The silencer (optional) can be connected near the exhaust grid. -
Page 39: Use Of Central Unit
Pay attention to the ceasing of the cleaner; Due to the vacuum pressure in the tubing and in the motor, the system remains active for a couple of second after switching it off; Disan takes no responsibility for any harm or damage done due to misuse of the central unit. -
Page 40: Maintenance
No maintenance or repair work should be carried out on the central unit unless it is discon- nected from the main power supply. Disan recommend a general check of the electric motor, bearings, cables every 4/5 years. 7.2 Ordinary maintenance. -
Page 41: Troubleshooting
7. Motor does not turn off. If the motor does not turn off after use, ther is probably a short circuit in the control line. Contact the Disan customer service. 8. Simultaneous use of several inlet valves. the Matrix range is conceived to be used by a... - Page 42 whistling inlet valves Absence of suction power Weak suction power The motor does not switch off The motor turns off...
-
Page 43: Guarantee
The guarantee issued by Disan will be valid if the coupon is received by the manufacturer or installer no more than 30 days after the purchase date. Replacement parts under guarantee will not be issued if the payment terms were observed by the purchaser. - Page 44 ERSATZTEILE - PEZZI DI RICAMBIO - SPAREPARTS Papiertüte Sacchetto di carta ER602 paper bag HEPA-Filter Filtro HEPA ER650 HEPA-FIlter Steuermodul Scheda elettronica ER905 printed cicuit board Saugmotor Motore d’aspirazione ER790 Motor ZUBEHÖR - ACCESSORI - ACCESSORIES cod.: GE101 Metallgehäuse zur Aussenwandmontage, Box murale in metallo, Metal enclosure 7 cm...
- Page 45 ZUBEHÖR - ACCESSORI - ACCESSORIES Zubehörablagerkorb Cestello SZ322 Basket Saugschlauch 7,5 m/* 9 m SZN228 Tubo flessibile 7,5 m/* da 9 m /*SZN230 Flexible hose 7,5 m/* 9 m Saugschlauch 7,5 m mit EIN/AUS/* 9 m SZN226 Tubo flessibile 7,5 m. con ON/OFF/* da 9 m /*SZN231 Flexible hose 7,5 m with ON/OFF/* 9 m Verlängerung 2 m...
- Page 46 ZUBEHÖR - ACCESSORI - ACCESSORIES Fugendüse Lancia piatta SZN342 Crevice tool Möbelbürste Spazzola per mobili SZN334 Round dusting brush Polsterdüse Spazzola per poltrone SZN340 Upholstery tool Hartbodenbürste Spazzola per pavimenti SZN345 Floor tool Kleiderbürste Spazzola per abiti SZN331 Tool for cloths Heizkörperbürste Spazzola per radiatori SZN337...
- Page 48 zu frankieren da affrancare to stamp...
Need help?
Do you have a question about the Matrix Series and is the answer not in the manual?
Questions and answers