Advertisement
Quick Links
PLEASE READ INSTRUCTIONS COMPLETELY BEFORE INSTALLING THIS MOUNT KIT
ASSEMBLY (if necessary)
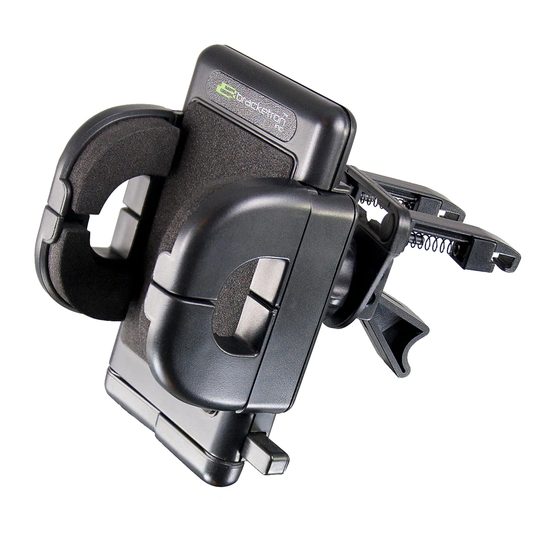
Main Body
Stabilizer
Bar
VENT MOUNT INSTALLATION
OPTION 1 Vent Mount
OPTION 1 Vent Mount
OPTION 2 Vent mount
OPTION 2 Vent mount
install:Align the front of
install:
install
install: : Pull back on the
each spring clip on the
spring slide to fully
edge of the louver.
retract the spring on the
Push the vent mount into
Spring Vent Clip. Insert
the vent at an upward angle
the Spring Vent Clip into
until the front hooks of the
the vent and hook it
spring clips clears the rear
around the back side of
edge of the louver.Lower
the louver. Release the
the hooked ends over the
slide to secure to the
rear edge of the louver and
louver. Repeat with the
allow the springs clips to
second vent clip and then
tighten - attaching itself to
attach the main body as
the vent.Rest the stabilizer
shown in ASSEMBLY. Rest
bar on the lip of the dash to
the stabilizer bar on the
prevent the vent from
lip of the dash to prevent
sagging.
the vent from sagging.
DO NOT RETURN PRODUCT TO THE RETAILER
IF YOU NEED ASSISTANCE OR REPLACEMENT PARTS
CALL US TOLL FREE: 1-866-237-4443
HOURS MON-FRI 9AM-5PM(CT)
PHV-200-BL
IMPORTANT NOTE
Insert the round end of the
spring vent clip into the hole in
the middle of the horizontal
gap in the Main Body. Slide the
Spring Vent Clip to one side
and repeat with the other Clip
on the other side. Insert the
Stabilizer bar into either of the
2 hole sets on the back of the
Main Body. (The size of your
air vents will determine which
set to use.)
Note: If you need to remove the
Note: If you need to remove the
spring vent clips, continue to the
spring vent clips, continue to the
next page for spring vent clip
next page for spring vent clip
removal instructions.
removal instructions.
IMPORTANT!
Limitation on Warranty and Claims. SELLER WARRANTS THAT THE GOODS SOLD AND DELIVERED BY THE SELLER TO
THE BUYER SHALL BE FREE FROM DEFECTS IN WORKMANSHIP AND MATERIAL UNDER NORMAL USE AND SERVICE
FOR A PERIOD OF ONE (1) YEAR FROM THE DATE OF DELIVERY. THIS WARRANTY IS EXPRESSLY IN LIEU OF ALL
OTHER WARRANTIES, EXPRESS OR IMPLIED, WHETHER STATUTORY OR OTHERWISE, INCLUDING ANY IMPLIED
WARRANTY OF MERCHANTABILITY OR FITNESS FOR A PARTICULAR PURPOSE. Sellerʼs liability for breach of
warranty shall arise only upon the return of the defective parts at the buyerʼs expense after notice to the seller of
claimed breach and shall be limited to furnishing a like quantity of such goods free from such defects or, a the
sellerʼs option to refund the purchase price. Notice to the seller of claimed defects discoverable by inspection
must be given within ten (10) days after receipt of shipment. In no event shall the seller be liable to the buyer for
indirect, incidental, collateral or consequential damages of any kind. The buyer indemnifies the seller, its succes-
sors and assigns from and against any and all losses, damages and expenses (including reasonable attorneyʼs
fees) which the seller may sustain or incur as a result of any claim of negligence, breach of warranty or strict
liability in tort in connection with the use of the goods furnished hereunder, except such as may be wholly caused
by the negligence of the seller.
MOUNTING Grip-It
OPTION 1: VENT MOUNT
OPTION 1: VENT MOUNT
Slide the T-notch from the Vent
Mount into the hole in the back
of the Grip-It. Slide the Grip-It
down securing Vent Mount to
the Grip-It
OPTION 2: ADHESIVE MOUNT
OPTION 2: ADHESIVE MOUNT
Find the flattest spot on your
dash and clean it with the
supplied Alcohol Prep Pad and
let dry. Remove one side of the
adhesive backing and apply the
adhesive pad to the back of the
Grip-It holder over the T-notch
hole. Remove the remaining
backing from the adhesive and
press the Grip-It firmly to the
cleaned area of the dash.
Note:
Note: The adhesive works best
with all surfaces at room
temperature. You may yield
better results warming the
mounting surface and the
adhesive with a blow dryer.
OPTION 3: T-NOTCH PLATE
OPTION 3: T-NOTCH PLATE
Attach the T-Notch Plate to the
Custom Vehicle Mount (sold
separately) or Multi-Vehicle
Mount (sold separately) with the
supplied hardware. Insert the
T-Notch from the T-Notch plate
into the back of the Grip-It
holder. Slide the Grip-It holder
down securing the T-Notch
fastener.
Visit http://www.bracketron.com
Visit http://www.bracketron.com
for available Custom Vehicle and
for available Custom Vehicle and
Multi-Vehicle Mounts.
Multi-Vehicle Mounts.
PAGE 1 of 2
LIMITED WARRANTY
Advertisement

Subscribe to Our Youtube Channel
Related Manuals for Bracketron PHV-200-BL

Summary of Contents for Bracketron PHV-200-BL
- Page 1 MOUNTING Grip-It PHV-200-BL OPTION 1: VENT MOUNT OPTION 1: VENT MOUNT Slide the T-notch from the Vent Mount into the hole in the back of the Grip-It. Slide the Grip-It down securing Vent Mount to the Grip-It IMPORTANT NOTE PLEASE READ INSTRUCTIONS COMPLETELY BEFORE INSTALLING THIS MOUNT KIT...
- Page 2 Visit http://bracketron.com/replacement-springclips.php http://bracketron.com/replacement-springclips.php for broken or missing spring clips Expand the Grip-It arms using the side button. Insert your PAGE 2 OF 2 device and squeeze the arms back in to secure the device.
Need help?
Do you have a question about the PHV-200-BL and is the answer not in the manual?
Questions and answers