Table of Contents
Advertisement
Advertisement
Table of Contents

Related Manuals for Antelope Axino Synergy Core

Summary of Contents for Antelope Axino Synergy Core
-
Page 2: Table Of Contents
AuraVerb (send effect) ........................28 Mixer section ............................33 USING STREAMING AND VIDEO CALL APPLICATIONS ............37 RECORDING WITH THE AXINO SYNERGY CORE ..............39 CUSTOMER SUPPORT INFORMATION .................. 42 MY ANTELOPE AUDIO PRODUCT ISN’T WORKING.............. 44 LIMITED WARRANTY POLICY ....................46 SAFETY NOTES ........................53... -
Page 3: Before You Begin
Getting comfortable the Windows and macOS Control Panel application - the Mixer section, in particular, is crucial to operating the Axino Synergy Core. Additional guidance is provided in the chapters Using streaming and video call applications Recording with the Axino Synergy Core. -
Page 4: System Requirements
Windows 10 (64-bit) with latest Microsoft Updates • Available storage space (Minimum 4 GB) • Memory (RAM): 4 GB minimum (8 GB or more recommended) • CPU: Intel Core i3™ or AMD FX (Higher recommended) Antelope Audio Axino Synergy Core User Manual Page 4... -
Page 5: Online Activation Instructions
1. Connect the Axino Synergy Core to a Windows or macOS computer. 2. Open your internet browser and navigate to https://en.antelopeaudio.com/login/ 3. Login to the Antelope Audio user area with your e-mail and password. If you don't have an account, visit https://en.antelopeaudio.com/sign-up/ to create one. - Page 6 8. Click on 'Activate device'. Note: If the Axino Synergy Core does not appear in the 'Devices' tab, click on 'Not seeing your device?' and follow the on-screen instructions. 8. In the Antelope Management Wizard window, choose 'Activate device or assign features' and click 'Continue'.
-
Page 7: Setting Up
Please proceed with the 'Setting up' chapter below to configure the Axino Synergy Core for use with your Windows or macOS computer. Note: The Axino Synergy Core will be listed in the 'My Hardware' page of the Antelope Audio user area with its serial number and activation date. -
Page 8: Configuring For Macos (10.14 And Later)
Windows 10 Optimization Configuring for macOS (10.14 and later) The security settings in macOS (10.14 and later) may result in no input signal reaching your DAW, despite having everything set up correctly. Antelope Audio Axino Synergy Core User Manual Page 8... - Page 9 These steps apply when you are using the Axino Synergy Core in a DAW for the first time: 1. Launch your DAW and choose Axino Synergy Core as the input device. The following dialog box will appear (if using Ableton Live 10 Suite, for example): 2.Click 'OK' and your DAW should function normally.
- Page 10 Note: You may have to click the padlock symbol in the bottom left corner and enter your password to make changes. Antelope Audio Axino Synergy Core User Manual Page 10...
-
Page 11: Antelope Launcher
Audio products. The application is organized into the following tabs: ‘Devices’ tab All Antelope Audio devices currently connected to your computer are listed in this section. The application functionality is identical for each Antelope device. The following functionality is available in the 'Devices' tab: Device Click the black field to enter a name for your device. - Page 12 Note: Make sure to allow any operating system prompts, such as Windows Firewall or macOS admin user access so the application can function correctly. Manage Device Click to launch the Antelope Management Wizard. Use it to register/de-register devices and assign/un-assign features (such as AFX2DAW, Synergy Core FX, and so on). Device Info...
- Page 13 If a device is missing from the list, the most common reason is driver conflict. The Antelope Launcher makes it easy to re-install drivers and troubleshoot. Click 'Not seeing your device?' to launch the 'Add Drivers' wizard. Choose your device and connection type from the drop-down menus, disconnect the device from your computer, and click ‘Next’...
-
Page 14: Plug-Ins' Tab
'Plug-ins’ tab This section lets you install, update, and uninstall Antelope Audio software such as native mic emulations and AFX2DAW. By default, the Bundle Version drop-down menus show the most recent software bundle available for each product. Clicking the menu shows the currently installed software bundle version and lets you roll-back to an older build. -
Page 15: System' Tab
Restart the Manager Server and enable/disable remote connections from other • computers on your network. Install the Antelope Audio Thunderbolt™ driver. Choose a Bundle Version from the • drop-down menu, click the check mark, then click the ‘Update’ button. Antelope Audio Axino Synergy Core User Manual... - Page 16 Login button Click and enter your Antelope Audio username and password, then click ‘Login’. If you don't have an Antelope Audio account, click ‘Register’ and follow the on-screen instructions. Settings button Click to open the Settings window. Antelope Audio Axino Synergy Core User Manual...
- Page 17 Here, you can do the following: Click ‘View Logs’ to view, save, and send activity logs to Antelope Audio Customer • Support. Click 'Advanced' to enable or disable automatic updates for each of the following: • Device firmware USB Driver...
-
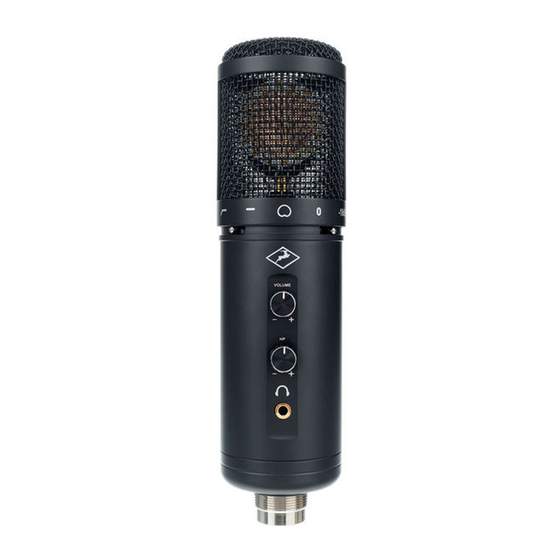
Page 18: Controls Explained
CONTROLS EXPLAINED 1. Low cut switch Toggles the Axino Synergy Core's built-in low frequency filter. Use it if you hear undesirable low-frequency buildup (i.e. boom) in your voice or instrument. You can also try increasing the distance between the microphone and the sound source to reduce the proximity effect. - Page 19 Turn clockwise to increase the microphone's input level. Turn counter-clockwise to reduce. Ideally, the signal coming from your Axino Synergy Core should consistently measure at around -15 to -12dB on your recording software's peak meters. 4. Headphone volume knob Turn clockwise to increase the volume in your headphones. Turn counter-clockwise to reduce the volume.
-
Page 20: Control Panel Application
CONTROL PANEL APPLICATION Welcome to the Axino Synergy Core Windows/macOS Control Panel application! The software provides straightforward and comprehensive access to crucial aspects of the microphone's functionality, such as settings, mic emulations, audio mixing, effects chains, metering, and presets. We encourage you to get comfortable with the application to make the most of your new recording system. -
Page 21: Layout
Session files (*.as) from the ‘Save As’ button. When your Session is already saved in *.as file format, click the 'Save' button to save any changes you have made to it. Antelope Audio Axino Synergy Core User Manual Page 21... - Page 22 Clicking the 'Set Defaults' button followed by the 'Load' button will return the Control Panel application to its default state. 3. Buttons in the following order – Settings, Minimize, Close. Antelope Audio Axino Synergy Core User Manual Page 22...
- Page 23 When muted, no microphone input will reach your headphones and computer. USB 3/4 REC Click the drop-down menu to choose what will be recorded from Axino Synergy Core Inputs 3 and 4 in your recording software. The following choices are available: •...
- Page 24 RAW MIC - Raw microphone input. This way, you can record mic emulation audio (with or without Synergy Core FX applied) from Axino Synergy Core inputs 1 and 2, and raw (unprocessed) microphone audio from inputs 3 and 4 in your DAW simultaneously.
- Page 25 2. Input level knob – click and drag to adjust the input signal level. Ideally, the input signal strength meter above should consistently hover between -15dB to -12dB during capture. 3. Mute button - click to mute or enable the microphone input. Antelope Audio Axino Synergy Core User Manual Page 25...
- Page 26 Click the drop-down menu to choose among 18 emulations of classic studio microphones. They are applied to the Axino Synergy Core's input signal in real-time. You can monitor, stream and record with them. Choose the 'AXINO' model to bypass the mic emulations.
-
Page 27: Synergy Core Fx Rack
Hold Ctrl (Windows) or Command (Mac) and click the 'DEL ALL' button to clear the FX Rack. • Click the drop-down menu below the audio input label to choose factory presets. Antelope Audio Axino Synergy Core User Manual Page 27... -
Page 28: Auraverb (Send Effect)
• Hold Shift and use the mouse scroll wheel to scroll up and down through the FX rack. The Axino Synergy Core comes with 10 Synergy Core FX included. Additional effects can be purchased from the Antelope Audio online software store. - Page 29 The following parameters are available: On/Bypass switch Click and drag to toggle the reverb effect on and off. Pan knob Click and drag to increase or decrease the reverb's stereo spread. Antelope Audio Axino Synergy Core User Manual Page 29...
- Page 30 Input level meter Visualizes the input signal reaching the reverb effect. Preset knob Click and drag to choose from 7 preset reverb spaces. Antelope Audio Axino Synergy Core User Manual Page 30...
- Page 31 Output level meter Visualizes the reverb effect's output signal level. Reverb level knob Click and drag to adjust the reverb's output signal level. Mute buttons Antelope Audio Axino Synergy Core User Manual Page 31...
- Page 32 Click the rec button (bottom) to enable or disable the reverb effect in the mixer output. Mixer button Click to show or hide the Control Panel's mixer section. Understanding its part in the workflow process is very important. Antelope Audio Axino Synergy Core User Manual Page 32...
-
Page 33: Mixer Section
2-channel stereo and can be recorded from Inputs 1 and 2 in your DAW. The diagram below provides a visual overview of the signal flow within the Control Panel application's Mixer section: Antelope Audio Axino Synergy Core User Manual Page 33... - Page 34 The mixer section contains the following: Reverb Send knobs Available for channels AXINO and USB 1/2. Click and drag to adjust the amount of reverb added to the audio from each channel. FX Areas Antelope Audio Axino Synergy Core User Manual Page 34...
- Page 35 The buttons on the bottom row let you mute and un-mute the three mix channels in the main Stereo mix. This way, you can exclude any of the three channels from being recorded. Antelope Audio Axino Synergy Core User Manual Page 35...
- Page 36 1. Peak meter – visualizes the output volume in dB for the signal in your headphones. 2. HP Volume knob – click and drag to adjust headphone volume. 3. Mute button – click to mute or un-mute the Axino Synergy Core's headphone output. Antelope Audio Axino Synergy Core User Manual...
-
Page 37: Using Streaming And Video Call Applications
DAW or a media player. Have the following in mind when setting up your session: 1. Choose the Axino Synergy Core as the recording and playback device from your video call application (i.e. Zoom, Skype)'s settings. The input device should be Axino USB Driver Recording 1/2. - Page 38 Outputs 3 and 4. Use the virtual mixer to mix the audio sources and record or stream the mixer output from Inputs 1 and 2 in your DAW or streaming application. Antelope Audio Axino Synergy Core User Manual Page 38...
-
Page 39: Recording With The Axino Synergy Core
RECORDING WITH THE AXINO SYNERGY CORE This chapter explains the basics of using the Axino Synergy Core and your Windows or Mac computer to record audio. Important! When recording in your DAW, make sure to disable live monitoring for the tracks you are recording on to prevent feedback loops. - Page 40 • AFX USB 1/2 - System audio output with Synergy Core FX applied. • AFX USB 3/4 - Axino Synergy Core Inputs 3 and 4 outputs 3 and 4 with Synergy Core FX applied. This functionality lets you use the Axino Synergy Core as an external effects processor.
- Page 41 Route DAW tracks to Outputs 3 and 4 to take the audio into the Axino Synergy Core's effects engine. Apply Synergy Core FX onto Outputs 3 and 4 channel USB 3/4 from the virtual mixer in the Control Panel application.
-
Page 42: Customer Support Information
CUSTOMER SUPPORT INFORMATION Antelope Audio Customer Support can be reached by the following means: Online Visit support.antelopeaudio.com Phone We are there for you around the clock, 21 hours/day, Monday to Friday. North America +1-916-238-1643 01:00 a.m. – 10:00 p.m. (EST) International +44 19 2593 3423 06:00 a.m. - Page 43 Please contact our customer support team for such inquiries. • Knowledge Base in our Customer Support section is an often-overlooked source of troubleshooting information, answers to commonly asked questions and Antelope know-how. Antelope Audio Axino Synergy Core User Manual Page 43...
-
Page 44: My Antelope Audio Product Isn't Working
Please, don't attempt to send us your device without receiving a RMA number first, as the device will be returned and not serviced. How do I get an RMA number? The Antelope Audio Customer Support team is in charge of issuing RMA numbers. Visit support.antelopeaudio.com and get in touch. - Page 45 The shipping costs are covered by the owner of the product. Antelope Audio will not cover any local customs charges. We recommend using a courier service of your choice (e.g. DHL, UPS, FedEx). The package should be insured for its real value, marked as fragile and a tracking number should be provided.
-
Page 46: Limited Warranty Policy
Antelope Audio Limited Warranty or under their consumer law rights. All claims made under the Antelope Audio Limited Warranty will be governed by the terms set out in this warranty document. - Page 47 3) to refund the price paid. Should Antelope Audio decide to refund the price paid, it may deduct from the paid Product’s price any damages caused to the Product; where, within...
- Page 48 These warranty obligations are conditioned upon the hardware being returned to the original place of purchase, or another place as directed by Antelope Audio, with the original sales receipt attached. You will be required to pay shipping and handling charges for returning the product.
- Page 49 Antelope Audio or any of its authorized manufacturing partners; (ii) Products purchased from a person or entity which is not an authorized dealer or re-seller of Antelope Audio; (iii)Product sold “as is” or “with all faults”, to the extend permitted by local law.
- Page 50 Product. Returning Your Product In the event that you need to return your Antelope Audio products for repair or replacement, Antelope Audio will provide you with a Return Merchandise Authorization Number (RMA#) as well as return instructions.
- Page 51 (B2B) / Direct customers of Antelope Audio please email us at techsupport@antelopeaudio.com (ii) A valid proof of purchase is required for RMA processing (i.e. receipt, invoice, etc). Antelope Audio will provide you with the RMA number within 2 working days as of the claim submission date.
- Page 52 Republic of Bulgaria with UIN: 131052590, is doing business and is worldwide known. Elsewhere in this document where the trade name Antelope Audio is used shall refer to Elektrosfera ltd., with address of management: Tsarigradsko Shose Blvd., 7th km, Building of BIC IZOT, floor 6, Mladost region, Sofia, Bulgaria.
-
Page 53: Safety Notes
• To completely turn off the device, unplug the power cable first from the outlet and then from the rear panel of the unit. Antelope Audio Axino Synergy Core User Manual Page 53... - Page 54 Both occasional and continued exposure to high sound pressure levels can cause permanent ear damage via headphones and monitors. • The device is designed to operate in a temperate environment, with a correct Operating Temperature of 0-50° C, 32-122° F. Antelope Audio Axino Synergy Core User Manual Page 54...
-
Page 55: Technical Specifications
USB connector: USB Type-B (USB 2.0 compatible) • Headphone output: 1/8” (3.5 mm) stereo jack • Weight (mic body): 0.96 lbs (435 grams) • Dimensions (mic body): 1.9" x 2.2" x 7.4" (50mm х 56mm х 188mm) Antelope Audio Axino Synergy Core User Manual Page 55...
Need help?
Do you have a question about the Axino Synergy Core and is the answer not in the manual?
Questions and answers