
Summary of Contents for MAKSIWA LD.300
- Page 1 LD.300 Disc Sander 12” (300 mm) INSTRUCTION MANUAL Attention: Read this manual before using the machine.
- Page 2 Maksiwa’s highest standards of technology and quality. Your Disc Sander allows you to have the highest productivity in woodworking. Besides a great finish, the LD.300 ensures that your work pieces come always precise. It should be noted that to use this machine with maximum efficiency, you should read and understand the instructions in this manual.
-
Page 3: Table Of Contents
Index 1. Safey Regulations................................04 1.1 Safety Instructions for All Tools........................04 1.2 Additional Safety Rules for Sanders.........................05 1.3 Electrical Connection............................06 2. Description..................................07 2.1.Specifications...............................07 2.2 Components................................07 3. Installation..................................08 3.1 Unpacking...................................08 3.2 Connection Test.................................10 4. Settings....................................10 4.1 Table Angle Adjustment............................10 4.2 Angle Guide Setting..............................11 5. -
Page 4: Safey Regulations
1 Safety Regulations Important information you should know: Only work with suitable sandpaper. Inappropriate sandpaper does not result in a good finish and overload the engine. ALWAYS USE PROPER PROTECTIVE EQUIPMENT WHEN OPERATING THIS EQUIPMENT. ATTENTION: When using power tools, always follow safety precautions to reduce the risk of fire, electric shock and personal injury, including the following. -
Page 5: Additional Safety Rules For Sanders
• Only use recommended accessories. Refer to the instruction manual to check the recommended accessories. Improper use of accessories can cause a risk of accident. • Never step on the tool. A serious accident can occur if the tool is tilted or if the tool is touched accidentally. -
Page 6: Electrical Connection
A 10% decrease in voltage or more will cause loss of power and overheating. All MAKSIWA equipment is tested at the factory. If this tool does not work, check the power supply. Check the compatibility between your outlet and the machine’s plug. Avoid making patches and... -
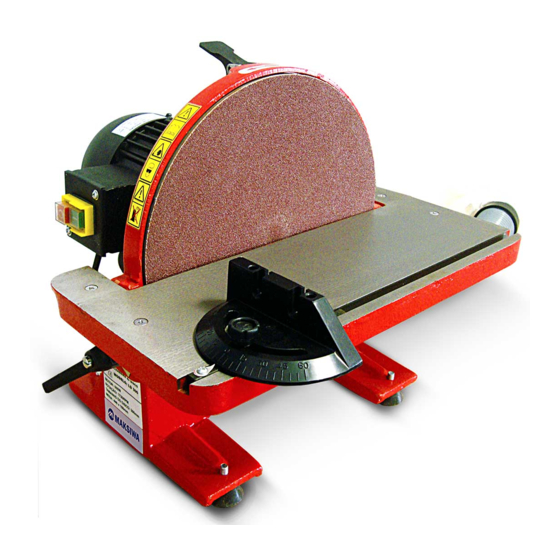
Page 7: Description
2 Description Place the machine on a smooth, flat surface. Check the figures and pay attention to the description of the parts to familiarize yourself with its different components. The next section will deal with the necessary adjustments for a good functioning of the machine, and will refer to the termination that goes along with the illustrations. -
Page 8: Installation
3.1 Unpacking Due to modern mass production techniques, it is unlikely that the LD.300 MAKSIWA sander is defective or that a part is missing. If you find something wrong, do not use the tool until the parts are replaced, or the fault is corrected. - Page 9 8. A dust collector can also be connected directly to the dust outlet. Simply connect a hose directly to the outlet nozzle as shown in the figure below. Consult the MAKSIWA Catalog to find products that fulfill this function. 8. A dust collector can also be connected directly to the dust outlet.
-
Page 10: Connection Test
To test, follow these steps: Read the entire instruction manual first, so that you are familiar with all the controls and functions of the LD.300 MAKSIWA sander. 2. Connect the machine to the power source. 3. Turn the switch to the ON position. The sander should work smoothly, with little or no vibration. -
Page 11: Angle Guide Setting
Angle Guide. Follow the next figure. 5 Operations There are a series of operational guidelines for the MAKSIWA LD.300 sander that must be followed. These guidelines aim to increase the life of your equipment and offer safe and risk-free work for the operator. -
Page 12: Maintenance
14. When sanding long pieces, do not apply pressure to the entire surface along the piece. Apply pressure only to the area over the sandpaper, removing material. Consult the MAKSIWA catalog for information on other equipment to support long parts. -
Page 13: Lubrication
6.1 Table and Support Base • Cleaning the LD.300 sander is relatively easy with a vacuum cleaner to remove excess wood chips and sawdust, and dust with a dry cloth. If there is any resin, use a resin remover and a clean cloth to remove it. -
Page 14: Grinding Quality
7 Technical Assistance For your greater safety, maintenance and adjustments (including inspection and replacement) contact technical assistance recommended by MAKSIWA, which will always use genuine spare parts and accessories, reassembling your sander in the same way as the original. Before using an extension cord, check for loose or exposed wires, damaged insulation and defective... -
Page 15: Terms Of Warranty
8 Terms of Warranty MAKSIWA assures the owner that their equipment, identified by the Serial number issued on the Warranty Terms. The equipment under warranty, for two (2) years, is as followed: The warranty period begins on the date of the Warranty Terms below. - Page 16 For your safety, trust the repairs, maintenance and adjustments (including inspection and replacement) for technical assistance recommended by MAKSIWA, always use genuine spare parts and accessories, reassembling to its original machine the same way. MODEL: SERIAL NUMBER: DATE: LOT NUMBER: Imported by: Maksiwa International Inc.
Need help?
Do you have a question about the LD.300 and is the answer not in the manual?
Questions and answers