
Summary of Contents for ORANGE Pi 2
- Page 1 Orange Pi 2 User Manual Shenzhen Xunlong Software CO., Limited Orange Pi 2 User Manual <Version: V0.9 > www.orangepi.org www.xunlong.tv...
- Page 2 Who’s it for? Orange Pi 2 is for anyone who wants to start creating with technology – not just consuming it. It's a simple, fun, useful tool that you can use to start taking control of the world around you.
-
Page 3: Hardware Specification
Orange Pi 2 User Manual Shenzhen Xunlong Software CO., Limited Hardware specification H3 Quad-core Cortex-A7 H.265/HEVC 4K Mali400MP2 GPU @600MHz, Supports OpenGL ES 2.0 Memory (SDRAM) 1GB DDR3 (shared with GPU) Onboard Storage TF card (Max. 64GB) / MMC card slot... -
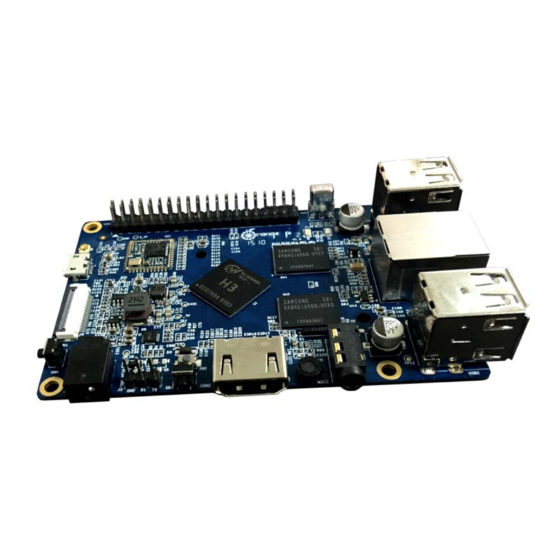
Page 4: Interface Definition
Power led & Status led IR input, UBOOT, POWER Supported OS Android, Ubuntu, Debian, Rasberry Pi Image Interface definition Product size 93mm × 60mm Weight Orange Pi™ is a trademark of the Shenzhen Xunlong Software CO., Limited Hardware Top view: www.orangepi.org www.xunlong.tv... -
Page 5: Bottom View
Orange Pi 2 User Manual Shenzhen Xunlong Software CO., Limited Bottom view: www.orangepi.org www.xunlong.tv... - Page 6 Orange Pi 2 User Manual Shenzhen Xunlong Software CO., Limited Interface: Use method By following this short quick start guide, you can use your Orange Pi 2 in just a few minutes. There are three steps to boot your Orange Pi 2. www.orangepi.org www.xunlong.tv...
- Page 7 Orange Pi 2 User Manual Shenzhen Xunlong Software CO., Limited Step 1: Get what you need To enjoy the use of your Orange Pi 2, you will need at least the accessories in the table below. Item Minimum recommended specification & notes •...
- Page 8 DC power adapter Step2: Prepare your TF card for the Orange Pi 2 In order to enjoy your Orange Pi 2, you will need to install an Operating System (OS) onto a TF card. Instructions below will teach you how to write an OS image to your TF card under Windows and Linux.
- Page 9 Orange Pi 2 User Manual Shenzhen Xunlong Software CO., Limited iv. Check the TF card you inserted matches the one selected by the tool. v. Click the “Format” button. 3. Download the OS image from the Downloads webpage. Website:http://www.orangepi.org/downloaded/download.html 4. Unzip the download file to get the OS image...
- Page 10 Orange Pi 2 User Manual Shenzhen Xunlong Software CO., Limited writing. Linux: 1. Insert your TF card into your computer. The size of TF should be larger than the OS image size, generally 4GB or greater. 2. Format the TF card.
- Page 11 Orange Pi 2 User Manual Shenzhen Xunlong Software CO., Limited How to Write an Android OS image to your TF card? Android OS image can not use the command under the Linux nor the Win32 Diskimager under Windows, you need to use PhoenixCard to make the TF card.
- Page 12 Orange Pi 2 User Manual Shenzhen Xunlong Software CO., Limited Successfully to format the TF card to normal, click the “OK” button. 4. Then burn the Android OS image to your TF card. Pay attention to those red tag options.
- Page 13 Orange Pi 2 User Manual Shenzhen Xunlong Software CO., Limited Click the “Burn” button. Burn Android OS image to TF card successfully. Click “Exit”. www.orangepi.org www.xunlong.tv...
- Page 14 Orange Pi 2 User Manual Shenzhen Xunlong Software CO., Limited Step3: Set up your Orange Pi 2 According to the set up diagram below, you can easily set up your Orange Pi Hardware connect sketch map www.orangepi.org www.xunlong.tv...
- Page 15 Orange Pi 2 User Manual Shenzhen Xunlong Software CO., Limited Hardware connect physical map-top view www.orangepi.org www.xunlong.tv...
- Page 16 Orange Pi 2 User Manual Shenzhen Xunlong Software CO., Limited Hardware connect physical map-bottom view 1. Insert the written-image TF card into the TF card slot on the left edge of the downside of the board. 2. On the bottom edge in the middle of the board is the HDMI Type A (Full sized) port.
- Page 17 If all is well ,so you can use orange pi 2 now. GPIO specification Orange Pi 2 40-pin GPIO Orange Pi 2 has a 40-pin GPIO header that matches that of the Model A and Model B Raspberry Pi. Following is the Orange Pi 2 GPIO Pinout: www.orangepi.org...
- Page 18 Orange Pi 2 User Manual Shenzhen Xunlong Software CO., Limited Orange_Pi-2(H3) CON3-P01 VCC-3V3 CON3-P02 VCC-5V CON3-P03 TWI0-SDA PA12 CON3-P04 VCC-5V CON3-P05 TWI0-SCK PA11 CON3-P06 CON3-P07 PWM1 CON3-P08 UART3_TX PA13 CON3-P09 CON3-P10 UART3_RX PA14 CON3-P11 UART2_RX CON3-P12 PD14 PD14 CON3-P13 UART2_TX...
- Page 19 The CSI Camera Connector is a 24-pin FPC connector which can connect external camera module with proper signal pin mappings. The pin definitions of the CSI interface are shown as below. This is marked on the Orange Pi 2 board as “CON1″. OrangePi 2-CSI CON1-P01...
- Page 20 Orange Pi 2 User Manual Shenzhen Xunlong Software CO., Limited CON1-P20 CSI-D3 CON1-P21 CSI-D1 CON1-P22 CSI-D2 CON1-P23 CON1-P24 AFVCC-CSI www.orangepi.org www.xunlong.tv...
Need help?
Do you have a question about the Pi 2 and is the answer not in the manual?
Questions and answers