Table of Contents
Advertisement
Quick Links
GANTOM JUNI DMX USER GUIDE
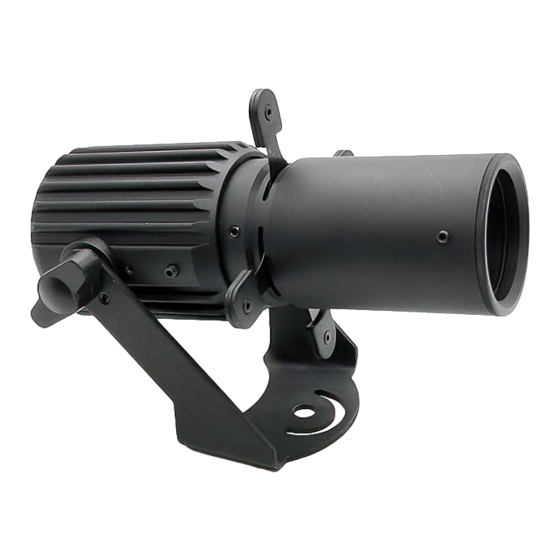
At less than 130mm (5 inches) in length, the Juni is the smallest framing projector on the market.
Gantom has responded to overwhelming demand from top lighting designers around the world to
produce a compact and versatile fixture that can disappear into the environment. Gantom's Juni
features 25-40 degree optics with framing shutters in a DMX fixture the size of a salt shaker! With it's
hyper-efficient optical and cooling systems, the Juni delivers crisp and clean illumination from a fixture
less than half the size of its competition.
The Juni has a black anodized aluminum finish, with silver available by custom quotation. It is available
in a non-dimming version or a DMX controlled version. There are 3 available mounting options: screw-
mount yoke, recessed canopy, and track mounting.
Features
o Ultra-compact design < 130mm (5 inches) long
o Class 2, low-voltage 12-24VDC input (DO NOT HOT PLUG)
o 25-40° beam angle with adjustable zoom and focus lenses
o 3000K 90CRI LED source
o Tri-plane shutter system
o Accepts 19mm steel or glass gobo (up to 2mm thick)
o Non-dimming and DMX dimming options
o Machined aluminum body in silver or black finishes
o Track adapter and canopy mount available
Available Models:
Item Number
GP285
Gantom Juni DMX - Cool White - Black Finish - Pro Cable Connector
Gantom Juni DMX – Warm White - Black Finish - Pro Cable Connector
GP286
Gantom Juni DMX - Cool White - Black Finish – Eutrac Low Voltage Adapter
TL285
Gantom Juni DMX – Warm White - Black Finish - Eutrac Low Voltage Adapter
TL286
Item Description
Gantom Juni DMX User Guide
Version 1.0 – 3/25/2021
Advertisement
Table of Contents

Subscribe to Our Youtube Channel
Related Manuals for Gantom JUNI DMX GP285

Summary of Contents for Gantom JUNI DMX GP285
- Page 1 At less than 130mm (5 inches) in length, the Juni is the smallest framing projector on the market. Gantom has responded to overwhelming demand from top lighting designers around the world to produce a compact and versatile fixture that can disappear into the environment. Gantom's Juni...
- Page 2 POWER AND WIRING REQUIREMENTS The Gantom Juni DMX has a maximum wattage of 11W and an operating voltage range of 12-24VDC. The Gantom Juni DMX includes a single locking connector which combines both power and data into one compact cable. This connector is compatible with our Gantom Pro Cable System, including our G8 Power/Data Distribution Box.
-
Page 3: Mounting Instructions
426-8661). MOUNTING INSTRUCTIONS The Gantom Juni micro framing projector comes with an aluminum mounting yoke pre-installed. It is meant to be used with ¼” size hardware, but please note that mounting hardware is not included with the fixture. The yoke has a center hole (1) and a curved slot (2). Install a screw in the center hole first, then loosely screw down a second screw through the curved slot. - Page 4 Once the fixture has been mounted, you can complete the aiming of the fixture. The fixture is adjustable in the following ways: When you have the light pointed in the correct orientation, tighten the locking screws in the indicated locations. Gantom Juni DMX User Guide Version 1.0 – 3/25/2021...
-
Page 5: Focal Adjustment
When you have finished focusing the lenses, replace the lens tube cover and tighten the set screws back down to hold the lens tube in place. Gantom Juni DMX User Guide Version 1.0 – 3/25/2021... -
Page 6: Gobo Installation
GOBO INSTALLATION A gobo can be a great way to add texture and dimension to your application. The Gantom Juni DMX micro framing projector accepts glass and stainless steel gobos with an outer diameter of 19mm. The maximum image size for patterns is 15mm and the maximum image size for text is 10mm. Both stainless steel and full color glass gobos are available to fit the Gantom Juni DMX. - Page 7 Next, screw the gobo retention ring back into the hole until it is firmly seated and holding the gobo in place. Once the gobo is in place within the retainer system, reattach the lens tube, focus your optics to your desired effect, then reattach the lens tube cover. Gantom Juni DMX User Guide Version 1.0 – 3/25/2021...
- Page 8 SHUTTER ADJUSTMENT AND LOCKING The Gantom Juni DMX features 4 independently adjustable framing shutters which are perfect for creating rectangles, triangle, trapezoids, slits, or irregular shapes for selective lighting. This gives you the ability to add a crisp angular edge to your beam. This feature is perfect for highlighting a table or piece of art with minimal light spill.
-
Page 9: Installing Accessories
INSTALLING ACCESSORIES The Gantom Juni DMX has a retention ring on the front for holding a polycarbonate lens shield, an angled cutaway snoot, or a top hat accessory for shielding the light source from view is available for the Gantom Juni (FA38 – fixture accessory pack). - Page 10 Apple device or Google Play for an Android device First, open the DMX Programmer app by Gantom. The app will open to the screen you see here. From this screen, select Generic Console. (note: a Gantom Juni DMX menu option...
-
Page 11: Control Screen
Console Sliders – These sliders allow you to set intensity levels for each channel. Only the CH1 slider will work with the Gantom Juni DMX o Store as Default – hitting this will save the current color and brightness to be the default state for the light when it turns on. - Page 12 DMX address through a sequence of flashes. By default, the DMX starting address will be 1. The Gantom Juni DMX will flash several times when it is powered on to indicate its starting address. If the Gantom Juni DMX is assigned to address 245 it will report its address by flashing 2 times, pausing briefly, then flashing 4 times, pausing briefly, then flashing 5 times.
-
Page 13: Stand-Alone Operation
STANDALONE OPERATION Some applications may not require live DMX control. In order to configure your Gantom Juni DMX for standalone operation, all you must do is use the CH1 slider on the Generic Console control screen to set the desired intensity level. Once the light has the desired output, tap the “STORE AS DEFAULT” button at the lower left portion of the screen to save this setting directly into the light fixture. -
Page 14: Dmx Channel Mapping
DMX light fixture. However, if you run into a wiring issue, a bug in the software, or just a light that doesn’t seem to want to cooperate, we at Gantom are ready to help you out! Just send an email to Support@GANTOM.com...
Need help?
Do you have a question about the JUNI DMX GP285 and is the answer not in the manual?
Questions and answers