Table of Contents
Advertisement
Quick Links
Coyote, highly specialized in research & development, offers
integrate molecular diagnostic solutions by providing devices
from sample pre to gene amplification / detection.
Coyote Bioscience Co., Ltd.
Tel: 010-64844237
Fax: 010-64844237-8000
Add: Room A211/213, 2/F, Shangdixinxilu#12 Haidian District, Beijing, China. 100085
Mini8 Plus
Real-Time PCR System
Version:EN / 20160413
www.coyotebio.com
Advertisement
Table of Contents

Summary of Contents for Coyote Mini8 Plus
- Page 1 Mini8 Plus Real-Time PCR System Version:EN / 20160413 Coyote, highly specialized in research & development, offers integrate molecular diagnostic solutions by providing devices from sample pre to gene amplification / detection. Coyote Bioscience Co., Ltd. Tel: 010-64844237 Fax: 010-64844237-8000 Add: Room A211/213, 2/F, Shangdixinxilu#12 Haidian District, Beijing, China. 100085...
-
Page 2: Table Of Contents
Contents Chapter 1 Overview Introduction Chapter 2 Setup Unpack the Mini8 Plus System Place Mini8 Plus on the Bench Connect Mini8 Plus Install the Mini8 Plus Software Turn on the Mini8 Plus System Chapter 3 Workflow Mini8 Plus System Workflow... -
Page 3: Chapter 1 Overview
Connect the other connector to the port on the side panel of the Mini8 Registered Address: 509, 510, 5th floor, Chuangyezhonglu#36, Haidian, Plus. Beijing 2. Connect the Mini8 Plus power cable to the DC power inlet on the side ZIP: 100085 panel, and then to the wall outlet. TEL: 010-64844237 3. -
Page 4: Install The Mini8 Plus Software
USB cable Click Next Install Mini8 Plus software ·Connect Mini8 Plus to computer and switch on the device; ·Load CD or open the software file, click setup program. 1) Before installation the Prerequisites Wizard must be started running to set up the environment as follow:... - Page 5 Click Next Click Install Click Next ·The System will automatically detect the operating environment, and check the installation options, If a project has been installed, you can manually cancel. ·Click next to start the installation. Note: During the installation, the system may be requested to restart, you Click Finish can choose to restart later.
- Page 6 2) The software installation will be boot up once the environment detection completed. Click Install to start the installation Click Next The Mini8 Plus software is installing Select installation path and click Next to continue...
-
Page 7: Turn On The Mini8 Plus System
Workflow Mini8 Plus System Workflow 1. Prepare the sample strip, load it into the Mini8 Plus, and close the lid. 2. Double-click the Mini8 Plus icon on desktop to open the software. 3. Define and name the experiment, save the experiment. -
Page 8: Define A New Experiment
PCR amplification product in the status you want. (221°F) when the device is working . Define a New 1. Double-click the Mini8 Plus icon on the desktop to open the software. Experiment 2) Fill in your Email, when the running is over, the result report (Excel file) will be sent to your email. -
Page 9: Set Up The Thermal Profile
Set up the Thermal Profile Define the Plate Layout Define Sample Name Define Sample Type Define Fluorophore CH1(None/SYBR/FAM) Define Fluorophore CH2(None/Texas Red/ROX) Define the concentration unit for samples Click to choose the sample(1-8) 1. Click , the Setup window opens, with the Thermal Protocol tab visible. -
Page 10: Monitor Run
The Real time PCR curve will be showed during the amplification. Channel switch 5. Set up fluorophore CH1(None/SYBR/FAM) 6. Set up fluorophore CH2(None/Texas Red/ROX)* Warning 7. Click to save plate layout Do not open the lid while a run is in progress. It may allow extraneous 8. -
Page 11: Data Analysis
Data Analysis Click to show the saved data. Melt Peak PCR amplification curve CH1 FAM Melt Curve PCR amplification curve CH2 ROX Thermal Profile... -
Page 12: Chapter 4 System Information
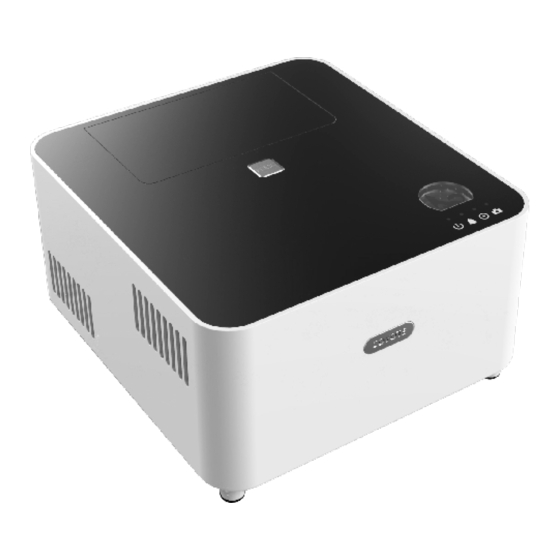
System Lights Information The Mini8 Plus System has four indicator lights on the bottom right corner of the top panel: Power, Error, Status, and Scaning . The following table shows the meaning of each combination of off ,on,and flashing lights. -
Page 13: Specifications And Environmental Requirements
Supported Resolution to 0.5°C use a lint-free cloth slightly dampened with 95% isopropyl alcohol. Multiplexing Detect up to 2 dyes simultaneously, (FAM/ROX) Follow these practices for regular maintenance of your Mini8 Plus system. Physical Dimensions 205×190×98 mm (L×W×H) 1. Every time before using the system, visually check it to confirm there Weight 2.1 kg... -
Page 14: Chapter 5 Concepts
Concepts ·The weight of one genome (g) = (size of genome in bp) x (618 g/mol/ bp)/Avogadro’s number One human genome (g) = (3x10 bp) x (618g/mol/bp) / (6.02x10 3.08x10 One haploid cell (sperm/egg) = 3.08 pg of DNA One diploid cell = 6.16 pg of DNA ·RNA concentration (μg/μl) = (A260×40×D)/1000, where D = dilution factor and A260= absorbance at 260 nm.
Need help?
Do you have a question about the Mini8 Plus and is the answer not in the manual?
Questions and answers