Table of Contents
Advertisement
Quick Links
Advertisement
Table of Contents

Related Manuals for Balzano TXG-D16K


Summary of Contents for Balzano TXG-D16K
- Page 1 User Manual 5.5L Digital Air fryer Model: TXG-D16K...
-
Page 2: Important Safeguards
Please read theses Instructions carefully before use and keep them handy for future reference. IMPORTANT SAFEGUARDS When using electrical appliances, basic safety precautions should always be followed, including the following: • Read all instructions before use. • Do not touch hot surfaces. Use handles or knobs. •... -
Page 3: Additional Safeguards
cupboards and walls. • A fire may occur if the appliance is covered or touches flammable material, including curtains, draperies, walls, and the like, when in operation. Do not store any item on top of the appliance when in operation. •... -
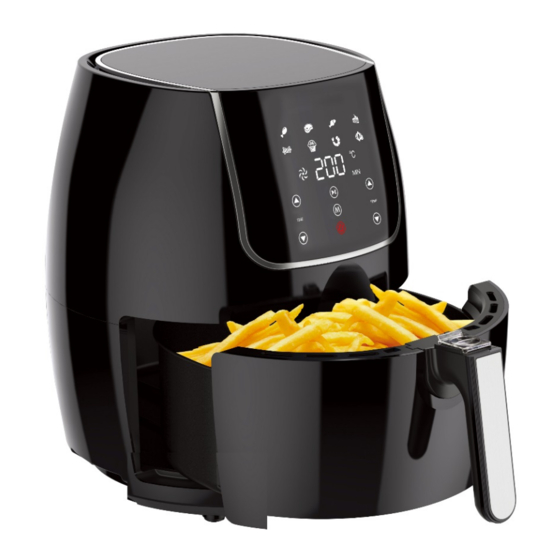
Page 4: Product Description
PRODUCT DESCRIPTION KNOW YOUR DIGITAL AIR FRYER Prepare our favorite foods and snacks in a quick, healthy, and easy way with your new. This Air Fryer combines heat with high-speed air circulation to cook your ingredients from all sides, simultaneously! It also allows you to prepare a variety of tasty dishes without the addition of excess oils or fats to most ingredients. -
Page 5: Operation
Important: For golden, crispier results, similar to those obtained in a deep fryer, it is important to remember that leaner foods (fries, vegetables, chicken, fish, etc.) are best coated with just a tablespoon of oil. Simply add the ingredients in a bowl, add a tablespoon of oil, and toss until well coated. - Page 6 Default Default Cooking MENU Range temperature Range Menu Icon time (min.) (°C) Default Setting Fries (home-made fries or frozen fries) Drumsticks Steak 1-60Min 80-200°C Fish Onion rings Shrimp Muffin Cake Using the appliance This appliance can be used to prepare fries and potatoes, meat and poultry, snacks and for baking (see “Recommended cooking times and temperatures”).
- Page 7 Button Function Possible settings lights up blue at Standby mode, Switching the appliance Working mode and Pause ON/OFF Button ON or OFF mode, lights up red at OFF mode Select one of the cooking MENU Selection Button menu Increase Temperature Button Increasing temperature 80°C to 200°C Decrease Temperature adjustable in steps of 5°C...
- Page 8 WARNING: - Only use accessories recommended by the manufacturer. Do not place any other materials in the appliance. - Do not cover or insert any objects into the Air Vents (ill. b). - Never let the Power Cord with Plug come in contact with the Housing of the appliance during use (ill.
- Page 9 WARNING: - Do not overfill the Basket (ill. h). Do not exceed the MAX marking on the Basket when placing food inside. - Do not use the Basket Holder without the Basket. Do not place food directly in the Basket Holder (ill. i). - Do not add oil directly into the Basket or Basket Holder (ill.
- Page 10 • Insert the Power Cord with Plug into a wall outlet (ill. l). The ON/OFF Button lights up red. • Press the ON/OFF Button to switch the appliance on. The display lights up and shows the Default Setting. Time/Temperature Display shows 15 and 180 alternate. •...
- Page 11 • Then, press the Release Button and carefully lift the Basket upwards, out of the Basket Holder, by the Basket Handle (ill. o). • Turn the basket upside down and carefully pour the food onto a suitable dish. Use suitable utensils to remove food, if required.
-
Page 12: Hints And Tips
Preheat the appliance (if required) - Insert Power Cord with Plug into a wall outlet, ON/OFF button lights up red; - Press ON/OFF button switch the appliance on, Time/Temperature Display show 15 and 180 alternate; - Press Decrease Time Button set the time to 5 minutes, then press STAT/PAUSE button start cooking, appliance beep 3 times when set time elapsed, indicating preheat process finished. - Page 13 WARNING: - Always turn the appliance off by pressing the ON/OFF Button. Disconnect the Power Cord with Plug from the wall outlet before cleaning. Allow all parts of the appliance to cool down completely. NOTE: - Do not immerse the Power Cord with Plug and appliance Housing into water or any other liquids.
-
Page 14: Troubleshooting
TROUBLESHOOTING Problem Cause Solution • Appliance not plugged in • Insert the plug into the wall outlet • Wall outlet not energized The appliance is not • Check fuses and circuit breaker • Basket Holder not properly working • Fit the Basket Holder properly into engaged with the appliance the appliance housing housing... - Page 15 • Cooking temperature too high • Reduce set temperature • The food was not shaken during • Shake or flip the food in the middle the cooking cycle of the cooking cycle (see “Operation”) Food is soggy and not • The food used is not suited for •...
-
Page 16: Environment Friendly Disposal
By doing this, you help to preserve the environment. BALZANO products are intended for household use only BALZANO has policy of continuous improvement in product quality and design. The company, therefore reserves the right to change the specification of its model at any time.
Need help?
Do you have a question about the TXG-D16K and is the answer not in the manual?
Questions and answers