
Summary of Contents for Pergola kits USA CLASSIC CEDAR PERGOLA KIT
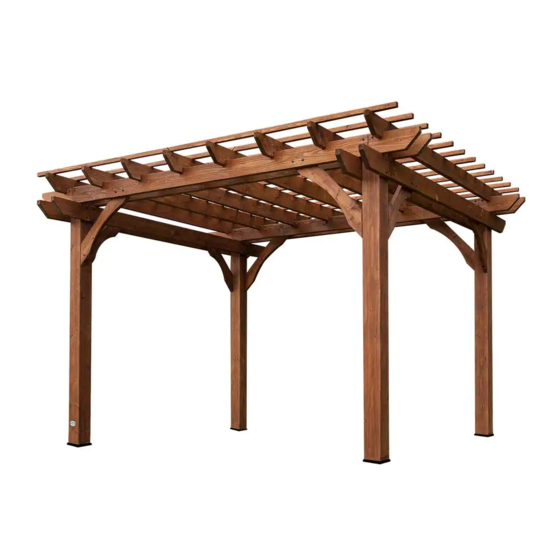
- Page 1 CLASSIC CEDAR PERGOLA KIT FREESTANDING ASSEMBLY MANUAL Shown – 10’x14’ Classic Cedar Pergola Kit, Cedar Color Stain, top runners 8" o.c.
- Page 2 Thank you for purchasing the Classic Wood Freestanding Pergola. Depending on the size of the pergola, installation can usually be completed in a day. These instructions apply to both cedar and treated pine models. There are a few things you should consider before installation: 1.) Do not store the Pergola components in direct contact with ground concrete, or other moisture wicking surface as this may warp the components.
- Page 3 approximate location of where the pergola the 2x4 boa approximate location of where the perg the 2x4 b will be. Connect the corners of the box that wi P a g e will be. Connect the corners of the template using 2 ½” screws. (As shown at box that when prope template using 2 ½”...
- Page 4 dimensions MUST be the same. Adjust the tem pergola to a wood deck, use a 4” lag bolt (not included) instead of a wedge bol until the diagonal measurements are identical. 5. Once the template is “square”, mark the pos locations using the INSIDE corners of the frame on a concrete slab with a pencil.
- Page 5 Setting the Posts Post Bases 7.) As you can see there are notches on top of 8.) Now you are ready to install the Post Bases. Get a ladder and slide the base over the top the post, make sure all notches are turned in of the post (see picture above).
- Page 6 SECTION 2 - SETTING BEAMS 10.) A helper (or two) will be needed when setting the beams. The marks will face the posts. Lift into place, setting in the notch at the top of the post, and make sure that the ends over hang the same on both ends.
- Page 7 4 per side w you would be ready to install the rn beams. These go in between the der. Keep it flush on bottom of 2x8 der center of post. Attach it with 4 screws. Setting Runners 11.) Continue with the rest of the beams. 12.) Now you would be ready to install the a level to insure that the posts are Repeat with the other side of the post, and...
- Page 8 tioned before attaching them. aces Fasten Corner Braces 8 corner braces. 4 of them NOTE: There are a total of (8) corner braces. These will go up in Four braces will be larger and will go up in 8 headers. The smaller between the 2’x8’...
- Page 9 er may be needed to hold sts in place when positioning st runner. Make sure that the ng is the same on both ends of nner. Measure from the beam end of the runner, or to the ing of the scroll cut on both (as shown to the right) Slide the until the overhang is the Anchor remaining Posts to Concrete...
- Page 10 osite beam. Be sure to check rhangs on the back beam. ting Top Runners that there are marks on top of n runners where the top s are to be attached. These gs are about 16" on center, or r dimension if the pergola was d with additional top runners.
- Page 11 19.) Place the top runners at the pencil mark by the rafters, then put the pencil mark that is on top of the top runner at the side of the runners. Make sure the “X” is on top of the runner.
Need help?
Do you have a question about the CLASSIC CEDAR PERGOLA KIT and is the answer not in the manual?
Questions and answers