Advertisement
INSTRUCTIONS FOR:
CaRbUReTTOR SyNChRONIzeR
Model No:
Thank you for purchasing a Sealey product. Manufactured to a high standard this product will, if used according to these instructions and properly
maintained, give you years of trouble free performance.
IMPORTANT: PLeaSe ReaD TheSe INSTRUCTIONS CaReFULLy. NOTe The SaFe OPeRaTIONaL ReQUIReMeNTS, WaRNINGS aND
CaUTIONS. USe ThIS PRODUCT CORReCTLy, aND WITh CaRe FOR The PURPOSe FOR WhICh IT IS INTeNDeD. FaILURe TO DO SO May
CaUSe DaMaGe aND/OR PeRSONaL INJURy aND WILL INVaLIDaTe The WaRRaNTy.
1.
SaFeTy INSTRUCTIONS
Ensure that Health & Safety, local authority and general workshop practice regulations are strictly adhered to
when using tools.
Maintain the equipment in good and clean condition for best and safest performance. DO NOT use if
damaged.
Wear approved eye protection. A full range of personal safety equipment is available from your Sealey
dealer.
8 DO NOT use the equipment for purposes other than for which it is designed.
8 DO NOT use the equipment when you are tired or under the influence of alcohol, drugs or intoxicating
medicine.
Wear suitable clothing to avoid snagging. Do not wear loose jewellery and tie back long hair.
Account for all tools and parts being used and do not leave them in, on or near the engine.
Ensure that work area has adequate lighting.
Keep children and unauthorised persons away from work area.
When not in use, store the equipment in a safe, dry childproof area.
IMPORTaNT: Refer to the vehicle manufacturer's service instructions, or a proprietory manual, to establish
the correct procedure and data. These instructions are provided as a guide only.
IMPORTaNT: Ensure the vehicle has been serviced and that the air screw and pilot screw have been
correctly adjusted.
WaRNING! exhaust fumes are dangerous, ensure steps are taken to remove fumes from work area.
WaRNING! It is assumed that anybody using the VS209 will have some knowledge of the mechanics of the
vehicle, particularly in regard to safe handling of fuel systems and removal of the fuel tank. If there is any
doubt refer the job to a professional mechanic.
2.
INTRODUCTION
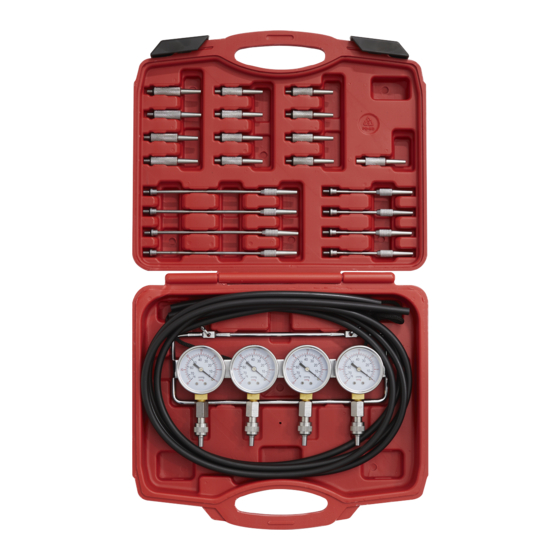
One of the most comprehensive balancer sets available on the market. Features a bank of four mini-gauges with
lockable valves enabling user to hold vacuum values in use. Supplied with set of long and short carburettor
adaptors for easy access amongst the tubes and wires around the carburettor. Includes four 900mm delivery
tubes. Supplied in carry-case.
3.
INSTRUCTIONS FOR USe
3.1
SeT-UP
3.1.1
Start the vehicle and run until it will operate without choke. When this has been
achieved, turn off the engine and fit the vacuum gauges as follows:
3.1.2
Remove the inlet manifold vacuum screw(s). Select the appropriate extension
connector and screw into the inlet manifold of vehicle, do not overtighten,
finger pressure is adequate.
3.1.3
Repeat for the remaining carburettors (up to four).
3.1.4
Push fit the rubber hose to each extension connector ensuring a good fit so no air
will leak.
3.1.5
Push fit the other end of the hose to the gauges ensuring a good fit so no air will leak.
3.2
OPeRaTION
3.2.1
Close the lockable valves (fig.1) and start the engine.
3.2.2
Open each regulator gradually by turning the lockable valves (fig.1) until the display needle stabilises.
3.2.3
Refer to the vehicle handbook for slide adjustments to the carburettors. Following the vehicle
handbook, make the adjustments to each carburettor until all the display readings are the same.
3.2.4
Advance the throttle a few times and allow the engine to settle back to tickover. You can close the
lockable valves to hold vacuum values in use. Re-check the display readings and confirm they are still
reading the same values. If not re-adjust the carburettors as necessary.
3.2.5
When synchronization is complete, switch off engine and remove extension connectors from the
manifold. Replace the vacuum screw(s) back into the inlet manifold.
Original Language Version
VS209.V2
fig.1
Release valve
VS209.V2
Issue: 1 - 15/04/11
INSTRUCTIONS FOR:
CaRbUReTTOR SyNChRONIzeR
Model No:
Thank you for purchasing a Sealey product. Manufactured to a high standard this product will, if used according to these instructions and properly
maintained, give you years of trouble free performance.
IMPORTANT: PLeaSe ReaD TheSe INSTRUCTIONS CaReFULLy. NOTe The SaFe OPeRaTIONaL ReQUIReMeNTS, WaRNINGS aND
CaUTIONS. USe ThIS PRODUCT CORReCTLy, aND WITh CaRe FOR The PURPOSe FOR WhICh IT IS INTeNDeD. FaILURe TO DO SO May
CaUSe DaMaGe aND/OR PeRSONaL INJURy aND WILL INVaLIDaTe The WaRRaNTy.
1.
SaFeTy INSTRUCTIONS
Ensure that Health & Safety, local authority and general workshop practice regulations are strictly adhered to
when using tools.
Maintain the equipment in good and clean condition for best and safest performance. DO NOT use if
damaged.
Wear approved eye protection. A full range of personal safety equipment is available from your Sealey
dealer.
8 DO NOT use the equipment for purposes other than for which it is designed.
8 DO NOT use the equipment when you are tired or under the influence of alcohol, drugs or intoxicating
medicine.
Wear suitable clothing to avoid snagging. Do not wear loose jewellery and tie back long hair.
Account for all tools and parts being used and do not leave them in, on or near the engine.
Ensure that work area has adequate lighting.
Keep children and unauthorised persons away from work area.
When not in use, store the equipment in a safe, dry childproof area.
IMPORTaNT: Refer to the vehicle manufacturer's service instructions, or a proprietory manual, to establish
the correct procedure and data. These instructions are provided as a guide only.
IMPORTaNT: Ensure the vehicle has been serviced and that the air screw and pilot screw have been
correctly adjusted.
WaRNING! exhaust fumes are dangerous, ensure steps are taken to remove fumes from work area.
WaRNING! It is assumed that anybody using the VS209 will have some knowledge of the mechanics of the
vehicle, particularly in regard to safe handling of fuel systems and removal of the fuel tank. If there is any
doubt refer the job to a professional mechanic.
2.
INTRODUCTION
One of the most comprehensive balancer sets available on the market. Features a bank of four mini-gauges with
lockable valves enabling user to hold vacuum values in use. Supplied with set of long and short carburettor
adaptors for easy access amongst the tubes and wires around the carburettor. Includes four 900mm delivery
tubes. Supplied in carry-case.
3.
INSTRUCTIONS FOR USe
3.1
SeT-UP
3.1.1
Start the vehicle and run until it will operate without choke. When this has been
achieved, turn off the engine and fit the vacuum gauges as follows:
3.1.2
Remove the inlet manifold vacuum screw(s). Select the appropriate extension
connector and screw into the inlet manifold of vehicle, do not overtighten,
finger pressure is adequate.
3.1.3
Repeat for the remaining carburettors (up to four).
3.1.4
Push fit the rubber hose to each extension connector ensuring a good fit so no air
will leak.
3.1.5
Push fit the other end of the hose to the gauges ensuring a good fit so no air will leak.
3.2
OPeRaTION
3.2.1
Close the lockable valves (fig.1) and start the engine.
3.2.2
Open each regulator gradually by turning the lockable valves (fig.1) until the display needle stabilises.
3.2.3
Refer to the vehicle handbook for slide adjustments to the carburettors. Following the vehicle
handbook, make the adjustments to each carburettor until all the display readings are the same.
3.2.4
Advance the throttle a few times and allow the engine to settle back to tickover. You can close the
lockable valves to hold vacuum values in use. Re-check the display readings and confirm they are still
reading the same values. If not re-adjust the carburettors as necessary.
3.2.5
When synchronization is complete, switch off engine and remove extension connectors from the
manifold. Replace the vacuum screw(s) back into the inlet manifold.
Original Language Version
VS209.V2
fig.1
Release valve
VS209.V2
Issue: 1 - 15/04/11
Advertisement
Table of Contents

Related Manuals for Sealey AUTO SERVICE VS209.V2

Summary of Contents for Sealey AUTO SERVICE VS209.V2
- Page 1 Model No: Thank you for purchasing a Sealey product. Manufactured to a high standard this product will, if used according to these instructions and properly Thank you for purchasing a Sealey product. Manufactured to a high standard this product will, if used according to these instructions and properly maintained, give you years of trouble free performance.
- Page 2 INFORMaTION: For a copy of our latest catalogue and promotions call us on 01284 757525 and leave your full name and address, INFORMaTION: For a copy of our latest catalogue and promotions call us on 01284 757525 and leave your full name and address, including postcode including postcode Sole UK Distributor, Sealey Group, Sole UK Distributor, Sealey Group, 01284 757500 www.sealey.co.uk 01284 757500 www.sealey.co.uk...
Need help?
Do you have a question about the AUTO SERVICE VS209.V2 and is the answer not in the manual?
Questions and answers