
Related Manuals for 3DAeroventures X-100 Infinity Wing V2

Summary of Contents for 3DAeroventures X-100 Infinity Wing V2
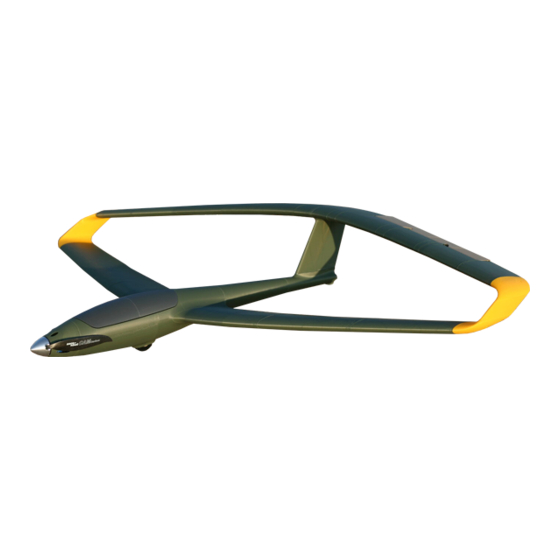
- Page 1 X-100 Infinity Wing V2 3D Printed R/C Aircraft Build Guide Wingspan: 1270mm (50”) www.3daeroventures.com w�w�3�A�r�v�n�u�e�.�o� - 1 - Aeroventures N�v�r S�o� E�p�o�i�g� N�v�r S�o� Q�e�t�o�i�g� N�v�r S�o� P�a�i�g...
- Page 2 Please Read A Note from the Designer: irst of all, thank you so much for your interest and support of 3DAeroventures. I can’t tell you how much joy I get out of designing and testing these aircraft, and the fact that you can now get joy out of my creations just makes this calling that much more special.
- Page 3 1800g / 63.5 oz No. of Channels: 3 - Throttle, Aileron, Elevator (Elevons) 45mm CG Location 45mm in front of the Trailing Edge of the Wing Root www.3daeroventures.com w�w�3�A�r�v�n�u�e�.�o� - 3 - Aeroventures N�v�r S�o� E�p�o�i�g� N�v�r S�o� Q�e�t�o�i�g� N�v�r S�o� P�a�i�g...
-
Page 4: Recommended Setup
1mm - 1.5mm O.D. x 400mm Long Carbon fiber rod or Steel Wire for Elevon Hinges 1.2 mm steel wire for servo control rods https://amzn.to/2QhIKr7 www.3daeroventures.com w�w�3�A�r�v�n�u�e�.�o� - 4 - Aeroventures N�v�r S�o� E�p�o�i�g� N�v�r S�o� Q�e�t�o�i�g� N�v�r S�o� P�a�i�g... - Page 5 LW-PLA Cowl Servo Cover R Servo Cover L Motor Mounts PETG Tire TPU/TPE Tire Hub 1 Tire Hub 2 Tailwheel TPU/TPE Printed Part Weight 1048 www.3daeroventures.com w�w�3�A�r�v�n�u�e�.�o� - 5 - Aeroventures N�v�r S�o� E�p�o�i�g� N�v�r S�o� Q�e�t�o�i�g� N�v�r S�o� P�a�i�g...
- Page 6 If you prefer to use another slicer or create your own profiles in Simplify3D, use the included STL files and reference the included Recommended Slicer Settings PDF. Cura and PrusaSlicer profiles for PLA are also provided www.3daeroventures.com w�w�3�A�r�v�n�u�e�.�o� - 6 - Aeroventures...
-
Page 7: Printing Tips
We have experienced nice , clean outer surfaces when keeping the fan speed up to 20% without negatively affecting layer bonding. Experiment with fan speeds set between 0 - 20%. www.3daeroventures.com w�w�3�A�r�v�n�u�e�.�o� - 7 - Aeroventures N�v�r S�o� E�p�o�i�g� N�v�r S�o� Q�e�t�o�i�g� N�v�r S�o� P�a�i�g... - Page 8 A small amount of elephant’s foot is okay but too much will interfere with the designed alignment aids. www.3daeroventures.com w�w�3�A�r�v�n�u�e�.�o� - 8 - Aeroventures...
- Page 9 A landing gear and rudder upgrade package is now available for the X-100 Infinity Wing V2. It includes a separate fuselage file set which is compatible with the wings included in this file set. Learn more at www.3daeroventures.com/shop www.3daeroventures.com w�w�3�A�r�v�n�u�e�.�o�...
- Page 10 Tailwheel Fuse Tray 3 (PLA) Fuse 3 Fuse Tray 2 (PLA) Fuse Tray 1 (PLA) Tire Hub 1 Tire Hub 2 Tire- TPE Fuse 1 www.3daeroventures.com w�w�3�A�r�v�n�u�e�.�o� - 1� - Aeroventures N�v�r S�o� E�p�o�i�g� N�v�r S�o� Q�e�t�o�i�g� N�v�r S�o� P�a�i�g...
- Page 11 Using a rotary tool (Dremel), miter saw, or hand saw, cut your 6mm carbon fiber wing tubes to the proper lengths. You will need: Qty. 3 300mm long Qty. 1 200mm long www.3daeroventures.com w�w�3�A�r�v�n�u�e�.�o� - 1� - Aeroventures N�v�r S�o� E�p�o�i�g� N�v�r S�o� Q�e�t�o�i�g� N�v�r S�o� P�a�i�g...
- Page 12 Fuse Tray parts slide into rails located in the Fuse parts. The Trays overlap the seams of the Fuse parts and make for a very strong, rigid fuselage. DO NOT GLUE ALL OF THE FUSE PARTS TOGETHER WITHOUT THE FUSE TRAY PARTS IN PLACE! www.3daeroventures.com w�w�3�A�r�v�n�u�e�.�o� - 1� - Aeroventures...
- Page 13 Fuse 4 Fuse 2 Fuse Tray 3 (PLA) Fuse 3 Fuse Tray 2 (PLA) Fuse Tray 1 (PLA) Fuse 1 Fuse 2 Removable Support www.3daeroventures.com w�w�3�A�r�v�n�u�e�.�o� - 1� - Aeroventures N�v�r S�o� E�p�o�i�g� N�v�r S�o� Q�e�t�o�i�g� N�v�r S�o� P�a�i�g...
- Page 14 ALWAYS TEST YOUR EXTENSIONS AND SERVOS PRIOR TO INSTALLATION 2.3.5 Glue the Vert Stab/Back Wing R1/Back Wing L1 sub-assembly to your Fuselage assembly using CA glue. The built in alingment tabs will keep all parts well aligned. www.3daeroventures.com w�w�3�A�r�v�n�u�e�.�o� - 1� - Aeroventures...
-
Page 15: Step 2.4 Assemble The Wheels
CA glue to the mating face of the hub and insert Tire Hub 2 into the other side of the TPE Tire. (Total Wheel Weight 14g) Tire Hub 2 Tire Hub 1 Fuse 1 (62g) Tire- TPE www.3daeroventures.com w�w�3�A�r�v�n�u�e�.�o� - 1� - Aeroventures N�v�r S�o� E�p�o�i�g� N�v�r S�o� Q�e�t�o�i�g� N�v�r S�o� P�a�i�g... - Page 16 Fuse 4. Insert your tailwheel into the wheel bay, insert your wheel axle and apply a small drop of CA glue into both sides of the axle hole to keep it in place. www.3daeroventures.com w�w�3�A�r�v�n�u�e�.�o� - 1� - Aeroventures N�v�r S�o�...
-
Page 17: Step 2.5 Assemble The Canopy
3, 10mm long pieces. These small dowel pins will be used to align parts Canopy 1 and Canopy 2 for gluing. 2.5.3 Insert your 3mm diameter pins into part Canopy 1, apply glue to the mating face and mate to part Canopy 2. www.3daeroventures.com w�w�3�A�r�v�n�u�e�.�o� - 1� - Aeroventures... - Page 18 The mating magnets can then be glued into the magnet recesses in part Fuse 2. BE EXTRA CAREFUL TO GLUE THESE MAGNETS IN THE PROPER ORIENTATION SO AS TO ATTRACT AND NOT REPELL THE MATING MAGNET. www.3daeroventures.com w�w�3�A�r�v�n�u�e�.�o� - 1� - Aeroventures...
-
Page 19: Step 3. Front Wing Assembly
Front Wing L1 - Front Wing L3 and Front Wing Tip L. NOTE: Parts Front Wing Tip R and Front Wing Tip L contain a sacrificial support structure that was generated in Simplify3D. www.3daeroventures.com w�w�3�A�r�v�n�u�e�.�o� - 1� - Aeroventures... - Page 20 Back Wing Tip R Elevon R2 Elevon R1 Back Wing R5 Back Wing R4 Middle Wing Tip R Back Wing R3 Back Wing R2 Servo Cover R (PLA) www.3daeroventures.com w�w�3�A�r�v�n�u�e�.�o� - 2� - Aeroventures N�v�r S�o� E�p�o�i�g� N�v�r S�o� Q�e�t�o�i�g� N�v�r S�o� P�a�i�g...
- Page 21 Simplify3D. Use slight force to remove these support structures. Sand this area with sandpaper or a small file to clean it up. Wing Tip Removable Support www.3daeroventures.com w�w�3�A�r�v�n�u�e�.�o� - 2� - Aeroventures N�v�r S�o� E�p�o�i�g� N�v�r S�o� Q�e�t�o�i�g� N�v�r S�o� P�a�i�g...
- Page 22 4.2.1 Repeat steps 4.2.1 and 4.2.2 for the Back Left Wing, using parts Back Wing L1 - Back Wing L5, Back Wing Tip L, and Middle Wing TIp L for the wing. Use parts Elevon L1 and Elevon L2 for the elevon. www.3daeroventures.com w�w�3�A�r�v�n�u�e�.�o� - 2� - Aeroventures N�v�r S�o�...
- Page 23 4.3.2 Using the mounting screws that came with your servo, mount the servo to part Servo Cover R. Note: It is recommended to test and center the servos and install the servo control horn prior to installation. www.3daeroventures.com w�w�3�A�r�v�n�u�e�.�o� - 2� - Aeroventures...
- Page 24 4.3.4 Install your preferred servo control linkages. We used a 1.2mm O.D. steel wire with a Z bend on the servo control horn and a connector linkage on the elevon control horn. 4.3.5 Repeat Steps 4.3.1 - 4.3.5 for the Back Left Wing www.3daeroventures.com w�w�3�A�r�v�n�u�e�.�o� - 2� - Aeroventures...
-
Page 25: Step 5. Motor Installation
Motor Mount- EFlite Power 15 Motor Mount- Leopard 3536 Cowl - EFlite Power 15 (12g) Motor Mount - 10mm Thick Cowl - Leopard Motor Mount - 15mm Thick www.3daeroventures.com w�w�3�A�r�v�n�u�e�.�o� - 2� - Aeroventures N�v�r S�o� E�p�o�i�g� N�v�r S�o� Q�e�t�o�i�g� N�v�r S�o� P�a�i�g... - Page 26 CAUTION! Do not skip the next step: Choosing the proper motor mount. The motor mount is designed to give your motor the proper down thrust and right thrust for optimal flight performance. www.3daeroventures.com w�w�3�A�r�v�n�u�e�.�o� - 2� - Aeroventures N�v�r S�o� E�p�o�i�g� N�v�r S�o� Q�e�t�o�i�g� N�v�r S�o� P�a�i�g...
- Page 27 NOTE: It is recommended to print the motor mount from PETG, ABS, ASA, or other rigid plastic with higher temperature resistance than PLA. Right Thrust Angle Down Thrust Angle www.3daeroventures.com w�w�3�A�r�v�n�u�e�.�o� - 2� - Aeroventures N�v�r S�o� E�p�o�i�g� N�v�r S�o� Q�e�t�o�i�g� N�v�r S�o� P�a�i�g...
- Page 28 Note: Two version of the cowl are included in the STL package. The one designated for the Leopard 3536 motor has a slightly large opening at the front of the cowl. www.3daeroventures.com w�w�3�A�r�v�n�u�e�.�o� - 2� - Aeroventures N�v�r S�o� E�p�o�i�g� N�v�r S�o� Q�e�t�o�i�g� N�v�r S�o� P�a�i�g...
- Page 29 6.1.3 Install the battery behind the reciever for now (you may need to adjust this later to achieve the proper balance). It is recommended to use an additional velcro strap to wrap around the battery to securely hold it in place. www.3daeroventures.com w�w�3�A�r�v�n�u�e�.�o� - 2� - Aeroventures...
- Page 30 6.2.2 Connect your wing servo leads to the extensions and screw the wings together using the M3 x 15mm long wing bolts. 2 bolts for each wing root and 2 bolts for each wing tip (12 bolts total). www.3daeroventures.com w�w�3�A�r�v�n�u�e�.�o� - 3� - Aeroventures N�v�r S�o�...
- Page 31 Low Rate High Rate 25mm 15mm Exponential: 20% Exponential: 40% 15mm 25mm Aileron Low Rate High Rate 25mm 12mm Exponential: 20% Exponential: 40% 10mm 21mm www.3daeroventures.com w�w�3�A�r�v�n�u�e�.�o� - 3� - Aeroventures N�v�r S�o� E�p�o�i�g� N�v�r S�o� Q�e�t�o�i�g� N�v�r S�o� P�a�i�g...
- Page 32 Shift the battery forward or aft to achieve the proper balance. Remember to err on the side of slightly nose heavy. CG Location 45mm 45mm in front of the Trailing Edge of the Wing Root www.3daeroventures.com w�w�3�A�r�v�n�u�e�.�o� - 3� - Aeroventures N�v�r S�o� E�p�o�i�g� N�v�r S�o� Q�e�t�o�i�g� N�v�r S�o� P�a�i�g...
- Page 33 Dolly Rear Support Dolly R1 Dolly L2 Dolly Front Support Dolly L1 Dolly Tire - TPE (x4) Dolly Tire Hub 2 (x4) Dolly Tire Hub 1 (x4) www.3daeroventures.com w�w�3�A�r�v�n�u�e�.�o� - 3� - Aeroventures N�v�r S�o� E�p�o�i�g� N�v�r S�o� Q�e�t�o�i�g� N�v�r S�o� P�a�i�g...
- Page 34 Make sure the notches on the Front and Rear supports are facing towards the inside of the assembly. Dolly R1/R2 Dolly Rear Support Notches Face Inward Dolly Front Support www.3daeroventures.com w�w�3�A�r�v�n�u�e�.�o� - 3� - Aeroventures N�v�r S�o� E�p�o�i�g� N�v�r S�o� Q�e�t�o�i�g� N�v�r S�o� P�a�i�g...
- Page 35 7.1.7 Apply the 1/4” wide x 1/8” thick foam tape to the areas that the Infinity Wing will rest on. Apply foam tape to the wing saddle and fuselage support areas Dolly Base Assembly Dolly L1/L2 www.3daeroventures.com w�w�3�A�r�v�n�u�e�.�o� - 3� - Aeroventures N�v�r S�o� E�p�o�i�g� N�v�r S�o� Q�e�t�o�i�g� N�v�r S�o� P�a�i�g...
- Page 36 3mm wheel collar. Option 1 Option 2 Secure each side with wheel collar Use a washer between the tire hub and the face of the dolly www.3daeroventures.com w�w�3�A�r�v�n�u�e�.�o� - 3� - Aeroventures N�v�r S�o� E�p�o�i�g� N�v�r S�o� Q�e�t�o�i�g� N�v�r S�o� P�a�i�g...
- Page 37 (30 or more paces away from the aircraft) to ensure your radio signal is strong and you don’t experience servo flutter. 5. Double check all controls are moving the proper direction! www.3daeroventures.com w�w�3�A�r�v�n�u�e�.�o� - 3� - Aeroventures N�v�r S�o� E�p�o�i�g� N�v�r S�o� Q�e�t�o�i�g� N�v�r S�o� P�a�i�g...
- Page 38 3. Hold the aircraft with the wings level and the nose pointed up slightly, 5 to 10 degrees, and give the aircraft a strong throw. 4. Get your throwing hand back on the radio as quickly as possible and enjoy your flight! www.3daeroventures.com w�w�3�A�r�v�n�u�e�.�o� - 3� - Aeroventures...
- Page 39 3. Now that you are ready for takeoff, advance the throttle slowly until you reach full throttle and apply slight up elevator until the aircraft lifts off of the dolly. 4. It’s helpful to have another person assist you to clear the dolly from the runway affter takeoff. www.3daeroventures.com w�w�3�A�r�v�n�u�e�.�o� - 3� - Aeroventures...
- Page 40 Alliance, to connect with other Aeroventurers, to share your builds, and to troubleshoot any issues with us and the community. - With any questions or feedback on 3DAeroventures’ designs or content, you mailto: eric@3daeroventures.com can email Eric directly at eric@3daeroventures.com N�v�r S�o�...
Need help?
Do you have a question about the X-100 Infinity Wing V2 and is the answer not in the manual?
Questions and answers