Table of Contents
Advertisement
Advertisement
Table of Contents

Related Manuals for GHL Mitras LX7


Summary of Contents for GHL Mitras LX7
- Page 1 Mitras LX7 Instruction Manual Valid from Firmware Version 1.00 As of 2016-12-27...
-
Page 2: Table Of Contents
ANUAL ................................5 EATURES ..............................5 COPE OF ELIVERY ........................6 MPORTANT PERATING NSTRUCTIONS CONNECTIONS OF THE MITRAS LX7 ........................8 ................................8 ENERAL ............................8 ONNECTION VERVIEW 3.2.1 USB Connection ............................9 3.2.2 Power Supply Connection .......................... 9 FUNCTIONS OF THE MITRAS LX7 ........................9 ................................ - Page 3 Unleash the True Potential of your Plants and Corals! Congratulations on your new Mitras® LX7 purchase! You now own the most powerful LED light on the market from GHL. From design to function, the Mitras® LX7 provides outstanding quality and light performance. These characteristics make a difference in your aquarium by boosting coral and plant coloration and also helping to achieve accelerated growth.
-
Page 4: Safety Instructions
These and other helpful documents can be downloaded from our website’s download area (Support->Downloads). Visit our homepage at www.aquariumcomputer.com, our Support Forum or meet us on Facebook to become a GHL-Product expert and fully utilize the full range of functions offered from your device! 1 Safety Instructions Please read these instructions carefully before operating the Mitras LX7. -
Page 5: Safety Of Children And Vulnerable Persons
By people who are unfamiliar with the functions of this product. 1.2 Intended Use The Mitras LX7 is intended exclusively for use in the domestic area. Mitras LX7 may only be operated with GHL accessories. Make sure to place the device away from splashing water, moisture or other liquids. -
Page 6: Important Operating Instructions
Please check to make sure all items are in perfect condition. In case of damage, immediately contact the dealer from whom you purchased the Mitras LX7. WARNING Damaged Mitras LX7 Luminaires or components may not be put into operation under any circumstances. 2.4 Important Operating Instructions Mitras®... - Page 7 Instruction Manual Mitras LX7 Disconnect the power plug by pulling the plug, not the cable. Never attempt to disassemble, repair or alter the equipment by yourself. Do not insert sharp objects into the electrical contacts and ports. ...
-
Page 8: Connections Of The Mitras Lx7
Connect only original accessories from GHL. Do not use force when plugging connectors. If a plug contact does not fit, it is imperative to check that you have chosen the correct socket.. 3.2 Connection Overview The Mitras LX7 has the following connections: 2016-12-27... -
Page 9: Usb Connection
The USB port is located on the back of the luminaire. The Mitras LX7 can be connected to a PC by using the included USB cable. With this connection, you can comfortably program your fixture by using GHL Control Center. GCC software can be downloaded free of charge from our website’s download area. -
Page 10: Activation
This device must be protected from water at all times! The Mitras LX7 can be positioned above the aquarium by using the Mitras Flex Mount System or Mitras Hanging Kit. Please make sure to allow sufficient space between the fixture and top of the aquarium. - Page 11 Instruction Manual Mitras LX7 luminaire. Under no circumstances should the luminaire be operated without the protective shield or with a damaged shield. The luminaire must be protected against splashing water, excess and condensing humidity. Please observe the following technical data.
-
Page 12: Connection To The Power Supply / Switching On The Mitras Lx7
The Mitras LX7 is equipped with an acclimation program that allows you to easily adjust the performance and output of the light. -
Page 13: Operation
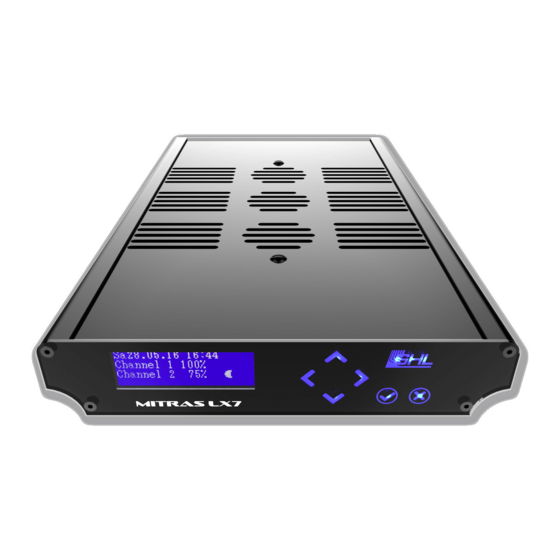
Use the navigation buttons (arrow keys) on the device to make settings or desired changes to your settings. The Mitras LX7 can be operated as a stand-alone light or together with several lamps in the master and slave mode. 2016-12-27... - Page 14 Sunrise and sunset with east-west simulation Thunderstorm It is particularly convenient to use these settings via the GHL Control Center (See below 6.2) Set the time and date first. If several Mitras® LX7 are operated, it is sufficient to make the settings for the lighting and the clock with only one luminaire.
-
Page 15: Menu Structure
Instruction Manual Mitras LX7 The following types of dialogs are used when operating the device: Dialog type Display* Operation Use the left-arrow key to select Yes, use the right-arrow key to select No. The Select Yes / No current selection is marked with a frame. -
Page 16: Display Indications
* The illustrations are exemplary. 6.2 Operating the Device via the Software GCC All settings of the device can also be programmed via the software GHL Control Center (GCC), which is available for download free of charge in the download area (support-> downloads) of our homepage www.aquariumcomputer.com. -
Page 17: Requirements
6.2.2 GCC General Information With the Load button, the settings of the Mitras LX7 are read out and the program displays are updated. Clicking the Save button will store the settings you have made in the program and transfer it to the device. - Page 18 Instruction Manual Mitras LX7 In the illustrated example, this is "COM4". (For illustration purposes only!) Close the "Device Manager window" and click "New". Select your device. The "Connection settings" window pops up automatically. 2016-12-27...
- Page 19 "Connect" button in the upper ribbon bar, the connection between the device and your PC is established. Once connected, you can view the menu of the Mitras LX7, in which you can make all desired settings. For further settings and programming please refer to the "Programming manual for Mitras LX7"...
- Page 20 Instruction Manual Mitras LX7 Once a connection has been successfully established, GHL Control Center examines the connected luminaire and displays the start screen. (Shown above) The available setting options are displayed in a tree structure in the sidebar. The connection can be disconnected by pressing the "Disconnect” button in the upper ribbon bar.
- Page 21 If your luminaire is connected to GCC and you make settings adjustments directly on your Mitras LX7 at the same time, you have to transfer these to the GCC by pressing the "Update view" button. 2016-12-27...
-
Page 22: Adjusting The Lighting
6.4 Adjusting the Lighting GCC offers you various possibilities to adjust the lighting. Please also refer to the programming manual for the Mitras LX7 and the detailed explanations for the Light Composer which you can download from our homepage www.aquariumcomputer.com in the download area (Support->... - Page 23 The Light Composer feature offers you two menus for processing: light sources and illumination. The LEDs of the respective Mitras LX7 and their channel assignment are displayed. These are permanently assigned in the Mitras LX7 and therefore do not have to be edited.
- Page 24 Instruction Manual Mitras LX7 In the Illumination Run menu shown above, you can create your own light schedule. All lighting projects work in relation to 24 h. For example, 13:00, 16:00, etc. Double-clicking on a time-slot allows you to change the color mixing, color temperature or brightness for that given time.
- Page 25 Instruction Manual Mitras LX7 If you have ticked the checkbox "Output directly on lamps", you will see how the changed settings directly affect your connected luminaire(s). The display of the luminaire will now show "M" for manual lighting. If you want to change the brightness of the luminaire at this time, enter either the desired percentage or move the upper slider.
- Page 26 Instruction Manual Mitras LX7 More red: If you want to change the intensity of all color channels, simply press the available percent buttons. Change Intensity: Intensity of all color channels at 75% 2016-12-27...
- Page 27 Instruction Manual Mitras LX7 You can save your LC-generated light color by adding it to Predefined colors using the arrow key. You load your predefined colors by selecting the appropriate color on the right side of the menu and loading it with the arrow key.
- Page 28 Instruction Manual Mitras LX7 Once you have found your corresponding settings, you must save them by clicking “Apply”. Once the light spectra are set at any desired time, you can test your newly generated lighting process. Activate the checkbox and move the slider. The illumination run can be followed directly on the luminaire.
-
Page 29: Securing And Loading Lighting Projects
Instruction Manual Mitras LX7 If you are satisfied with your settings after the test, transfer the new lighting sequence to your lighting channels. These are then overwritten with the new settings. Press Yes to accept the new settings. In a second step, you transfer the settings to your luminaire. -
Page 30: Customizing The Color Channels
Instruction Manual Mitras LX7 If you want to change an existing lighting project, you should save it first. So you can always go back on it. 6.4.3 Customizing the Color Channels You may also configure your desired light spectrum by editing the individual color channels. -
Page 31: Power Balancing Technology
Instruction Manual Mitras LX7 6.4.5 Power Balancing Technology Under the item Energy Options there is a further possibility to adjust the light spectrum. Here, you can weigh the available power of the luminaire in favor-of or at the expense of individual color channels. -
Page 32: Further Settings
You will find further information in the Mitras LX7 Programming Manual and in the detailed explanations for the Light Composer that can be downloaded from our homepage www.aquariumcomputer.com... -
Page 33: Saving Settings
How to read the settings or sensor data from the Mitras LX7 ? The PC program uses parameter definition files (file extension .def) to know which settings should be available or read out in the connected luminaire. These files are located in the GHL Control Center program directory. -
Page 34: Additional Information
8.2 Firmware-Update The firmware of your Mitras LX7 is constantly being further developed. If you want to use new features that are not supported by your current firmware, you can update your controller. DANGER Be sure to back up your data before updating! ... - Page 35 Instruction Manual Mitras LX7 Lamp Max. Power Recommended Water Illumination Area Light Output comparable Operation Mode Consumption Volume with Water depth ca. 77 cm / 30.31” High Efficiency Mode max.240 Liter / 63 130 W Bottom area ca. 82 cm x 55 cm /...
Need help?
Do you have a question about the Mitras LX7 and is the answer not in the manual?
Questions and answers