Table of Contents
Advertisement
Available languages
Available languages
Quick Links
MANUALE DI INSTALLAZIONE E USO
IT
EN
INSTALLATION & OWNER'S MANUAL
MANUAL DE INSTALACIÓN Y DEL USUARIO
ES
FR
MANUEL D'INSTALLATION ET D'UTILISATION
PT
MANUAL DE INSTALAÇÃO E DO UÁRIO
CONTROLLORE CENTRALE TIMER SETTIMANALE
WEEKLY-TIMER CENTRAL CONTROLLER
CONTROLADOR CENTRAL CON TEMPORIZADOR SEMANAL
CONTRÔLEUR CENTRAL AVEC PROGRAMMATEUR HEBDOMADAIRE
CONTROLADOR CENTRAL DE TEMPORIZADOR SEMANAL
Advertisement
Chapters
Table of Contents

Summary of Contents for Ferroli MD-CCM09(A)
- Page 1 CONTROLLORE CENTRALE TIMER SETTIMANALE WEEKLY-TIMER CENTRAL CONTROLLER CONTROLADOR CENTRAL CON TEMPORIZADOR SEMANAL CONTRÔLEUR CENTRAL AVEC PROGRAMMATEUR HEBDOMADAIRE CONTROLADOR CENTRAL DE TEMPORIZADOR SEMANAL MANUALE DI INSTALLAZIONE E USO INSTALLATION & OWNER’S MANUAL MANUAL DE INSTALACIÓN Y DEL USUARIO MANUEL D’INSTALLATION ET D’UTILISATION MANUAL DE INSTALAÇÃO E DO UÁRIO...
-
Page 3: Table Of Contents
1. PRECAUZIONI DI SICUREZZA Assicurarsi di conformarsi alle leggi e normative locali, „ „ nazionali e internazionali. Leggere “PRECAUZIONI” con attenzione prima „ „ dell’installazione. SOMMARIO PAGINA Le seguenti precauzioni includono punti di sicurezza di „ „ 1. PRECAUZIONI DI SICUREZZA ............1 grande importanza. -
Page 4: Istruzioni Di Cablaggio Del Sistema
Dopo aver completato l’installazione, assicurarsi che l’apparecchiatura ATTENZIONE funzioni correttamente durante l’operazione di avviamento. Formare il cliente all’utilizzo dell’apparecchiatura e alla manutenzione della medesima. Inoltre, informare i clienti che questo manuale di Non installare in presenza di una fuga di gas infiammabile. installazione deve essere conservato unitamente al manuale del In caso di fuga di gas infiammabile, la fuga rimane nelle proprietario per consultazione futura. -
Page 5: Elenco E Punti Accessori
■ 3. ELENCO E PUNTI ACCESSORI Schema elettrico 2 corretto ■ Segue la distinta di carico del controllore centrale timer Interno Interno Interno Interno Interno Interno settimanale. Verificare che comprenda tutti gli accessori. Num. Nome Quantità Note Controllore centrale timer Controllore centrale timer Secondo il modello settimanale... -
Page 6: Istruzioni Di Installazione
4. ISTRUZIONI DI INSTALLAZIONE 4.1 Istruzioni di installazione al controllore centrale: Assicurarsi di collegare il cablaggio di alimentazione alla Fig.4-2 morsettiera di alimentazione. 5. METODO DI INSTALLAZIONE Monofase, Alimentazione 50 Hz, 198 V-242 V 5.1 Il metodo di installazione del controllore centrale utilizzando la cassetta elettrica interruttore. - Page 7 Tubo di espansione in plastica Φ6X30 GCM09 CCM09 GB845/ ST3.9X25-C-H(S) 4XØ6 Fig.5-2 Fig.5-4 Interruttore arresto di Interruttore apertura di emergenza, utilizzato per emergenza, utilizzato per attivare disattivare tutti i climatizzatori tutti i climatizzatori Interfaccia di comunicazione Alimentazione 220 VCA all’unità interna 4XR2.5 Fig.5-3 Fig.5-5...
- Page 8 5.2 Schema elettrico di un sistema di climatizzazione basato su rete (Vi sono due tipi di unità interne, ovvero unità interna con modulo di interfaccia rete esterno sulla scheda di controllo principale o modulo di interfaccia di rete integrato nella scheda di controllo principale.) Il filo schermato deve essere messo a terra in Resistenza corrispondente...
-
Page 9: Descrizione Indicatore Del Controllore Centrale Timer Settimanale
6. DESCRIZIONE INDICATORE DEL CONTROLLORE CENTRALE TIMER SETTIMANALE 6.1 Disegno generale del display a cristalli liquidi del controllore centrale timer settimanali °C Fig.6-1 Tabella matrice condizione on line dei climatizzatori 0-63 Funzionamento ECO Query (interroga) Oscillazione Set (imposta) Riscaldatore elettrico ausiliario Opr (risultato op.) Bloccaggio: Tutti i tasti disabilitati eccetto il pulsante di bloccaggio. - Page 10 6.2 Descrizione icona LCD del contollore centrale timer settimanale Tabella.6-1 Tabella.6-2 Icona Significato Icona Significato Icona Significato Icona Significato Modalità Modalità solo Online Protezione Automazione ventola Set (imposta) Errore Temperatura Modalità Modalità deu- raffreddamento midificazione Temperatura Periodo 1,2,3,4 ambiente Velocità Modalità...
-
Page 11: Descrizione Tasti Del Controllore Centrale Timer Settimanale
7. DESCRIZIONE TASTI DEL CONTROLLORE CENTRALE TIMER SETTIMANALE 7.1 Layout generale tasti del controllore centrale timer settimanale Time (Imposta ora) Set Fan Weekly (ON/OFF Set (Imposta Query (Interroga Speed Set Run Mode timer settimanale) climatizzatore) climatizzatore) (Imposta Confirm (Conferma (Imposta Set Swing Program (Inserire Utilizzato per selezionare... - Page 12 7.2 Istruzioni tasti controllore centrale timer settimanale Tabella.7-1 NOME TASTO UTILIZZO Premere il pulsante ON/OFF. Tutti i climatizzatori si spengono se sono in funzione o, al contrario, si accendono se sono spenti. Se si preme il tasto per meno di 5 secondi, la modalità di avvio è l’ultima modalità di funzionamento sul climatizzatore.
- Page 13 Tabella.7-2 NOME TASTO UTILIZZO Quando si interroga l’unità interna, premere il tasto “Reduce” (riduci) per interrogare più parametri dell’unità interna. Nell’impostare l’unità interna, serve per modificare la temperatura di impostazione. Nell’impostare il timer settimanale, si modifica l’ora di accensione e spegnimento. Nell’impostazione dell’unità...
- Page 14 Tabella.7-3 NOME TASTO UTILIZZO Nella pagina principale, premere il tasto “Weekly” (settimanale) per attivare o disattivare la funzione timer settimanale. Nella pagina principale, premere il tasto “Time” (ora) per 5 secondi per accedere allo stato di modifica, quindi premere il tasto “Add” (aggiungi) o “Reduce” (riduci) per modificare l’ora. Premere “Left” (sinistra) o “Right” (destra) per selezionare minuto/ora/giorno/mese/anno.
- Page 15 7.3 L’interfaccia principale del controllore centrale timer settimanale (interfaccia utente) 1) Nelle altre pagine, premere per ritornare all’interfaccia principale. 2) nelle altre pagine, la visualizzazione ritorna all’interfaccia principale quando non si esegue alcuna operazione per un periodo di tempo. 3) L’interfaccia principale visualizza la condizione on line dell’unità interna. Sessantuno unità...
- Page 16 7.4 Interfaccia di impostazione con controllore centrale timer settimanale 1) Nell’interfaccia principale, premere per selezionare l’interfaccia di impostazione singola 2) La visualizzazione ritorna all’interfaccia principale quando non si esegue alcuna operazione per un periodo di tempo. 3) Impostare lo stato di funzionamento del singolo climatizzatore in questa pagina. Impostare la Impostazione riuscita Impostazione...
- Page 17 7.5 Interfaccia di impostazione dei parametri timer settimanale del controllore centrale timer settimanale 1) Nell’interfaccia principale, premere per visualizzare l’interfaccia di impostazione parametri del singolo timer settimanale. 2) La visualizzazione ritorna automaticamente all’interfaccia principale se non si esegue alcuna operazione per un periodo di tempo. 3) In questa pagina impostare i parametri timer settimanale del singolo climatizzatore, inclusi l’ora di accensione, l’ora di spegnimento, la modalità...
- Page 18 7.6 Interfaccia di impostazione unificata sul controllore centrale timer settimanale 1) Nell’interfaccia principale, premere per visualizzare l’interfaccia di impostazione unificata. 2) La visualizzazione ritorna automaticamente all’interfaccia principale se non si esegue alcuna operazione per un periodo di tempo. 3) Impostare la modalità di funzionamento: di tutti i climatizzatori in questa pagina, inclusa la modalità, la temperatura e la velocità ventola: Impostazione non riuscita Tutte le unità...
-
Page 19: La Descrizione Del Flusso Operativo Del Controllore Centrale Timer Settimanale
8. LA DESCRIZIONE DEL FLUSSO OPERATIVO DEL CONTROLLORE CENTRALE TIMER SETTIMANALE 8.1 Come impostare lo stato di funzionamento del climatizzatore? Nell’interfaccia principale 1. Premere per accedere all’interfaccia stato impostazione 4. Se si seleziona la modalità raffreddamento o riscaldamento, di un singolo climatizzatore. Premere ripetutamente il tasto Reduce premere per regolare la temperatura (l’intervallo... - Page 20 8.2 Come interrogare lo stato di funzionamento del climatizzatore? Nell’interfaccia principale 1. Premere per impostare lo stato di interrogazione del climatizzatore singolo, che visualizza “Query” (interroga); Premere per selezionare un climatizzatore. 2. Premere per visualizzare più parametri del climatizzatore. Fig.8-2 8.3 Come bloccare e sbloccare il telecomando del climatizzatore? Nell’interfaccia principale 1.
- Page 21 8.4 Come bloccare e sbloccare la modalità del climatizzatore? Nell’interfaccia principale 1. Premere e mantenere premuto , quindi premere accedere all’interfaccia di impostazione del bloccaggio modalità. 2. Premere per selezionare il bloccaggio del raffreddamento o del riscaldamento, premere per inviare il comando di bloccaggio modalità. 3.
- Page 22 8.6 Come impostare la funzione e i parametri pertinenti del timer settimanale del climatizzatore? Nell’interfaccia principale 1. Premere per accedere all’interfaccia stato di impostazione di un singolo climatizzatore, premere ripetutamente il tasto per selezionare Single (singolo) e All (tutti) alternativamente, visualizza “Set” (imposta), se si seleziona “sigle”...
- Page 23 5. Premere per selezionare la modalità di funzionamento: automatico, raffreddamento, riscaldamento, solo ventola, deumidificazione, o OFF. Se si seleziona la modalità raffreddamento, automatica o riscaldamento, premere per regolare la temperatura (l’intervallo è 17 - 30 gradi). Premere per regolare la velocità ventola che può essere selezionata tra velocità automatica, velocità ridotta, velocità...
- Page 24 8.7 Come chiudere l’impostazione del timer settimanale di un periodo di un climatizzatore? Nell’interfaccia principale 1. Premere per accedere all’interfaccia stato di impostazione di un singolo climatizzatore, premere ripetutamente il tasto per selezionare Single (singolo) e All (tutti) alternativamente, visualizza “Set” (imposta), se si seleziona “sigle” (singolo), premere per selezionarne uno.
- Page 25 4. Impostare il parametro del periodo 1 inclusa l’ora di spegnimento, l’ora di accensione, la modalità di funzionamento, la velocità ventola e la temperatura. Innanzitutto, impostare l’ora di accensione e l’ora di spegnimento. Premere per selezionare l’ora di accensione e l’ora di spegnimento. Premere per modificare l’ora di accensione e l’ora di spegnimento.
- Page 26 8.8 Come interrogare il parametro di impostazione timer settimanale del climatizzatore? Nell’interfaccia principale 1. Premere e mantenere premuto , quindi premere entro due secondi per accedere allo stato di interrogazione di un singolo climatizzatore, premere per selezionare il climatizzatore che deve essere interrogato. Premere per selezionare il Premere...
- Page 27 8.9 Come attivare o disattivare la funzione timer settimanale di tutti i climatizzatori? Nell’interfaccia principale Weekly 1. Premere 2. Se la funzione timer settimanale è disattivata, si attiva; se la funzione timer settimanale è attivata, si disattiva. 3. Se la funzione timer settimanale è disattivata, il display visualizza “Weekly Timer Off” (timer settimanale OFF) Fig.8-9 Manuale di installazione e uso...
- Page 28 8.10 Come modificare l’ora del sistema? Nell’interfaccia principale 1. Premere per 5 secondi, accedere all’interfaccia di impostazione ora. 2. Premere per un tempo prolungato per selezionare il minuto / ora / giorno / mese / anno che deve essere modificata. 3.
- Page 29 7. Premere nuovamente per selezionare il “Day” (giorno) da modificare. 8. Premere per modificare “Day” (giorno) 9. Premere per selezionare “Hour” (ora) da modificare. 10. Premere per modificare ”Hour” (ora) 11. Premere nuovamente per selezionare “Minute” (minuto). 12. Premere per modificare “Minute” (minuto) 13.
-
Page 30: Altri
9. ALTRI 9.1 Esempio del funzionamento del timer settimanale 1) Prendere l’unità interna del climatizzatore con l’indirizzo “04”, ad esempio, impostare i parametri del timer settimanale e attivare la funzione timer settimanale secondo la procedura sopra illustrata. Il parametro di impostazione specifico è indicato nella tabella seguente: Table.9-1 Periodo 1 Periodo 2... - Page 31 Dalla tabella precedente, si vede che l’unità interna è stata impostata con i parametri timer settimanale per due giorni alla settimana, nello specifico per il periodo 1, 2, 3 del lunedì e il periodo 1 del martedì. Se si attiva la funzione timer settimanale, il climatizzatore funziona in base all’impostazione del periodo corrispondente all’interno del periodo specificato.
-
Page 32: Tabella Codici Di Protezione E Di Errore
10. TABELLA CODICI DI PROTEZIONE E DI ERRORE Table.10-1 Codice Contenuto Altri guasti Guasto di rilevamento livello acqua Protezione da guasti dell’unità esterna Guasto freschezza Protezione modulo inverter Flusso eccessivo del compressore (quattro volte) Guasto di comunicazione tra la scheda principale e la scheda display Perdita controllo di esame velocità... -
Page 33: Indici E Requisiti Tecnici
12. CONDIZIONI BASE DELL’AZIONAMENTO Codice Contenuto DEL CONTROLLORE CENTRALE Altre misure di protezione riservato SETTIMANALE riservato 12.1 Intervallo applicabile di tensione di riservato alimentazione: riservato Monofase, Alimentazione riservato 50 Hz, 198 V-242 V riservato Flusso eccessivo del compressore Protezione da sovratensione o da sottotensione 12.2 Condizioni operative: Protezione bassa tensione di scarico aria Temperatura ambiente: -15 °C~+43 °C(+5 °F~+109 °F). - Page 35 1. SAFETY PRECAUTIONS Be sure to be in conformity with the local, national and „ „ international laws and regulations. Read “PRECAUTIONS” carefully before installation. „ „ CONTENTS PAGE The following precautions include important safty items. „ „ Observe them and never forget. 1.
-
Page 36: System Wiring Instructions
After completing the installation, make sure that the unit operates CAUTION properly during the start-up operation. Please instruct the customer on how to operate the unit and keep it maintained. Also, inform customers that they should store this installation manual along with the owner’s Do not install it in the place with the flammable gas manual for future reference. -
Page 37: Accessory List And Items
■ 3. ACCESSORY LIST AND ITEMS Correct connecting diagram 2 ■ The following is the packing list of the weekly-timer central Indoor Indoor Indoor Indoor Indoor Indoor controller. Confirm whether it contains all accessories. Name Quantity Remarks Acccording to the Weekly-timer central controller Weekly-timer central controller applicable model... -
Page 38: Installation Instructions
4. INSTALLATION INSTRUCTIONS 4.1 Installation instructions to the central controller: Besure to connect the power supply wiring to the power supply Fig.4-2 terminal block. 5. INSTALLATION METHOD Power Single phase, Supply 50Hz, 198V-242V 5.1 The installation method of the central controller using electrician switch case. - Page 39 Plastic expansion tube Φ6X30 GCM09 CCM09 GB845/ ST3.9X25-C-H(S) 4XØ6 Fig.5-2 Fig.5-4 Emergency Stop Swich, used to Emergency Open Swich, used to shut down all air conditioners star up all air conditioners Communication interface Power AC 220V to the indoor unit 4XR2.5 Fig.5-3 Fig.5-5...
- Page 40 5.2 Connecting diagram of network-based air conditioning system (There are two types of indoor units, namely indoor unit with external network interface module on the main control board or built-in network interface module in the main control board.) The shielded wire must be reliable grounded Matching resistance of communication end is 120Ω...
-
Page 41: Indicator Description Of The Weekly-Timer Central Controller
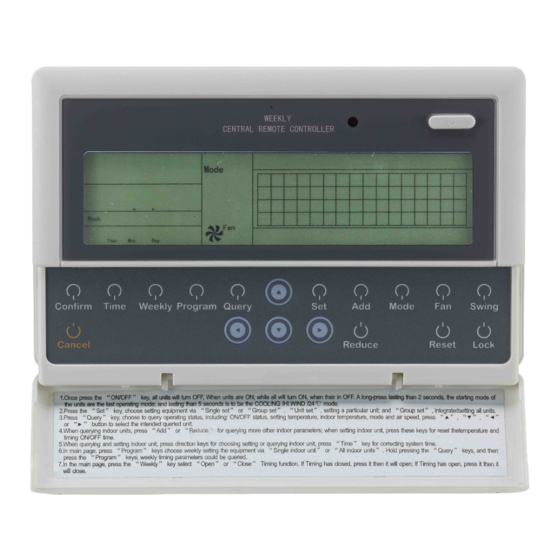
6. INDICATOR DESCRIPTION OF THE WEEKLY-TIMER CENTRAL CONTROLLER 6.1 General drawing of the liquid crystal display of the weekly-timer central controller °C Fig.6-1 On-line condition matrix table of air conditioners 0-63 Economy Run Query Swing Electric Auxiliary Heater Operate result Locking: All buttons disabled except Lock button. - Page 42 6.2 LCD icon description of the weekly-timer central controller Table.6-1 Table.6-2 Icon Meaning Icon Meaning Icon Meaning Icon Meaning Automation Fan Only Online Protecting Mode Mode Error Temperature Cool Mode Dry Mode Room Period1,2,3,4 Temperature Fan speed Heat Mode High/Middle/ T2A: Indoor pipe Low/Auto Temperature A...
-
Page 43: Key Description Of The Weekly-Timer Central Controller
7. KEY DESCRIPTION OF THE WEEKLY-TIMER CENTRAL CONTROLLER 7.1 General key layout of the weekly-timer central controller Set Time Query Airconditiner Set Airconditioner On/Off Weekly-timer Confirm to save Set Run Set Fan Used to select the air Enter the setting page Set Swing conditioner to be set or Mode... - Page 44 7.2 Key instructions of the weekly-timer central controller Table.7-1 KEY NAME USAGE Press the ON/OFF button. All air conditioners will be shut down if they are running, on the contrary, they will be started up. If you press the button for less than 5 seconds, the startup mode is the last running mode of the air conditioner. If you press the button for more than 5 seconds, the startup mode is cooling, high Speed, 24 degrees.
- Page 45 Table.7-2 KEY NAME USAGE When querying the indoor unit, press the “Reduce”button to query more parameter of the indoor unit. In setting the indoor unit, it is for modifying the setting temperature. In setting the weekly timer, it is for modifying the time of startup and shutdown.
- Page 46 Table.7-3 KEY NAME USAGE Under the main page, press the “Weekly” button to start up or shut down the weekly timer function. Under the main page, press the “Time” button for 5 seconds to enter the time-modifying status, and then press “Add” or “Reduce”button to modify the time.
- Page 47 7.3 The main interface of the weekly-timer central controller (user interface) 1) Under the other pages, press to return to the main interface. 2) Under the other pages, automatically return to the main interface when no operation for a period of time. 3) The main interface displays the on-line condition of the indoor unit.
- Page 48 7.4 Setting interface of single weekly-timer central controller 1) Under the main interface, press to select to the single setting interface 2) Automatically return to the main interface when no operation for a period of time. 3) Set the running status of single air conditioner under this page. Set temprature Set Successfully Setting...
- Page 49 7.5 Setting interface of weekly timer parameters of single weekly-timer central controller 1) Under the main interface, press to display the parameter setting interface of single weekly timer. 2) Automatically return to the main interface if no operation is performed for a period of time. 3) Under this page, set the weekly timer parameters of single air conditioner, including startup time, shutdown time, the running mode of this period, temperature and wind speed.
- Page 50 7.6 Unified setting interface of the weekly-timer central controller 1) Under the main interface, press to display the unified setting interface. 2) Automatically return to the main interface if no operation is performed for a period of time. 3) Set the running mode of all air conditioners under this page, including mode, temperature and Fan speed. Set unsuccessfully All indoor Lock...
-
Page 51: The Operating Flow Description Of The Weekly-Timer Central Controller
8. THE OPERATING FLOW DESCRIPTION OF THE WEEKLY-TIMER CENTRAL CONTROLLER 8.1 How to set the running status of the air conditioner? Under the main interface 1. Press to enter the setting status interface of single air 4. If you select the cooling or heating mode, press Reduce conditioner. - Page 52 8.2 How to query the running status of the air conditioner? Under the main interface 1. Press to enter the query status of single air conditioner, displaying “Query”; Press to select one air conditioner. 2. Press to view more parameters of the air conditioner. Fig.8-2 8.3 How to lock and unlock the remote controller of the air conditioner? Under the main interface...
- Page 53 8.4 How to lock and unlock the mode of the air conditioner? Under the main interface 1. Press and hold , then press , enter the setting interface of the mode-locking. 2. Press to select cooling-locking or heating-locking, press send mode-locking command. 3.
- Page 54 8.6 How to set the function and relevant parameters of the weekly timer of the air conditioner? Under the main interface 1. Press to enter the setting status interface of single air conditioner, press the button repeatedly to select “Single” and “All” alternately, displaying “Set”; if select “sigle”, press to select one.
- Page 55 5. Press to select running mode: automatic, cool, heat, Fan-only, Dry, or Off. If you select the cool, automatic or heat mode, press to adjust the temperature (the scope is within 17 - 30 degree). Press to regulate Fan speed, which can be selected among automatic speed, low Speed, middle speed and high speed Press to save the parameter of the...
- Page 56 8.7 How to close the weekly timer setting of a period of an air conditioner? Under the main interface 1. Press to enter the setting status interface of single air conditioner, press the button repeatedly to select “Single” and “All” alternately, displaying “Set”; if select “sigle”, press to select one.
- Page 57 4. Set the parameter of period 1, including shutdown startup time, time, running mode, Fan speed and temperature. First of all, set the startup and shutdown time. Press to select the startup time and shutdown time. Press to modify the startup and shutdown time. Press to cancel the set of period 1 and Press...
- Page 58 8.8 How to query the weekly timer setting parameter of the air conditioner? Under the main interface 1. Press and hold , then press in two second to enter the query status of single air conditioner, Press to select the air conditioner that needs to be queried. Press to select air conditioner to Press...
- Page 59 8.9 How to start up or shut down the weekly timer function of all air conditioners? Under the main interface Weekly 1. Press 2. If the weekly timer function is shut down, then start up it; if the weekly timer function is started up, and then shut down it. 3.
- Page 60 8.10 How to modify the system time? Under the main interface 1. Press for 5 seconds, enter the time-setting interface. 2. Press for a long time to select the minute/ hour/ day/ month/ year that need to be modified. 3. First, press to select the Year that needs to be modified.
- Page 61 7. Press again to select the “Day” that needs to be modified 8. Press modify “Day” 9. Press to select the “Hour” that needs to be modified. 10. Press to modify “Hour” 11. Press again to select the “Minute” that need to be modified. 12.
-
Page 62: Others
9. OTHERS 9.1 An example to show the function of the weekly timer 1) Take the indoor unit of the air conditioner with an address “04” for example, set the weekly timer parameters and start up the weekly timer function according to the above operation. The specific setting parameter is as shown in the table below: Table.9-1 Period 1... - Page 63 From the above table, we can see that the indoor unit has been set weekly timer parameters for two days every week, namely period 1, 2, 3 of Monday and period 1 of Tuesday. If the weekly timer function is started up, the air conditioner will run according to the corresponding period setting when it is within the specific period.
-
Page 64: Protect Code And Error Code Table
10. PROTECT CODE AND ERROR CODE TABLE Table.10-1 Code Content Other faults Water-level detection fault Fault protection of the outdoor unit Freshness fault Inverter module protect Excess flow of compressor (four times) Communication fault between main board and display board Losing control of wind speed examination EEPROM error Zero-crossing detection error... -
Page 65: Technical Indices And Requirements
12. BASIC CONDITIONS OF OPERATING THE Code Content WEEKLY CENTRALIZED CONTROLLER Other protection measures Reserved 12.1 Applicable range of supply voltage: Reserved Power Single phase, Reserved Supply 50Hz, 198V-242V Reserved Reserved 12.2 Operating Conditions: Reserved Environment temperature: -15°C~+43°C(+5°F~+109°F). Excess flow of compressor Environment Relative Humidity: RH40%~RH90%. - Page 67 Modelo aplicable: 1. PRECAUCIONES DE SEGURIDAD MD-CCM09(A) UL-CCM09(A)/E MD-CCM09/E MD-CCM09/E(H) MD-CCM09/E(H)-A Cumplir las leyes y reglamentos locales, nacionales e „ „ internacionales. Los modelos MD-CCM09/E(H) y MD-CCM03/E(H)-A muestran la temperatura en grados Fahrenheit ( “°F” ). Leer las “PRECAUCIONES” antes de la instalación. „...
-
Page 68: Instrucciones De Cableado Del Sistema
Después de completar la instalación, asegurarse de que la unidad PRECAUCIÓN funcione correctamente durante su encendido. Instruir al cliente sobre cómo utilizar la unidad y realizar su mantenimiento. Además, informar al cliente que debe guardar este manual de instalación con el manual No instalar la unidad donde haya fugas de gas inflamable. -
Page 69: Lista De Accesorios Y Elementos
■ 3. LISTA DE ACCESORIOS Y ELEMENTOS Diagrama de conexiones correcto 2 ■ La siguiente es la lista de embalaje del controlador central Interior Interior Interior Interior Interior Interior con temporizador semanal. Confirmar que se han recibido todos los accesorios. Núm. -
Page 70: Instrucciones De Instalación
4. INSTRUCCIONES DE INSTALACIÓN 4.1 Instrucciones de instalación del controlador central: Asegurarse de conectar el cableado de alimentación al bloque de Fig.4-2 bornes de alimentación eléctrica. 5. MÉTODO DE INSTALACIÓN Alimentación Monofásico, eléctrica 50Hz, 198V-242V 5.1 Método de instalación del controlador central con la caja de interruptor. - Page 71 Tubo de expansión Φ6X30 de plástico GCM09 CCM09 GB845/ ST3.9X25-C-H(S) 4XØ6 Fig.5-2 Fig.5-4 Interruptor de parada de Interruptor de encendido de emergencia, para apagar todos emergencia, para encender todos los acondicionares de aire los acondicionadores de aire Interfaz de comunicación Alimentación CA 220V con la unidad de interior 4XR2.5...
- Page 72 5.2 Diagrama de conexiones del sistema de aire acondicionado basado en red (Hay dos tipos de unidades de interior, una con el módulo de red externo en la placa de control y otra con el módulo de red integrado en la placa de control.) El cable blindado debe estar conectado a tierra.
-
Page 73: Descripción De Testigos Del Controlador Central Con Temporizador Semanal
6. DESCRIPCIÓN DE TESTIGOS DEL CONTROLADOR CENTRAL CON TEMPORIZADOR SEMANAL 6.1 Ilustración de la pantalla LCD del controlador central con temporizador semanal °C Fig.6-1 Tabla de estados en línea de los acondicionadores de aire 0-63 Func. Economy Interrog. Movim. Ajuste Calentador eléctrico auxiliar Resultado Bloqueo: Todos los botones desactivados excepto Lock. - Page 74 6.2 Descripción de iconos LCD del controlador central con temporizador semanal Tabla 6-1 Tabla 6-2 Icono Significado Icono Significado Icono Significado Icono Significado En línea Protecc. Modo Modo solo automático ventil. Ajuste Error temperatura Modo Modo de frío deshum. Temper. Periodo 1,2,3,4 ambiente Veloc.
-
Page 75: Descripción De Botones Del Controlador Central Con Temporizador Semanal
7. DESCRIPCIÓN DE BOTONES DEL CONTROLADOR CENTRAL CON TEMPORIZADOR SEMANAL 7.1 Disposición de botones del controlador central con temporizador semanal Ajustar hora Ajustar Interrogar acondicionador acondicionador Temporiz. semanal de aire de aire On/Off Ajustar Ajustar Confirmar para Para seleccionar el modo Ajustar guardar... - Page 76 7.2 Instrucciones de botones del controlador central con temporizador semanal Tabla 7-1 NOMBRE DE BOTÓN Pulsar el botón ON/OFF. Todos los acondicionadores de aire se apagan si están funcionando, o se encienden si estaban apagados. Si se pulsa el botón menos de 5 segundos, el modo de encendido es el último modo de ejecución del acondicionador de aire.
- Page 77 Tabla 7-2 NOMBRE DE BOTÓN Cuando se interrogue la unidad de interior, pulsar el botón “Reduce” para interrogar más parámetros. Al ajustar la unidad de interior, se usa para modificar el ajuste de temperatura. Al ajustar el temporizador semanal, se usa para modificar la hora de encendido y apagado.
- Page 78 Tabla 7-3 NOMBRE DE BOTÓN En la página principal, pulsar el botón “Weekly” para activar o desactivar la función de temporizador semanal. En la página principal, pulsar el botón “Time” durante 5 segundos para introducir el estado de modificación de hora, y pulsar “Add”...
- Page 79 7.3 Interfaz principal del controlador central con temporizador semanal (interfaz de usuario) 1) En las otras páginas, pulsar para volver a la interfaz principal. 2) En las otras páginas, volver automáticamente a la interfaz principal cuando no haya ninguna operación en un periodo. 3) La interfaz principal muestra el estado en línea de la unidad de interior.
- Page 80 7.4 Interfaz de ajustes del controlador central con temporizador semanal 1) En la interfaz principal, pulsar para seleccionar la interfaz de ajustes. 2) Volver automáticamente a la interfaz principal cuando no haya ninguna operación en un periodo. 3) Ajustar en esta página el estado de funcionamiento de un solo acondicionador de aire. Temperatura ajustada en Ajuste con éxito...
- Page 81 7.5 Interfaz de ajustes de los parámetros del temporizador semanal del controlador central 1) En la interfaz principal, pulsar para mostrar la interfaz de ajuste de parámetros de un solo temporizador semanal. 2) Volver automáticamente a la interfaz principal si no se realiza ninguna operación en un periodo. 3) En esta página, ajustar los parámetros del temporizador semanal para un solo acondicionador de aire, incluyendo la hora de encendido y apagado, el modo de funcionamiento durante este periodo, la temperatura y la velocidad de aire.
- Page 82 7.6 Interfaz de ajustes unificada del controlador central con temporizador semanal 1) En la interfaz principal, pulsar para mostrar la interfaz de ajustes unificada. 2) Volver automáticamente a la interfaz principal si no se realiza ninguna operación en un periodo. 3) Ajustar el modo de funcionamiento de todos los acondicionadores de aire en esta página, incluyendo el modo, temperatura y velocidad del ventilador.
-
Page 83: Descripción Del Proceso De Funcionamiento Del Controlador Central Con Temporizador Semanal
8. DESCRIPCIÓN DEL PROCESO DE FUNCIONAMIENTO DEL CONTROLADOR CENTRAL CON TEMPORIZADOR SEMANAL 8.1 ¿Cómo se ajusta el estado de funcionamiento del acondicionador de aire? En la interfaz principal 1. Pulsar para acceder a la interfaz de estado de ajuste de 4. - Page 84 8.2 ¿Cómo se interroga el estado de funcionamiento del acondicionador de aire? En la interfaz principal 1. Pulsar para acceder al estado de interrogación de un solo acondicionador de aire; se muestra “Query”. Pulsar para seleccionar un acondicionador de aire. 2.
- Page 85 8.4 ¿Cómo bloquear y desbloquear el modo del acondicionador de aire? En la interfaz principal 1. Mantener pulsado y después pulsar para acceder a la interfaz de ajuste de bloqueo del modo. 2. Pulsar para seleccionar el bloqueo de refrigeración o el bloqueo de calefacción;...
- Page 86 8.6 ¿Cómo ajustar la función y los parámetros del temporizador semanal del acondicionador de aire? En la interfaz principal 1. Pulsar para acceder a la interfaz de estado de ajuste de un solo acondicionador de aire; pulsar el botón varias veces para seleccionar “Single” y “All” alternadamente, mostrando “Set”;...
- Page 87 5. Pulsar para seleccionar el modo de funcionamiento: automático, frío, calor, solo ventilador, deshumidificación o apagado. Si se selecciona el modo de frío, calor o automático, pulsar para ajustar la temperatura (el margen es entre 17-30 grados). Pulsar para regular la velocidad del ventilador, que puede seleccionarse entre velocidad automática, baja velocidad, velocidad media y alta velocidad.
- Page 88 8.7 ¿Cómo terminar el ajuste de un periodo del acondicionador de aire en el temporizador semanal? En la interfaz principal 1. Pulsar para acceder a la interfaz de estado de ajuste de un solo acondicionador de aire; pulsar el botón varias veces para seleccionar “Single” y “All” alternadamente, mostrando “Set”;...
- Page 89 4. Ajustar el parámetro del periodo 1, incluyendo la hora de apagado y de encendido, el modo de funcionamiento, la velocidad del ventilador y la temperatura. Primero, ajustar la hora de encendido y de apagado. Pulsar para seleccionar la hora de encendido y de apagado. Pulsar para modificar la hora de encendido y de apagado.
- Page 90 8.8 ¿Cómo interrogar el parámetro de ajuste del temporizador semanal del acondicionador de aire? En la interfaz principal 1. Mantener pulsado y pulsar en 2 segundos para acceder al estado de interrogación de un solo acondicionador de aire. Pulsar para seleccionar el acondicionador de aire que se desea interrogar.
- Page 91 8.9 ¿Cómo activar o desactivar la función de temporizador semanal de todos los acondicionadores de aire? En la interfaz principal Weekly 1. Pulsar 2. Si la función de temporizador semanal está desactivada, se activa; si se encuentra activada, se desactiva. 3.
- Page 92 8.10 ¿Cómo modificar la hora del sistema? En la interfaz principal 1. Pulsar durante 5 segundos y acceder a la interfaz de ajuste de hora. 2. Pulsar durante un momento largo para seleccionar los minutos/ hora/ día/ mes/ año que es necesario modificar. 3.
- Page 93 7. Pulsar de nuevo para seleccionar el día que es necesario modificar. 8. Pulsar para modificar “Day”. 9. Pulsar para seleccionar la hora que es necesario modificar. 10. Pulsar para modificar “Hour”. 11. Pulsar de nuevo para seleccionar los minutos que es necesario modificar. 12.
- Page 94 9. OTROS 9.1 Ejemplo para mostrar la función del temporizador semanal 1) Tomemos, por ejemplo, el acondicionador de aire con la dirección “04”; podemos ajustar los parámetros y la hora de activación del temporizador semanal de acuerdo con el procedimiento anterior. El parámetro de ajuste específico se muestra en la siguiente tabla: Tabla 9-1 Periodo 1...
- Page 95 En la tabla anterior, podemos ver que la unidad de interior tiene los parámetros del temporizador semanal ajustados para dos días de cada semana: el periodo 1, 2, 3 del lunes y el periodo 1 del martes. Si se activa la función del temporizador semanal, el acondicionador de aire funcionará...
- Page 96 10. TABLA DE CÓDIGOS DE PROTECCIÓN Y DE ERROR Tabla 10-1 Código Contenido Otros fallos Fallo de detección del nivel de agua Protección de fallos de la unidad exterior Fallo de frescor Protección del módulo inversor Exceso de flujo del compresor (cuatro veces) Fallo de comunicación entre la placa principal y el panel de visualización Pérdida de control del examen de velocidad de aire Error de EEPROM...
- Page 97 12. CONDICIONES DE USO BÁSICAS Código Contenido DEL CONTROLADOR CENTRALIZADO Otras medidas de protección Reservado SEMANAL Reservado 12.1 Rango aplicable de la tensión Reservado de alimentación: Reservado Alimentación Monofásico, Reservado eléctrica 50Hz, 198V-242V Reservado Exceso de flujo del compresor 12.2 Condiciones de funcionamiento: Protección contra baja tensión o sobretensión Temperatura ambiente: -15°C~+43°C(+5°F~+109°F).
- Page 99 1. CONSIGNES DE SÉCURITÉ L’installation doit être conforme aux lois et „ „ réglementations locales, nationales et internationales. Lire attentivement les « CONSIGNES » avant l’installation. „ „ SOMMAIRE PAGE Les consignes suivantes contiennent des informations „ „ importantes en matière de sécurité. Toujours les respecter 1.
-
Page 100: Instructions De Câblage Du Système
Une fois l’installation terminée, procéder à la mise en service en ATTENTION s’assurant que l’appareil fonctionne correctement. Montrer au client comment utiliser l’appareil et en assurer l’entretien. Demander également au client de conserver en lieu sûr ce manuel d’installation Ne pas installer l’appareil dans un endroit exposé à avec le manuel d’utilisation pour toute consultation future. -
Page 101: Liste Des Accessoires Et Du Matériel Nécessairesà L'installation
■ 3. LISTE DES ACCESSOIRES ET DU MATÉRIEL Schéma de câblage 2 NÉCESSAIRES À L’INSTALLATION Intérieur Intérieur Intérieur Intérieur Intérieur Intérieur ■ Les accessoires suivants sont expédiés avec le contrôleur central à programmateur hebdomadaire. Vérifier que tous ces accessoires sont contenus dans le colis. Contrôleur central avec programmateur N°... -
Page 102: Instructions D'installation
4. INSTRUCTIONS D’INSTALLATION 4.1 Instructions d’installation du contrôleur central : Veiller à raccorder le câble d’alimentation au bornier d’alimentation. Fig.4-2 Monophasée, Alimentation électrique 5. MÉTHODE D’INSTALLATION 50Hz, 198V-242V 5.1 La méthode d’installation du contrôleur Lorsque les fils d’alimentation et de transmission sont acheminés central à... - Page 103 Chevilles à expansion en plastique Φ6X30 GCM09 CCM09 GB845/ ST3.9X25-C-H(S) 4XØ6 Fig.5-2 Fig.5-4 Bouton d’arrêt d’urgence, Bouton de marche d’urgence, utilisé pour arrêter tous les utilisé pour mettre en marche climatiseurs tous les climatiseurs Alimentation Interface de communication 220 Vca avec l’unité...
- Page 104 5.2 Schéma de raccordement d’un système de climatisation en réseau (Il existe deux types d’unités intérieures, à savoir l’unité intérieure avec module d’interface réseau externe sur la carte de commande principale ou avec module d’interface réseau intégré dans la carte de commande principale.) Le fil blindé...
-
Page 105: Description Des Indicateurs Du Contrôleur Central Avec Programmateur Hebdomadaire
6. DESCRIPTION DES INDICATEURS DU CONTRÔLEUR CENTRAL AVEC PROGRAMMATEUR HEBDOMADAIRE 6.1 Schéma général de l’écran à cristaux liquides du contrôleur central avec programmateur hebdomadaire °C Fig.6-1 Tableau matriciel des conditions en ligne des climatiseurs 0-63 Mode Eco Interrogation Oscillation Réglage Résistance électrique auxiliaire Verrouillage : tous les boutons sont désactivés sauf le Résultat... - Page 106 6.2 Description des icônes affichées sur l’écran LCD du contrôleur central avec programmateur hebdomadaire Tableau 6-1 Tableau 6-2 Icône Signification Icône Signification Icône Signification Icône Signification Mode En ligne Protection Mode Ventilateur Auto Réglage seul Erreur température Mode Froid Mode Sec Température Périodes 1,2,3,4 ambiante...
-
Page 107: Description Des Principaux Éléments Du Contrôleur Central Avec Programmateur Hebdomadaire
7. DESCRIPTION DES PRINCIPAUX ÉLÉMENTS DU CONTRÔLEUR CENTRAL AVEC PROGRAMMATEUR HEBDOMADAIRE 7.1 Schéma général du contrôleur central avec programmateur hebdomadaire Heure de consigne Marche/Arrêt programmateur Interrogation Réglage climatiseur Réglage hebdomadaire climatiseur Confirmation mode de Réglage fonctionne- pour enregistrer Accès à la page vitesse de Utilisé... - Page 108 7.2 Fonction des touches du contrôleur central avec programmateur hebdomadaire Tableau 7-1 TOUCHE FONCTION Pression de la touche ON/OFF. Tous les climatiseurs s’arrêtent s’ils sont en marche ou démarrent s’ils sont arrêtés. En appuyant sur la touche pendant moins de 5 secondes pour le démarrage, le mode sélectionné est le dernier mode de fonctionnement du climatiseur.
- Page 109 Tableau 7-2 TOUCHE FONCTION Lors de l’interrogation de l’unité intérieure, appuyer sur la touche « Reduce » pour interroger d’autres paramètres de l’unité intérieure. Lors du réglage de l’unité intérieure, cette touche permet de modifier la température de consigne. Lors du réglage du programmateur hebdomadaire, cette touche permet de modifier l’heure de démarrage et d’arrêt. Lors du réglage de l’unité...
- Page 110 Tableau 7-3 TOUCHE FONCTION Depuis la page principale, appuyer sur la touche « Weekly » pour démarrer ou arrêter la fonction du programmateur hebdomadaire. Depuis la page principale, appuyer sur la touche « Time » pendant 5 secondes pour entrer en mode réglage de l’heure puis appuyer sur la touche «...
- Page 111 7.3 Page principale du contrôleur central avec programmateur hebdomadaire (interface utilisateur) 1) Depuis les autres pages, appuyer sur pour retourner à la page principale. 2) Depuis les autres pages, l’affichage retourne automatiquement à la page principale si aucune opération n’est effectuée pendant un laps de temps donné.
- Page 112 7.4 Page de paramétrage d’un seul contrôleur central avec programmateur hebdomadaire 1) Depuis la page principale, appuyer sur pour accéder à la page de paramétrage d’un seul contrôleur central 2) Si aucune opération n’est effectuée pendant un laps de temps donné, l’affichage retourne automatiquement à la page principale. 3) Paramétrer le type de fonctionnement d’un seul climatiseur depuis cette page.
- Page 113 7.5 Page de réglage des paramètres d’un seul contrôleur central avec programmateur hebdomadaire 1) Depuis la page principale, appuyer sur pour afficher la page de réglage des paramètres d’un seul programmateur hebdomadaire. 2) Si aucune opération n’est effectuée pendant un laps de temps donné, l’affichage retourne automatiquement à la page principale. 3) Depuis cette page, régler les paramètres du programmateur hebdomadaire relatifs à...
- Page 114 7.6 Page de paramétrage unifiée du contrôleur central avec programmateur hebdomadaire 1) Depuis la page principale, appuyer sur pour afficher la page de paramétrage unifiée. 2) Si aucune opération n’est effectuée pendant un laps de temps donné, l’affichage retourne automatiquement à la page principale. 3) Régler le mode de fonctionnement de tous les climatiseurs depuis cette page, y compris le mode, la température et la vitesse du ventilateur.
-
Page 115: Schéma De Fonctionnement Du Contrôleur Central Avec Programmateur Hebdomadaire
8. SCHÉMA DE FONCTIONNEMENT DU CONTRÔLEUR CENTRAL AVEC PROGRAMMATEUR HEBDOMADAIRE 8.1 Comment régler le mode de fonctionnement du climatiseur Depuis la page principale 1. Appuyer sur pour accéder à la page des paramètres de 4. Si le mode Froid ou le mode Chaud a été sélectionné, appuyer fonctionnement d’un seul climatiseur. - Page 116 8.2 Comment interroger l’état de fonctionnement du climatiseur Depuis la page principale 1. Appuyer sur pour connaître l’état de fonctionnement d’un seul climatiseur en affichant « Query »; appuyer sur pour sélectionner un seul climatiseur. 2. Appuyer sur pour afficher d’autres paramètres du climatiseur. Fig.8-2 8.3 Comment verrouiller et déverrouiller le contrôleur distant du climatiseur Depuis la page principale...
- Page 117 8.4 Comment verrouiller et déverrouiller le mode de fonctionnement du climatiseur Depuis la page principale 1. Appuyer sur puis, sans relâcher, appuyer sur , accéder à la page de réglage du verrouillage de mode. 2. Appuyer sur pour sélectionner le verrouillage du mode Froid ou du mode Chaud, puis appuyer sur pour envoyer la commande de verrouillage du mode.
- Page 118 8.6 Comment définir la fonction et les paramètres correspondants du programmateur hebdomadaire du climatiseur Depuis la page principale 1. Appuyer sur pour accéder à la page des paramètres du climatiseur individuel, appuyer plusieurs fois sur la touche pour sélectionner tour à tour « Single » et « All » ; « Set » s’affiche. Si «...
- Page 119 5. Appuyer sur pour sélectionner le mode de fonctionnement : Automatique, Froid, Chaud, Ventilateur seul, Sec ou Arrêt. Si le mode Froid, Automatique ou Chaud a été sélectionné, appuyer sur pour régler la température (entre 17 et 30 degrés). Appuyer sur pour régler la vitesse du ventilateur, qui peut être sélectionnée entre automatique, basse, moyenne ou haute Appuyer sur...
- Page 120 8.7 Comment terminer le paramétrage d’une période d’un climatiseur sur le programmateur hebdomadaire Depuis la page principale 1. Appuyer sur pour accéder à la page des paramètres du climatiseur individuel, appuyer plusieurs fois sur la touche pour sélectionner tour à tour « Single » et « All »; «...
- Page 121 4. Définir les paramètres de la période 1, notamment l’heure d’arrêt, l’heure de démarrage, le mode de fonctionnement, la vitesse du ventilateur et la température. Régler en premier l’heure de démarrage et l’heure d’arrêt. Appuyer sur pour sélectionner l’heure de démarrage et l’heure d’arrêt. Appuyer pour modifier l’heure de démarrage et l’heure d’arrêt.
- Page 122 8.8 Comment interroger le paramétrage du programmateur hebdomadaire du climatiseur Depuis la page principale 1. Appuyer sur puis, sans relâcher, appuyer sur dans un délai de deux secondes pour entrer le statut d’interrogation d’un seul climatiseur ; appuyer sur pour sélectionner le climatiseur qui doit être interrogé.
- Page 123 8.9 Comment démarrer ou arrêter la fonction de programmateur hebdomadaire de tous les climatiseurs Depuis la page principale Weekly 1. Appuyer sur 2. Si la fonction programmateur hebdomadaire était arrêtée, elle démarre, tandis que si elle était en marche, elle s’arrête. 3.
- Page 124 8.10 Comment régler l’heure du système Depuis la page principale 1. Appuyer sur pendant 5 secondes, accéder à la page de réglage de l’heure. 2. Appuyer longtemps sur pour sélectionner les minutes, les heures, le jour, le mois et l’année à modifier. 3.
- Page 125 7. Appuyer à nouveau sur pour sélectionner le « Jour » à modifier 8. Appuyer sur pour modifier le « Jour » 9. Appuyer sur pour sélectionner l’« Heure » à modifier. 10. Appuyer sur pour modifier l’« Heure » 11.
-
Page 126: Autres
9. AUTRES 9.1 Exemple de fonction du programmateur hebdomadaire 1) On suppose que l’on veut régler le programmateur hebdomadaire et démarrer la fonction programmateur hebdomadaire pour l’unité intérieure du climatiseur avec adresse « 04 ». Le paramétrage correspondant est indiqué dans le tableau ci-dessous : Tableau 9-1 Période 1 Période 2... - Page 127 Le tableau ci-dessus montre que les paramètres de programmateur hebdomadaire de l’unité intérieure ont été réglés sur deux jours par semaine, à savoir les périodes 1, 2, 3 du lundi et la période 1 du mardi. La fonction du programmateur hebdomadaire a été démarrée, le climatiseur fonctionne conformément au paramétrage de la période dans laquelle il se trouve.
-
Page 128: Tableau Des Codes D'erreur Et De Leur Signification
10. TABLEAU DES CODES D’ERREUR ET DE LEUR SIGNIFICATION Tableau 10-1 Code Signification Autres défauts Défaut de détection du niveau de l’eau Défaut de protection de l’unité extérieure Défaut de fraîcheur Protection du module onduleur Excès de débit du compresseur (quatre fois) Défaut de communication entre la carte mère et l’afficheur Perte de contrôle de la vitesse du ventilateur Erreur EEPROM... -
Page 129: Indicateurs Et Exigences Techniques
12. CONDITIONS DE BASE DE Code Signification FONCTIONNEMENT DU CONTRÔLEUR Autres mesures de protection De réserve CENTRALISÉ HEBDOMADAIRE De réserve 12.1 Plage admise de tension d’alimentation : De réserve Monophasée, De réserve Alimentation électrique 50 Hz, 198 V-242V De réserve De réserve Excès de débit du compresseur 12.2 Conditions de fonctionnement :... - Page 131 Modelo aplicável: 1. PRECAUÇÕES DE SEGURANÇA MD-CCM09(A) UL-CCM09(A)/E MD-CCM09/E MD-CCM09/E(H) MD-CCM09/E(H)-A Certifique-se de que segue as leis e normas locais, „ „ nacionais e internacionais. Os modelos MD-CCM09/E(H) e MD-CCM03/E(H)-A apresentam a temperatura em fahrenheit ( “°F” ). Leia atentamente as “PRECAUÇÕES” antes da instalação. „...
-
Page 132: Instruções Das Ligações Do Sistema
Depois de completar a instalação, certifique-se de que a unidade CUIDADO está a funcionar devidamente durante o arranque. Ensine o cliente a trabalhar com a unidade e a assegurar a sua manutenção. Além disso, informe os clientes de que eles devem conservar este manual Não o instale num local onde possa haver uma fuga de de instalação juntamente com o manual do proprietário para uma gases inflamáveis. -
Page 133: Lista De Acessórios E Itens
■ 3. LISTA DE ACESSÓRIOS E ITENS Esquema 2 de ligações corretas ■ Apresenta-se, de seguida, a lista de embalagem do controlador Interior Interior Interior Interior Interior Interior central de temporizador semanal. Confirme se contém todos os acessórios. Núm Nome Quantidade Observações Controlador central de... -
Page 134: Instruções De Instalação
4. INSTRUÇÕES DE INSTALAÇÃO 4.1 Instruções deinstalação para o controlador central: Certifique-se de que liga a cablagem de alimentação ao bloco de Fig.4-2 terminais de alimentação. Monofásico, 5. MÉTODO DE INSTALAÇÃO Fonte de alimentação 50Hz, 198V-242V 5.1 O método de instalação do controlador central que usa um quadro de comando Ao endereçar os fios de alimentação e transmissão paralelos de eletricista. - Page 135 Tubo de expansão de plástico Φ6X30 GCM09 CCM09 GB845/ ST3.9X25-C-H(S) 4XØ6 Fig.5-4 Fig.5-2 Interruptor de paragem de Interruptor de abertura de emergência, usado para emergência, usado para ligar desligar todos os aparelhos todos os aparelhos de ar de ar condicionado condicionado Interface de comunicação Potência AC 220V...
- Page 136 5.2 Esquema de ligação de sistema de ar condicionado baseado na rede (Há dois tipos de unidades interiores, nomeadamente unidade interior com módulo de interface de rede externa na placa de controlo principal ou módulo de interface de rede integrada na placa de controlo principal.) O cabo blindado deve possuir uma ligação A resistência de ligação da...
-
Page 137: Descrição Dos Indicadores Do Controlador Central De Temporizador Semanal
6. DESCRIÇÃO DOS INDICADORES DO CONTROLADOR CENTRAL DE TEMPORIZADOR SEMANAL 6.1 Desenho geral do display de cristais líquidos do controlador central de temporizador semanal ou display “ ” com modelo MD-CCM09/E(H)-A MD-CCM09/E(H) Fig.6-1 Tabela de matriz de condição em linha de aparelhos de ar Funcionamento no modo Economia condicionado 0-63 Oscilação... - Page 138 6.2 Descrição dos ícones LCD do controlador central de temporizador semanal Tabela.6-1 Tabela.6-2 Ícone Significado Ícone Significado Ícone Significado Ícone Significado Modo de Em linha Proteção Modo apenas Automático Definição ventilação Erro Temperatura Modo de Modo de Temperatura arrefecimento desumidificação Período1,2,3,4 Ambiente Velocidade do...
-
Page 139: Descrição Das Teclas Do Controlador Central De Temporizador Semanal
7. DESCRIÇÃO DAS TECLAS DO CONTROLADOR CENTRAL DE TEMPORIZADOR SEMANAL 7.1 Disposição geral das teclas do controlador central de temporizador semanal Definição da hora Definição Programação do Consulta do ar Temporizador ar condicionado condicionado semanal On/Off Definição Confirmar para Definição velocidade do modo de guardar... - Page 140 7.2 Instruções das teclas do controlador central de temporizador semanal Tabela.7-1 NOME DA TECLA UTILIZAÇÃO Prima o botão ON/OFF. Todos os aparelhos de ar condicionado serão desligados se estiverem a funcionar, caso contrário, serão ligados. Se premir o botão durante menos de 5 segundos, o modo de arranque é o último modo de funcionamento do ar condicionado.
- Page 141 Tabela.7-2 NOME DA UTILIZAÇÃO TECLA Quando consultar a unidade interior, prima o botão “Reduce” (“Reduzir”) para consultar mais parâmetros da unidade interior. Ao programar a unidade interior, é para modificar a temperatura de programação. Ao programar o temporizador semanal, é para modificar a hora de arranque e paragem. Ao programar a unidade interior, é...
- Page 142 Tabela.7-3 NOME DA UTILIZAÇÃO TECLA Na página principal, prima o botão “Weekly” (“Semanal”) para ligar ou desligar a função de temporizador semanal. Na página principal, prima o botão “Time” (“Hora”) durante 5 segundos para entrar no estado de alteração da hora e, depois, prima o botão “Add”...
- Page 143 7.3 Interface principal do controlador central de temporizador semanal (interface do utilizador) 1) Nas páginas secundárias, prima para voltar à interface principal. 2) Nas páginas secundárias, volta-se automaticamente à interface principal se não houver nenhuma operação durante um certo tempo. 3) A interface principal apresenta o estado em linha da unidade interior.
- Page 144 7.4 Interface de programação de um único controlador central de temporizador semanal 1) Na interface principal, prima para selecionar a interface única de programação 2) Volta-se automaticamente à interface principal se não houver nenhuma operação durante um certo tempo. 3) Programe o estado de funcionamento do único ar condicionado nesta página. Temperatura Programada corretamente Definição...
- Page 145 7.5 Interface de programação dos parâmetros do temporizador semanal de um único controlador central de temporizador semanal 1) Na interface principal, prima para visualizar a interface de programação dos parâmetros de um único temporizador semanal. 2) Volta-se automaticamente à interface principal se não houver nenhuma operação durante um certo tempo. 3) Nesta página, programe os parâmetros do temporizador semanal de um único ar condicionado, incluindo o tempo de arranque, tempo de paragem, o modo de funcionamento deste período, a temperatura e a velocidade de ventilação.
- Page 146 7.6 Interface de programação unificada do controlador central de temporizador semanal 1) Na interface principal, prima para apresentar a interface de programação unificada. 2) Volta-se automaticamente à interface principal se não houver nenhuma operação durante um certo tempo. 3) Programe o modo de funcionamento de todos os aparelhos de ar condicionado nesta página, incluindo o modo, a temperatura e a velocidade do ventilador.
-
Page 147: Descrição Do Fluxo De Funcionamento Do Controlador Central De Temporizador Semanal
8. DESCRIÇÃO DO FLUXO DE FUNCIONAMENTO DO CONTROLADOR CENTRAL DE TEMPORIZADOR SEMANAL 8.1 Como programar o estado de funcionamento do ar condicionado? Na interface principal 1. Prima para entrar na interface do estado de programação 4. Se selecionar o modo de arrefecimento ou aquecimento, prima de um único ar condicionado. - Page 148 8.2 Como consultar o estado de funcionamento do ar condicionado? Na interface principal 1. Prima para consultar o estado do único ar condicionado, visualizando “Query” (“Consultar”); Prima para selecionar um ar condicionado. 2. Prima para ver mais parâmetros do ar condicionado. Fig.8-2 8.3 Como bloquear e desbloquear o controlador remoto do ar condicionado? Na interface principal...
- Page 149 8.4 Como bloquear e desbloquear o modo do ar condicionado? Na interface principal 1. Prima e mantenha premido , depois, prima , entre na interface de programação de bloqueio do modo. 2. Prima para selecionar o bloqueio no arrefecimento ou o bloqueio no aquecimento, prima para enviar o comando de bloqueio do modo.
- Page 150 8.6 Como programar a função e os parâmetros relevantes do temporizador semanal do ar condicionado? Na interface principal 1. Prima para entrar na interface do estado de programação de um único ar condicionado; prima o botão “Set” (“Definir”) repetidamente para selecionar “Single” (“Um”) e “All” (“Todos”) alternadamente;...
- Page 151 5. Prima para selecionar o modo de funcionamento: automático, arrefecimento, aquecimento, ventilação, desumidificação ou paragem. Se selecionar o modo de arrefecimento, automático ou aquecimento, prima para regular a temperatura (intervalo entre 17 - 30 graus). Prima para regular a velocidade de ventilação, a qual pode ser selecionada entre velocidade automática, baixa velocidade, velocidade média e alta velocidade Prima para guardar o parâmetro do...
- Page 152 8.7 Como fechar a programação do temporizador semanal de um período de um ar condicionado? Na interface principal 1. Prima para entrar na interface do estado de programação de um único ar condicionado; prima o botão “Set” (“Definir”) repetidamente para selecionar “Single” (“Um”) e “All”...
- Page 153 4. Programe o parâmetro do período 1, incluindo o tempo de paragem e de arranque, o modo de funcionamento, a velocidade do ventilador e a temperatura. Antes de mais, programe o tempo de arranque e o tempo de paragem. Prima para selecionar o tempo de arranque e o tempo de paragem.
- Page 154 8.8 Como consultar o parâmetro de programação do temporizador semanal do ar condicionado? Na interface principal 1. Prima e mantenha premido , depois, prima no espaço de dois segundos para entrar no estado de consulta de um único ar condicionado; prima para selecionar o ar condicionado a consultar.
- Page 155 8.9 Como iniciar ou parar a função de temporizador semanal de todos os aparelhos de ar condicionado? Na interface principal Weekly 1. Prima 2. Se a função de temporizador semanal estiver desligada, ligue-a; se a função de temporizador semanal estiver ligada, desligue-a. 3.
- Page 156 8.10 Como alterar a hora do sistema? Na interface principal 1. Prima durante 5 segundos, entre na interface de programação da hora. 2. Prima de forma prolongada para selecionar os minutos/hora/dia/ mês/ano que precisam de ser alterados. 3. Primeiro, prima para selecionar o Ano que precisa de ser alterado.
- Page 157 7. Prima novamente para selecionar o “Dia” que precisa de ser alterado 8. Prima para alterar o “Dia” 9. Prima para selecionar a “Hora” que precisa de ser alterada. 10. Prima para alterar a “Hora” 11. Prima novamente para selecionar os “Minutos” que precisam de ser alterados. 12.
-
Page 158: Outros
9. OUTROS 9.1 Um exemplo para mostrar a função do temporizador semanal 1) Veja-se, por exemplo, a unidade interior do ar condicionado com um endereço “04”; programe os parâmetros do temporizador semanal e ligue a função do temporizador semanal de acordo com a operação anterior. - Page 159 Da tabela acima, podemos ver que a unidade interior foi programada, nos parâmetros do temporizador semanal, para dois dias da semana, nomeadamente o período 1, 2, 3 de segunda-feira e o período 1 de terça-feira. Se a função do temporizador semanal for ligada, o ar condicionado funcionará de acordo com a programação do período correspondente quando estiver dentro do período específico.
-
Page 160: Tabela Dos Códigos De Erros E Proteções
10. TABELA DOS CÓDIGOS DE ERROS E PROTEÇÕES Tabela.10-1 Código Conteúdo Outras avarias Avaria de deteção do nível de água Proteção contra avarias da unidade exterior Avaria de restabelecimento Proteção do módulo do inversor Fluxo excessivo do compressor (quatro vezes) Avaria de comunicação entre a placa principal e a placa de visualização Perda de controlo da verificação da velocidade do ventilador Erro EEPROM... -
Page 161: Índices Técnicos E Requisitos
12. CONDIÇÕES BÁSICAS DE Código Conteúdo FUNCIONAMENTO DO CONTROLADOR Outras medidas de proteção Reservado CENTRALIZADO SEMANAL Reservado 12.1 Intervalo aplicável da tensão Reservado de alimentação: Reservado Monofásico, Reservado Fonte de alimentação 50Hz, 198V-242V Reservado Fluxo excessivo do compressor 12.2 Condições de funcionamento: Proteção contra sobretensão ou subtensão Temperatura ambiente: -15°C~+43°C(+5°F~+109°F). - Page 164 FERROLI S.p.A. Via Ritonda 78/a 37047 San Bonifacio - Verona - ITALY www.ferroli.com Made in China...