Advertisement
Quick Links
Packing List
1. iTIVO-HD x 1
2. Universal 12V Adapter x 1
3. RJ45 Pigtail Cable (default) x 1
or RJ5-DB9 Cable x 1
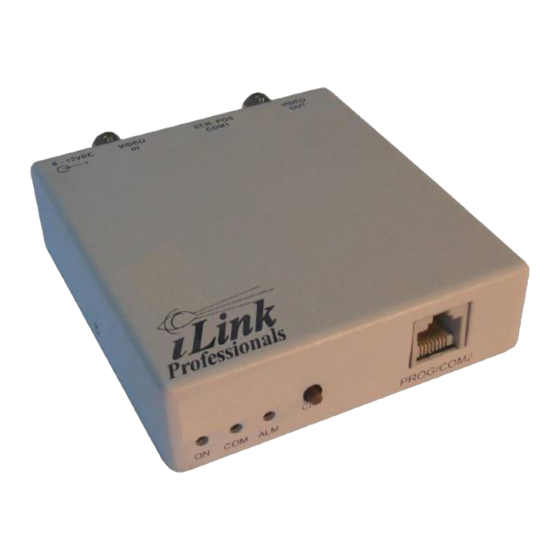
Connection
PROG/COM2 Port
PC programming or event logging /
networking port. This port can be
configured as RS232 or RS485 by
internal RS232/485 jumper setting
Power
on LED
Communication
Activity LED
Alarm/Video Loss LED
DC Power Jack
ECR-POS/COM1 Port
Connect to supplied
Connect to ECR/POS
12VDC adapter
serial port. Use the
supplied RJ45-DB9 cable
for cable conversion
Video In
Connect to Camera
Installing the iTIVO-HD
1. Connect VIDEO IN to video camera
2. Connect VIDEO OUT to TV monitor or digital video recorder (DVR)
3. Plug in the supplied RJ-45-DB9 cable to ECR/POS port and connect the cable to ECR, POS or PC
serial port. If the cable is too short, use a standard DB9 male-female extension cable (not supplied) to
extend the length.
NOTE 1: If the connector of your ECR/POS serial port is not DB9, you may have to make your own
cable or modify the supplied cable. Refer to
NOTE 2: The supplied cable has DB9 pin2 assigned to TX (of iTIVO-HD), pin3 to RX (of iTIVO-HD)
and pin5 to GND. If your cash machine is having standard serial port pinout (a.k.a DTE pinout), then it
should be no problem connecting your cash machine directly to the iTIVO-HD. Please check your
cash machine's hardware manual before you make any connection.
4. Plug in the supplied adapter DC jack and turn on the adapter power. Upon power on, iTIVO-HD gives
a short beep and briefly displays the current firmware version on TV monitor.
Connecting iTIVO-HD to ECR/POS
Quick Start Guide
Front
View
Clear Alarm Button
Rear
View
Video Out
Connect to DVR
or Monitor
Connection
Important Note
This package does not contain application software,
user menu, and other supporting documents. Please
download the latest software and documents here:
http://www.iLinkPro.com
Pinout
PROG/COM2
8 7 6 5 4 3 2 1
GND
ECR-POS/COM1
8 7 6 5 4 3 2 1
OUT
IN
GND
GND
section for pinout of iTIVO-HD.
iTIVO-HD
PIN1
RESET
TX
RX
RTS
TX
RX
CTS
Advertisement

Related Manuals for iLink iTIVO-HD

Summary of Contents for iLink iTIVO-HD
- Page 1 4. Plug in the supplied adapter DC jack and turn on the adapter power. Upon power on, iTIVO-HD gives a short beep and briefly displays the current firmware version on TV monitor.
- Page 2 NOTE: The default RS232 setting of iTIVO-HD is 9600 baud, 8 data bits, no parity bit and 1 stop bit. No flow control. Set your ECR/POS or PC to match this setting. Otherwise, this setting must be changed through PC programming (refer to iTIVO-HD User’s Manual).