Table of Contents
Advertisement
Quick Links
12/24/2018
Getting started with the Crazyflie
2.0
Unpacking the Crazyflie
The Crazyflie 2.0 packet contains the following items. Make sure that you have all of them
before you start assembling.
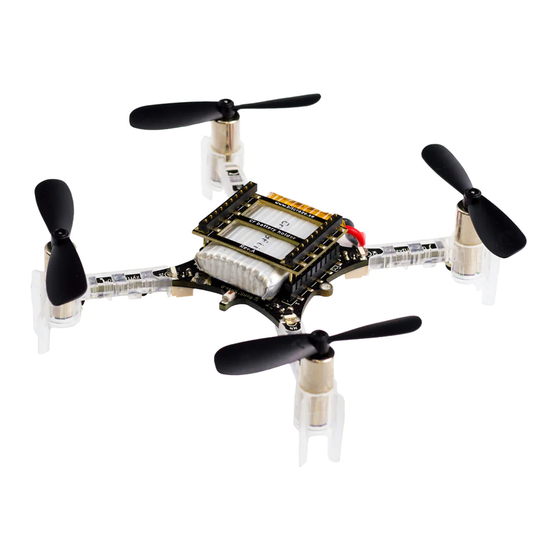
package contents
1 x Crazyflie 2.0 control board with all components mounted
5 x CW propellers
5 x CCW propellers
6 x Motor mounts
1 x LiPo battery (240mAh)
5 x Coreless DC motors
2 x Short expansion connector pins (1×10, 2mm spacing, 8 mm long)
2 x Long expansion connector pins (1×10, 2mm spacing, 14 mm long)
1 x Battery holder expansion board
Testing
The Crazyflie 2.0 is tested extensively in the production, but to make sure nothing has
happened during shipping/storage you should run the tests before starting the assembly.
Power on the Crazyflie 2.0 using a USB source (either computer or charger) and check the
results of the test below. Note that it's important to hold the Crazyflie 2.0 steady during the
test and away from strong magnetic sources.
self-test
Before you start assembling anything, run the power on self-test by connecting the Crazyflie
2.0 to a uUSB power source. The LEDs M1 and M4 will indicate the result of the test. If the
M4 LED blinks GREEN five times fast, then the test has passed.
https://www.bitcraze.io/getting-started-with-the-crazyflie-2-0/
Getting started with the Crazyflie 2.0 | Bitcraze
1/20
Advertisement
Table of Contents

Summary of Contents for Bitcraze Crazyflie 2.0
- Page 1 Power on the Crazyflie 2.0 using a USB source (either computer or charger) and check the results of the test below. Note that it’s important to hold the Crazyflie 2.0 steady during the test and away from strong magnetic sources.
- Page 2 12/24/2018 Getting started with the Crazyflie 2.0 | Bitcraze 0:00 / 0:05 self-test fails If the self-test fails, then the M1 LED blinks 5 times fast RED, then pauses and does it again. Go to our support forum (//forum.bitcraze.io) to get help.
-
Page 3: Mount The Motors
12/24/2018 Getting started with the Crazyflie 2.0 | Bitcraze Assembling your Crazyflie 2.0 will probably take less than 10 minutes, but there are a few pitfalls. So make sure to follow the instructions below! twisting the wires Start by twisting the wires of the four motors. This will reduce electronic noise and make the wires fit better in the motor mount “hooks”. - Page 4 12/24/2018 Getting started with the Crazyflie 2.0 | Bitcraze 0:00 / 0:06 attach the twisted wire Attach the twisted wire into the two small “hooks” that are underneath the motor mount. 0:00 / 0:06 insert the motor https://www.bitcraze.io/getting-started-with-the-crazyflie-2-0/ 4/20...
-
Page 5: Attach The Propellers
Getting started with the Crazyflie 2.0 | Bitcraze Insert the motor mounts on the Crazyflie 2.0 wings. They are press fit and might need a small amount of force. Make sure they go all the way to the stop. It’s not important which motor you put where. - Page 6 Here’s a detailed view of where to attach CW and CCW propellers. attach the rubber pad The rubber pad should be attached to the Crazyflie 2.0 between the expansion headers. This will create friction, keep the battery from slipping out and also protect the electronics.
-
Page 7: Attach The Battery
12/24/2018 Getting started with the Crazyflie 2.0 | Bitcraze There are two types of headers in the box, long and short ones. Find the two short ones and insert them into the expansion connector. 0:00 / 0:06 attach the battery Place the battery between the headers inserted into the expansion connector and insert the battery holder board onto the headers. - Page 8 12/24/2018 Getting started with the Crazyflie 2.0 | Bitcraze power on! The assembly is finished, now it’s time to power it on! Note that the power button is a push button, not a sliding button. During the power-on self-test all the propellers will spin in sequence.
- Page 9 1. Run self tests - the Crazyflie 2.0 checks that the hardware is OK 2. Calibrate sensors - the Crazyflie 2.0 reads its sensors to get base values. It must be absolutely still to do this, so it’s best to put it on a level surface for a second.
- Page 10 Continue reading the next section for instructions on how to install the app on your phone Installing on a mobile device It is really easy to install the app and connect to the Crazyflie 2.0. All you need is an Android or iOS device that supports Bluetooth Low Energy (BLE).
- Page 11 12/24/2018 Getting started with the Crazyflie 2.0 | Bitcraze Continue reading the flying section. Installing on a computer When using a computer to fly the Crazyflie, you also need a standard gamepad (more information (//wiki.bitcraze.io/projects:crazyflie:pc_utils:inputdevices)) for maneuvering and a Crazyradio PA for communication.
-
Page 12: Install Hardware
After downloading the virtual machine, double click it. VirtualBox is now going to start, and ask you to import the virtual machine. Click import. start the virtual machine Now it’s time to start the Bitcraze virtual machine. in VirtualBox, highlight the Bitcraze VM and start it. update source code In the virtual machine double click the “update all projects”... -
Page 13: Installing On Windows
Linux OS X Install the Crazyradio Windows USB driver (https://wiki.bitcraze.io/doc:crazyradio:install_windows_zadig). In the bottom right corner click the USB icon and choose “Bitcraze Crazyradio PA USB dongle”. Now choose your game controller in the same list. start the Crazyflie client Double click the “Crazyflie client” icon on the VM desktop... -
Page 14: Install Usb Drivers
12/24/2018 Getting started with the Crazyflie 2.0 | Bitcraze Download the file named cfclient-win32-install-XXX.exe from the latest release. Install Run the installer install hardware Insert Crazyradio PA in a USB port. Insert game controller in a USB port. Install USB drivers Install the Crazyradio Windows USB driver (https://wiki.bitcraze.io/doc:crazyradio:install_windows_zadig). - Page 15 12/24/2018 Getting started with the Crazyflie 2.0 | Bitcraze download latest firmware Open the web browser and go to https://github.com/bitcraze/crazyflie-release/releases (https://github.com/bitcraze/crazyflie-release/releases). If you are on the VM, open the browser in the VM. download the zip file named crazyflie-xxx.zip from the latest release.
- Page 16 Click the “Initiate bootloader cold boot” button. After a few seconds the status should read “Connected to bootloader”. Click the “Browse” button and go to home/bitcraze/Downloads and select the file you downloaded earlier. Click the “Program” button. The progress bar will go from 0% to 100% twice, as the firmware for the two processors is uploaded to the Crazyflie.
- Page 17 12/24/2018 Getting started with the Crazyflie 2.0 | Bitcraze Click the “Connect” button. Now that you have connected your Crazyflie to your client, telemetry data is continuously sent from the copter to the client. When you move the Crazyflie around you will see the flight data being updated in realtime, as well as battery status and the link quality.
- Page 18 12/24/2018 Getting started with the Crazyflie 2.0 | Bitcraze When flying a quadcopter there are four main dimensions of controls; roll, pitch, yaw and thrust. Roll - is the rotation around a horizontal axis going through the quadcopter from back to front.
-
Page 19: Normal Flight
12/24/2018 Getting started with the Crazyflie 2.0 | Bitcraze normal flight When thrusting without touching any other controls, this is what it might look like. The Crazyflie usually drifts in some direction if not compensated for, this is completely normal. -
Page 20: Charging The Battery
To charge the battery of the Crazyflie 2.0, just plug in a micro USB cable. Make sure the Crazyflie is powered on. While the battery is charging, the back left blue LED will blink. When the LED is fully lit the battery is charged.
Need help?
Do you have a question about the Crazyflie 2.0 and is the answer not in the manual?
Questions and answers