Table of Contents
Advertisement
Quick Links
Advertisement
Table of Contents

Summary of Contents for Gelikom SK1
- Page 1 Instruction manual for Gelikom SK1 Code lock for indoor and outdoor use...
- Page 2 These operating instructions contain the installation instructions and programming instructions for the Gelikom SK1 (from March 2020). It also contains important information on commissioning and handling. Please keep these operating instructions in a safe place, even if you sell them to third parties! A list of the contents can be found in the table of contents with indication of the corresponding page numbers on page 3.
-
Page 3: Table Of Contents
Content: Page 1. Introduction a. Properties b. Intended use c. Safety instructions d. Scope of delivery 2) installation a. Assembly b. Connections c. Restore factory settings d. Connection example e. Sound and light signals 3) Introduction to programming a. Terms & information on b. -
Page 4: Introduction
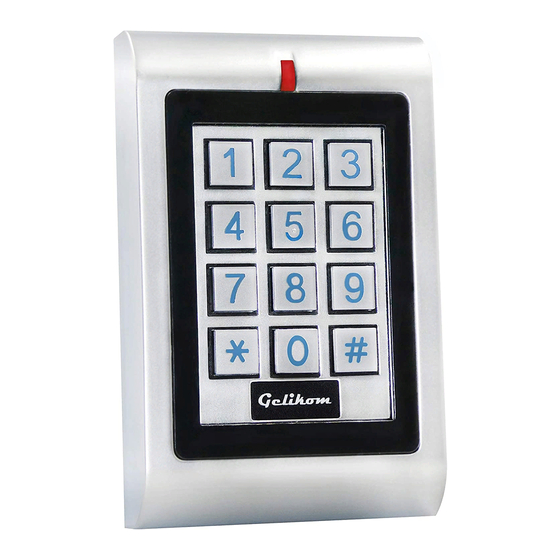
1. Introduction 1a) properties Waterproof according to IP 66 • • Vandal-proof metal housing 2 programmable relay outputs • Stand-alone operation via direct relay output • • Various access settings (RFID or PIN/RFID and PIN/RFID only) Switching mode, for example to keep the door open/closed. •... -
Page 5: Safety Instructions
1c) Safety instructions In the event of damage caused by non-observance of these operating instructions, the warranty / • guarantee expires! For further damages we do not accept liability! We do not accept any liability for damage to property or personal injury caused by improper •... -
Page 6: Scope Of Delivery
1d) Scope of delivery 1x Gelikom SK1 terminal 2x screws 2x dowels 1x screwdriver 1x diode for relay protection (not required) 1x Master Add card (Add = add) 1x Master Delete card (Delete = delete) -
Page 7: Assembly
2) installation Kinked or squeezed cables may result in malfunctions, short circuits and a device defect. When drilling holes in the wall or tightening screws, make sure that no cables or lines are damaged. When selecting the mounting position, note that this must not be exposed to direct sunlight and the product must be protected from vibrations. -
Page 8: Connections
2b) Connections Basic wiring stand alone Wire color function description AC & DC 12-24V DC / 12-28V AC black AC & DC 12-24V DC / 12-28V AC Grey black Minus (only for door contact) blue NO 1 Relay connection 1 (normally open) White COM 1 Relay connection 1 (common contact) -
Page 9: Connection Example
2d) Connection example DC voltage... -
Page 10: Sound And Light Signals
Function Red LED Green LED Blue LED Beep Operational Steady light Short tone Stand by Steady light Keystroke flash Short tone Action flash Flash once Short tone successful Action failed 3 short beeps Program mode flash Flash once Short tone Relay switch 1 Steady light Short tone... -
Page 11: Changing The Master Code
• In the following, programming mode stands for the mode in which changes to users and settings can be made. Enter the programming mode * 123456 # (Important: This is the standard value on delivery from the factory; please change the master code as described in 3b to avoid access by third parties) To exit programming mode, please press Note... -
Page 12: Adding A Pin User
4) User administration under "RFID or PIN" [see 3c] 4a) Add PIN user (please read point 3a carefully beforehand) Recommended method Start programming mode * Master code # Enter user ID and PIN Zone1: 1 user ID # PIN # Zone2: 2 user ID # PIN # III. -
Page 13: Adding Rfid Users
4d) Adding RFID users (please read point 3a carefully beforehand) Recommended method Start programming mode * Master code # Enter user ID and read RFID Zone1: 1 user ID # read RFID # Zone2: 2 user ID # read RFID # III. -
Page 14: Change Pin User
III. Exit programming mode Fast method Read master card Delete Read RFID III. Read master card Delete 5) User administration under "RFID and PIN" [see 3c] 5a) Adding RFID & PIN users (please read point 3a carefully beforehand) Add RFID as with RFID users [see 4d] Exit programming mode III. -
Page 15: Deleting All Users
6) User administration under "RFID only" [see 3c] 6a) & 6b) Adding RFID users & deleting RFID users Please see 4d) & 4e) 7) Delete all users Start programming mode * Master code # Input Zone/Relay1: 30000 # Zone/Relay2: 90000 # III. -
Page 16: Set Relay Switching Time
8b) Setting the relay switching time The switching time can be set from 1-99 seconds. Start programming mode * Master code # Enter the desired switching time Zone/Relay1: 51 switching time in sec. # Zone/Relay2: 52 switching time in sec. # III. -
Page 17: Problems & Solutions
Start programming mode * Master code # Input 60 # 70 # or etc. III. Exit programming mode 9) Problems & Solutions Code lock alarm sounds • The manipulation switch on the back of the device detects manipulation. This often happens when the incidence of light is low. -
Page 18: Technical Properties
10) Technical characteristics User capacity 1100 RFID/PIN Power supply 12-24V DC / 12-28V AC Quiescent current 55mA Operating current 80mA keyboard 12 buttons (3 * 4) PIN length 4-6 digits Card reader Reading technology 125KHz standard EM (e.g. EM4200) Reading distance 3 - 6cm connections Electric door opener, open button, DOTL, external...
Need help?
Do you have a question about the SK1 and is the answer not in the manual?
Questions and answers