Table of Contents
Advertisement
Advertisement
Table of Contents

Summary of Contents for MEDIZS Smart CP11
- Page 3 MEDIZS reserves the right to make changes in its products or product specifications at any time and without prior notice, and is not required to update this documentation to reflect such changes.
-
Page 4: Table Of Contents
CONTENTS 1. Introduction 1-1 Outline of product 1-2 Feature 2. Safety Information 2-1 Safety Symbols 2-2 EU Countries 2-3 Safety Instruction 2-4 General Safety Information 2-5 Notes for Using the Instrument Configurations 3-1 Main Body (front) 3-2 Main Body (rear) 3-3 Remote controller Installation 4-1 Installation and Focusing... -
Page 5: Introduction
1. Introduction 1-1 . Outline of product MEDIZS CP-11 is an Automatic Chart Projector which provides 41 different charts including red/green and polarized filters and orizontal/vertical/single letter mask. Users can select the desired charts instantaneously by cordless remote controller. 1-2 . Features ... -
Page 6: Safety Information
2. Safety Information 2-1 Safety Symbols Symbol Description Protective earth Alternating current This symbol identifies a safety note. Please check instructions in this manual. Power OFF Power ON Disposal of your old appliance 1. When this crossed-out wheeled bin symbol is attached to a product it means the product is covered by the European Directive 2002/96/EC. -
Page 7: Safety Instruction
2-3 Safety Instruction In case that you found „WARNING‟, „CAUTION‟ or „NOTE‟ mark during use of this equipment, please check the description carefully. Ignoring this may cause an injury or an accident. Please read carefully all instructions before switching on this device. -
Page 8: General Safety Information
2-4 General Safety Information This instrument is used with accessories from MEDIZS. If user would like to use the accessories from other manufacturers, safety of accessories should be verified and identified by manufacturer or by MEDIZS. Keep this manual in a place easily accessible at all times for persons operating and maintaining the instrument. -
Page 9: Notes For Using The Instrument
2-5 Notes for Using the Instrument 1. Caution ① Do not disassemble the instrument. It may cause malfunction or electric shock. ② When replacing the lamp, turn off power and disconnect the power cable. And allow the projector to cool down enough time before replacing the lamp. -
Page 10: Configurations
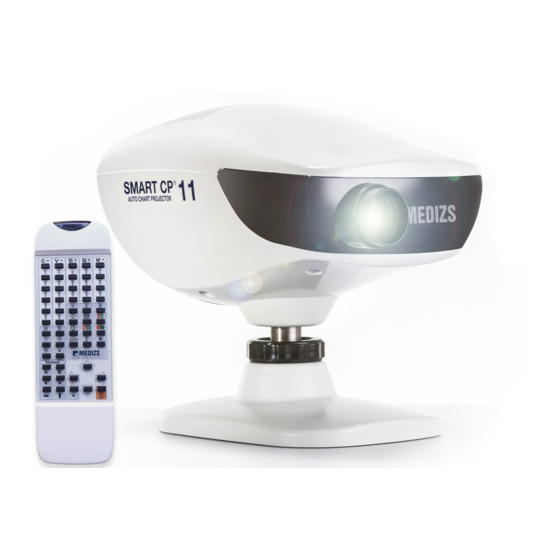
3. Configuration 3-1 Main Body (front) Focusing Wheel Projection Lens Angle Adjustment Wheel Table Stand [Fig. 1] 3-2 Main Body (rear) One Touch Button Spare Lamp Storage (for Halogen Lamp only) Lamp replacement handle [Fig. 2] Communication Port (RS232) Power Inlet Fuse Box Power Switch [Fig. -
Page 11: Remote Controller
3-3 Remote controller Infrared light Transmitter Letter Chart Number Chart Snellen Chart Landolt Chart Children Chart Red/Green filter Eye image Chart Program button Arrow button Horizontal/vertical/ LAMP single latter mask [Fig. 4]... -
Page 12: Installation
4. Installation 4-1 Installation and focusing 1. Position the screen within the range between 2m and 7m to the patient. 2. Position the Chart Projector with same range to the patient. 3. Project 0.05(20/400, 6/120) “C” chart onto the screen. 4. -
Page 13: Charts Description
6. Chart description Charts in CP-11 are as follow A Type (Fraction indication) [Fig. 6]... - Page 14 B Type (Feet indication)
- Page 15 C Type (Meter indication)
- Page 16 D Type (For Russian)
-
Page 17: Program Mode
7. Program Mode User can program desired charts on CP-11. 2 programs are available. Setup program “A” Press „Program-A‟ button long time to enter setup mode. Complete : Beep sound 3 times Select desired chart. Save selected chart by pressing „Program ▶‟ button. ... -
Page 18: Maintenance And Repair
8. Maintenance and Repair 8-1 Basic Trouble Shooting If there‟s some error or malfunction on the instrument, please do self inspection according to following instruction. If the problem still remain after self inspection, please switch off the instrument and contact dealer (refer to „9. Service Information‟) 1. -
Page 19: Lamp Replacement
8-2 Lamp Replacement 1. Switch off the instrument. 2. Allow the projector to cool down for about 10 minutes before replacing the lamp. 3. Put on heat protection gloves. 4. Pull lamp replacement handle on rear side. (Power cable is connected) [Fig. -
Page 20: Sleep Mode
8-3 Sleep mode This instrument enters into sleep mode when there is no use in selected period. User can set 3/5/10 minutes with remote controller. 1. Press „LAMP‟ button to turn off the lamp. 2. Press „Clock Dial‟ button 3 times. Enter into sleep mode setup with beep sound. -
Page 21: Specifications
10. Specification CHART Chart 41 Selections 3 horizontal lines Mask 3 vertical lines 21 single letters Chart selection speed Average 0.2 sec Filter Red/Green Projection distance 2.0m~7.0m (3m is Recommendable) Projection 30 x (at 5m) magnification Lamp Halogen (12V 30W) / P-LED (3W) Power saving 3min / 5min / 10min POWER... -
Page 22: Components List
11. Components List ○ ○ ○ ○ ○ ○ ○ ○ [Fig. 11] Components List Description Quantity 1. Power cable 2. Operation manual 3. Remote controller 4. Batteries (AAA) 5. Metal screen 6. Screw Bolt 7. Polarized glasses 8. Fuse Components List [Table 5]... - Page 23 Appendix A Hold this test scale at the screen and according to the refracting distance from the patient‟s eye to the screen such as 3m, 4m, 5m or 6m position the projector backward and forward to fit the projector Alphabet 400 chart “C” with this Scale frame in sharp focus.
- Page 25 –...
- Page 28 Beyond Medical Excellence 702 Tamnip-Dong, Yuseong-Gu, Daejeon, 305-510 Korea TEL : +82-42-933-5511 / FAX: +82-42-933-5526 http://www.medizs.com / E-MAIL: info@medizs.com...
Need help?
Do you have a question about the Smart CP11 and is the answer not in the manual?
Questions and answers