Table of Contents
Advertisement
Quick Links
Advertisement
Table of Contents

Subscribe to Our Youtube Channel
Summary of Contents for RC Electronics T3000
-
Page 2: Table Of Contents
Key features .............................. 4 Power supply ............................. 4 Controls ..............................5 USB Connector ............................5 SD card reader............................5 3.5 audio jack ............................5 Thermal assistant ............................7 Task ................................9 New ............................... 9 Load ..............................10 Save ..............................10 Setup .............................. - Page 3 Save ..............................16 Start ..............................16 Task ................................. 17 New ..............................17 Load ..............................18 Save ..............................18 Start ..............................18 GPS triangle statistic ..........................21 XC soaring statistic ..........................21 F3F statistic ............................. 21 F3B distance statistic ..........................21 F3B speed statistic ..........................
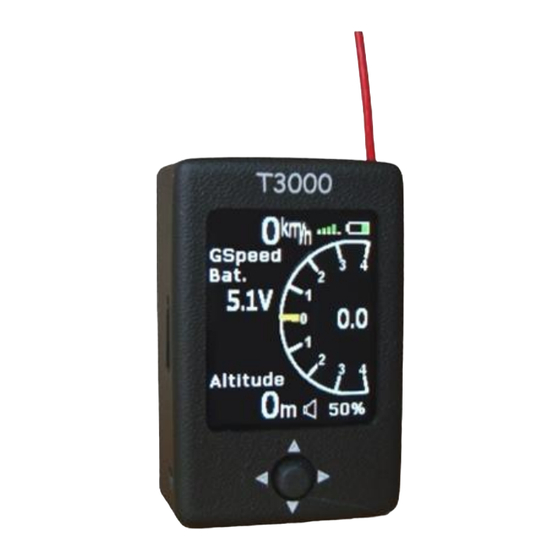
- Page 4 The unit’s main function is a telemetry receiver for the RC Multi 2 system with the RC TRX30 and RC GPS modules. With this system the user can view several parameters of the plane (vario, altitude, GPS position and battery). The Software is designed for many competition tasks or free flying. The user can fly predefined or manually created tasks.
-
Page 5: Audio Jack
There is no data carried on the USB port – no direct communication between the RC T3000 and PC via USB. Only power can be supplied (5V max) via the USB connector. The RC T3000 has a micro SD card slot positioned on the left side of the unit. The SD card is used for: ... - Page 6 The main page consists of basic flight parameters. In the upper section the ground speed information, GPS signal status with green bars, (1 bar represents 3 satellites and 5 bars more than 6 satellites) and the battery indicator are displayed. The main part of this page is the vario indicator with a yellow needle and a numeric value (current vario or average) in the middle.
-
Page 7: Thermal Assistant
Pressing the navigation switch while on the main vario page will activate the thermal assistant. An automatic switch from the main page is also possible by selecting the Thermal assistant item in the setup/vario menu. The Thermal assistant page shows the thermal profile in colors as a percent of the maximum climb rate in the last circle. - Page 8 last known latitude and longitude If the RC T3000 is powered OFF all this data (except last known latitude and longitude) will be reset. Last known latitude and longitude will be stored until “init memory” is done in Setup.
-
Page 9: New
The GPS triangle task is a complex navigation procedure which guides the pilot from the start point around 3 turn points until the finish line. The task can be created manually or imported from the SD card. On this page the pilot can find basic information on how to approach the next TP on the task. -
Page 10: Load
Load To load a pre-generated task you should upload the task file (.afg file) into the RC/TSK folder on the SD card. After selecting the “LOAD” option, all .afg task files in that folder will be shown. Select the required task file from the list and it will be uploaded. -
Page 11: Load
Course tracking - The XC soaring navigation page shows the course as a solid green line connecting the turn points. Current bearing to the next turn point is shown as a solid white line. The turn points are shown as yellow circles which depict the turn cylinders. -
Page 12: Setup
Setup This menu allows you to change the turn cylinder radius. Press Enter and use the up/down functions of the navigation switch to change it. The task will be recalculated when you leave this menu. Start To start/restart the task, select the “START” option. On the Task navigation page “ARMED” text will be displayed when the start is triggered. - Page 13 The F3F navigation page shows the course as a solid green line connecting the turn points. The two turn points are shown as yellow lines. These yellow lines define an infinite plane that is the turn point. The course and turn point lines are perpendicular.
- Page 14 Load To load a pre-generated task you should upload the task file (.f3x file) into the RC/TSK folder on the SD card. After selecting the “LOAD” option, all .f3x task files in that folder will be shown. Select the required task file from the list and it will be uploaded.
- Page 15 The F3B distance navigation page shows the course as a solid green line connecting the turn points. The two turn points are shown as yellow lines. These yellow lines define an infinite plane that is the turn point. The course and turn point lines are perpendicular.
- Page 16 Load To load a pre-generated task you should upload the task file (.f3x file) into the RC/TSK folder on the SD card. After selecting the “LOAD” option, all .f3x task files in that folder will be shown. Select the required task file from the list and it will be uploaded.
- Page 17 The F3B speed navigation page shows the course as a solid green line connecting the turn points. The two turn points are shown as yellow lines. These yellow lines define an infinite plane that is the turn point. The course and turn point lines are perpendicular.
- Page 18 Load To load a pre-generated task you should upload the task file (.f3x file) into the RC/TSK folder on the SD card. After selecting the “LOAD” option, all .f3x task files in that folder will be shown. Select the required task file from the list and it will be uploaded.
- Page 19 Thermal task does not have a Task navigation page although the statistic page is working normally. It is the only task where a GPS signal is not needed. Navigation switch actions: left -> Text page right -> Logbook/Statistic page ...
- Page 20 flight time The logbook is stored in the RC T3000 internal flash memory. Pressing Enter on any flight in the logbook displays flight info – statistics of completed task. Navigation switch actions: left -> Task navigation page right ->...
- Page 21 start time start altitude and speed number of laps average task speed penalty points flight time scoring code start time flight time distance flown average task speed flight time ...
- Page 22 start time flight time average task speed legs flown...
- Page 23 To leave the menu, use left or right movements of the navigation switch. The user has an option to save or load a personal profile on the RC T3000. The personal profile contains all of the user’s changed settings: vario settings, units, beeps and voice settings.
- Page 24 (from high to low or low to high, depending on the trigger setting). In the Units options the user can select the different units which the RC T3000 can display. Values: ...
- Page 25 The user has the option to set a user defined beep for entering inside the turn point zone, when penalty points are calculated on crossing start line, and alerts on the distance to the turn point (beep will be generated 100m, 50m and 20m before turn point).
- Page 26 If these warnings are triggered a warning box will be shown on the page and the user must confirm it by pressing the navigation switch to hide the warning. To access some special functions of the RC T3000 unit, different passwords can be entered: ...
- Page 27 A long press (approximately 2 seconds) on the navigation switch will power the unit ON. The first indication that the power has been turned on is the presence of the RC Electronics logo. After you see the logo, release the switch. If the press is too long the unit will switch OFF due to a safety feature to prevent unintended power on.
- Page 28 Insert the SD card to the RC T3000 unit. Power the RC T3000 ON. You will see the “Updating…” page. When update is finished (after 3 seconds), the unit will power OFF automatically. Power it ON again and you are ready to use the new firmware.
Need help?
Do you have a question about the T3000 and is the answer not in the manual?
Questions and answers