
Related Manuals for Display DT-VMMv2

Summary of Contents for Display DT-VMMv2
- Page 1 PROJECTOR VERTICAL MIRROR MOUNT DT-VMMv2 Installation Manual Installation Manual Revision 2.0 Revision 2.0...
-
Page 3: Table Of Contents
Manual Contents Vertical Mirror Mount v2 ............5 Product description ..............5 Warranty ..................6 Storage and Transport ............. 6 Please read prior to installation ...........7 Important notes ................ 8 Manual updates ..............8 Safety information ..............9 Unpacking ................11 Installation ................12 Positioning the Mirror ............ -
Page 5: Vertical Mirror Mount V2
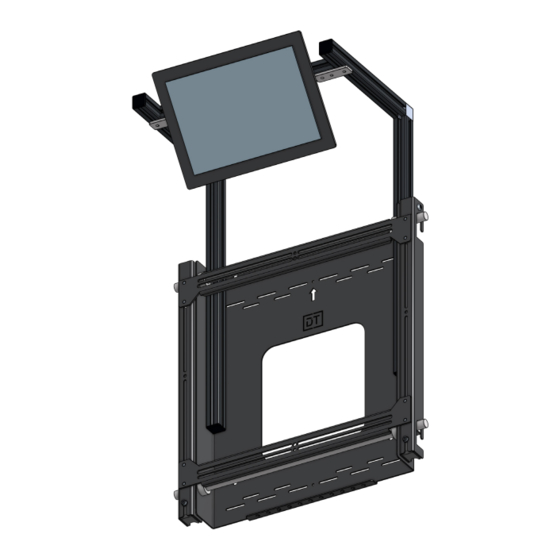
Manual Contents Vertical Mirror Mount v2 PRODUCT DESCRIPTION VERTICAL MIRROR MOUNT V2 DT-VMMV2 On wall projector mirror mount with universal projector mounting and orientation. DT Vertical Mirror Mount v2 is an on wall projector mirror mount featuring high performance optical mirrors, universal projector interface and flexible configuration to handle all install scenarios. -
Page 6: Warranty
WARRANTY All Products from Display Technologies Ltd carry a 3 year limited warranty for parts only, against failure due to parts or workmanship. Any parts required for warranty repair are supplied strictly on an Ex Works basis. Display Technologies Ltd are not responsible for any damage or repair caused to the product or surroundings by incorrect or unsuitable installation. -
Page 7: Please Read Prior To Installation
Manual Contents Please read prior to installation Before installation of this mount you should fully read these instructions to ensure you are aware of the full installation procedure. In addition to the mount and accessories and in order to carry out the installation you will need: •... -
Page 8: Important Notes
To ensure that you always have the latest SCAN QR CODE version always check against the relevant for latest manual product on our website – and product information www.displaytechnologies.co.uk Any support questions can be sent to our support team – support@displaytechnologies.co.uk Vertical Mirror Mount [DT-VMMv2]... -
Page 9: Safety Information
Manual Contents Safety information Maximum supported projector weight 50kg [110lbs] Maximum supported projector mounting hole spacing 440mm wide x 453mm - M8 Max DANGER: Risk of Electrical shock. Only authorised persons should open electrical control boxes contained within or for the control of this product. WARNING: Do not exceed the weight capacity stated for each product or component. - Page 10 16. Do not use outdoors unless marked for outdoor use. 17. Exceeding the weight capacity can result in serious personal injury or damage to equipment. 18. Only use in marine applications where the product is specifically a Marine model. Vertical Mirror Mount [DT-VMMv2]...
-
Page 11: Unpacking
Manual Contents Unpacking Unpack the mount ensuring that all the relevant parts are present. 1] Loosen the two lock plates and slide down to release. Fig.1. Removing the projector mount plate 2] Remove the projector frame from the mount plate. Installation Manual –... -
Page 12: Installation
Align in the desired position to suit the projector. (You may want to ‘Dry Fit’ the projector to the mount first to gauge the correct position for the Mirror). Re-tighten the M6 Bolts. Fig.2. Pulling out the Mirror Vertical Mirror Mount [DT-VMMv2]... -
Page 13: Installing The Mount Plate
INSTALLING THE MOUNT PLATE Using the central top hole on the mount plate screw the plate to the wall. Rotate the mount plate to ensure that it is vertical Screw a second screw in the middle hole of the rear row of mount holes Using suitable fixings (to fix the total weight of the projector and mount) fix the mount plate to the wall using both... -
Page 14: Fitting The Projector Frame
Tighten all the M6 nuts holding the bottom bar and top bar of the mount frame. Use the 10mm socket spanner provided for this. Fig.5. Fitting the bottom bar to the projector Vertical Mirror Mount [DT-VMMv2]... -
Page 15: Hanging The Projector
HANGING THE PROJECTOR Lift the projector up to align it with the mount plate on the wall Lift the projector so that the hooks on the projector plate engage with the rods on the mount plate and pushed right back. Slide in the two lock plates and tighten the lock bolts. -
Page 16: Rotation Adjustment
Do this until the desired rotation in achieved. Tighten the locking bolts on the locking plates at the bottom of the mount ensuring that the locking plate is tight against the handing bar. Fig.7. Perpendicular rotation adjustment Vertical Mirror Mount [DT-VMMv2]... -
Page 17: Mirror Adjustment
MIRROR ADJUSTMENT Once installed and with the projector on use a Monoscope Test pattern on the projector to align the mirror. LENS CENTRING Slacken the mirror bars bolt Adjust to centre the mirror to the centre of the lens. The exact location will depend on the model of projector. - Page 18 EXAMPLES: Fig.10. Correct pivot setup Fig.12. Incorrect pivot setup - example 2 Fig.11. Incorrect pivot setup - example 1 CORRECTIVE ACTIONS: Pivot Mirror forward CORRECTIVE ACTIONS: Pivot Mirror back Vertical Mirror Mount [DT-VMMv2]...
- Page 19 Projector Movements Once you have a rectangular image the VMM is set up. Now use the projector lens shift and zoom to align the image to the screen. Fig.13. Image alignment after the Mount setup Installation Manual – Revision 2.0...
- Page 20 Display Technologies Ltd 272 Bath Street, Glasgow, UK www.displaytechnologies.co.uk info@displaytechnologies.co.uk...
Need help?
Do you have a question about the DT-VMMv2 and is the answer not in the manual?
Questions and answers