Advertisement
Quick Links
Advertisement

Related Manuals for Dux CICLON L

Summary of Contents for Dux CICLON L
- Page 1 Macerator Pumps & Lifting Station Technical presentation Part 1...
- Page 2 Index Brief history and product background. Product range & characteristics. Benchmarking with SFA range Installation & Servicing...
- Page 3 History & Product Background The first model was launched in 2002. It incorporated a revolutionary characteristics which created market trend. Smooth design instead of the “shoe box” concept offered by the competitors.
- Page 4 History & Product Background Easy to use (just flush the toilet) - all the operation is automatic. Easy to maintain - the cassette concept, allows accessing to the unit’s engine WITHOUT moving the toilet and all the units connected to the macerator. Easy and straightforward to repair.
- Page 5 History & Product Background A second model, more compact. Pumping station followed shortly after.
- Page 6 Product Range Install it anywhere. Just select the inlets you need and the pumping height you require.
- Page 7 Product Range The complete product range here:...
- Page 8 Product Range Choose one depending on your needs. Dish Washing washer machine Basin Shower Bidet Sink...
- Page 9 Product Characteristics @ 23 l/min @ 23 l/min @ 23 l/min Lucia di Piave, 24th November 2011...
- Page 10 Product Characteristics Sanitary Macerator. 1 WC inlet, 2 bottom side inlets (1 ½”) Compatible with wash basins, shower trays & bath tubs. 1 vertical outlet (25mm PN15), with non-return valve, suitable for PVC pipes. Pumping capacity: 6 m (vertical) or 62 m (horizontal). 95 l/min (2m)- 23 l/min (6m).
- Page 11 Product Characteristics...
- Page 12 Product Characteristics Up to 2 m Up to 12 m Up to 22 m Up to 32 m Up to 42 m Up to 52 m Up to 62 m Horizontal distance...
- Page 13 Product Characteristics Compact Sanitary Macerator. 1 WC inlet, 1 bottom right side inlet 1 ½” Compatible with wash basins. 1 vertical outlet (25mm PN15), with non-return valve, suitable for PVC pipes. Pumping capacity: 5 m (vertical) or 52 m (horizontal). 85 l/min (2m)- 23 l/min (5m).
- Page 14 Product Characteristics Ø25mm PN15...
- Page 15 Product Characteristics...
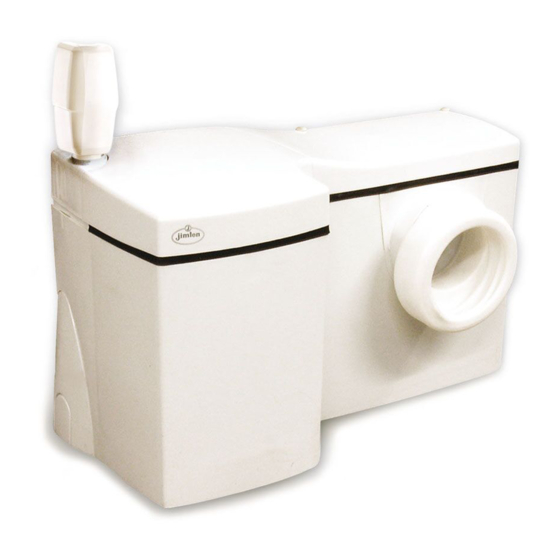
- Page 16 Product Characteristics Lifting Station 2 top inlets (1 ½”), 3 side inlets (two at the bottom) Compatible with wash basins, shower trays & bath tubs. 1 vertical outlet (25mm PN15), with non-return valve suitable for PVC pipes. Pumping capacity: 5 m (vertical) or 52 m (horizontal). 85 l/min (2m)- 23 l/min (5m).
- Page 17 Product Characteristics Ø25mm PN15...
- Page 18 Product Characteristics...
- Page 19 Benchmarking with SFA Equivalent product per application.
- Page 20 Benchmarking with SFA Per product: Wall separation 217 mm 227 mm Engine system Submerged Clean in casset system Max. pumping 5 m vertical 5 m vertical height / distance 100 m horizontal 52 m horizontal Motor (W) 400 W 470 W Weight 5.4 Kg 7.95 Kg...
- Page 21 Benchmarking with SFA Per product: Wall separation 217 mm 227 mm Engine system Submerged Clean in casset system Max. pumping 5 m vertical 5 m vertical height / distance 100 m horizontal 52 m horizontal Motor (W) 400 W 470 W Weight 5.4 Kg 7.95 Kg...
- Page 22 Benchmarking with SFA Per product: Wall separation 204 mm 217 mm Engine system Submerged Clean in casset system Max. pumping 7 m vertical 6 m vertical height / distance 110 m horizontal 62 m horizontal Motor (W) 1100 W 550 W Weight 10.0 Kg 10.8 Kg...
- Page 23 Benchmarking with SFA Per product: Size (w/h/t) mm 295/145/162 413/270.5/180 Engine system Submerged Clean in casset system Max. pumping 4 m vertical 7 m vertical height / distance 40 m horizontal 72 m horizontal Motor (W) 250 W 390 W Weight 3.5 Kg 7.6 Kg...
- Page 24 Benchmarking with SFA Per product: Size (w/h/t) mm 375/276/185 413/270.5/180 Engine system Submerged Clean in casset system Max. pumping 5 m vertical 7 m vertical height / distance 50 m horizontal 72 m horizontal Motor (W) 400 W 390 W Weight 6.3 Kg 7.6 Kg...
- Page 25 Benchmarking with SFA Per product: Size (w/h/t) mm 375/276/185 413/270.5/180 Engine system Submerged Clean in casset system Max. pumping 7 m vertical 7 m vertical height / distance 70 m horizontal 72 m horizontal Motor (W) 400 W 390 W Weight 6.4 Kg 7.6 Kg...
- Page 26 Installation Guide Installation video: [Play the video here]...
- Page 27 Installation Guide Main tips: Connected Always pump sanitary first the vertical appliances do gap and later the not need a trap horizontal Installing a non- return valve is a must. Lateral inlets must come from a 1-2% sloped pipe...
- Page 28 Installation Guide Main tips: When a shower tray or a bathtub is Ensure that lateral inlets equipped with the non-return valve are correctly installed minimum height must be assembled (NRV flap opens towards respected, otherwise waste water may appear onto the shower enclosure. the unit).
- Page 29 Installation Guide Main tips: Ensure when installing the outlet pipe When assembling a toilet ensure the pan connector correctly fits into the that no glue falls inside the NRV, this toilet spigot and the macerator unit could cause malfunction as it may not operate (open and/or close) properly.
- Page 30 Installation Guide Main tips: Always ensure there is a minimum Ensure the macerator is not concealed gap of 22 cm in the installation above behind a wall or at a different level the unit to allow access for from the wc which might prevent its maintenance.
- Page 31 Installation Guide Main tips: Prevent the installation Install a vac-valve if the Washing machines, Pipe must only run of 90º elbows on the unit pumps water to a dish washer machines vertical (straight) or outlet running pipe, use collector pipe below or other units equipped horizontal (with a 1-2% 45º...
- Page 32 Maintenance Guide Normal operation does not require any specific maintenance.
- Page 33 Maintenance Guide Fast access to all the electrical & Easy access from the left side of a toilet. mechanical parts which might require servicing . One screw away from accessing to Avoid disassembling all the pipe the motor, capacitor, pressure switch, connections and the toilet screws to triac and wiring parts.
- Page 34 Maintenance Guide Required tools Screw driver Hand made tool (to position the pressure switch pipe). Hand made pliers (to help securing the security ring to the pressure switch). Protection gloves Procedure Always ensure the unit is disconnected from the power supply and close the water supply prior to any operation.
- Page 35 Maintenance Guide Electrical wiring BLUE BROWN BLACK BROWN All the connections are faston equipped.
- Page 36 Maintenance Guide Cassette access top view Cassette access bottom Capacitor & TRIAC Motor External impeller blade Motor Pressure switch Pressure switch measuring point In case of blockage, servicing access All the electrical parts which might should be made here. need servicing are here.
- Page 37 Maintenance Guide Pressure switch top view Capacitor & Triac Pos. 1 To cable (brown) Pos. G To cable (black) Pos. A2. Double faston. To cable Pos.A1. (brown) To cable (brown) Pos. 3 To cable (black) Unused Pressure switch measuring point Capacitor and pressure switch come with faston All the pressure switch come factory regulated for easier assembly.
- Page 38 Maintenance Guide Spare parts (CICLON L)
- Page 39 Maintenance Guide Spare parts (CICLON XS)
- Page 40 Maintenance Guide Spare parts (CICLON LS)
-
Page 41: Troubleshooting
Troubleshooting... - Page 42 Ciclon product. follow-up. • Dux offers a 2 year warranty for all its sanitary macerators & lifting stations. • This warranty includes all manufacturing product failures, covering the cost of spare parts, labor costs and transport, but does not include any costs when failures are caused by...
- Page 43 Maintenance Guide Typical product failures: Improper use. Toilet used to evacuate elements which block the motor. Inadequate installation. Product installed not according to installation manual or using it for un-approved applications. Product failure. Electrical or mechanical failure.
- Page 44 Maintenance Guide How-to Macerator will not start Electrical supply Check wiring / switches / Fuse / Circuit breaker Thermotrip motor Wait 20 min (aprox). If protection you hear a buzz without further movement pump might be blocked. Macerator works, does Outlet pipe or unit Cassette disassembly not discharge or...
- Page 45 Maintenance Guide How-to The motor buzzes, but Pump is blocked. Cassette must be does not spin. extracted, bottom blades should be cleaned. After use, the macerator Water loss from WC or Fix leakages from WC or hunts on and off. auxiliary connections.
- Page 46 Maintenance Guide How-to Water returns to the Minimum fall for the inlet Correct installation. 18 shower tray or bathtub pipe has not been met. cm height under the shower tray is required. Clean NRV. The inlet non-return valve blocked. Pressure switch Replace the pressure malfunction switch...
- Page 47 Maintenance Guide User caused typical failure issues: Blade’s jam due to inappropriate toilet use. (1) Macerator used with sinks, washing machines, dishwashers. (2). Use of inadequate cleaning products. (3) Blades must be accessed un-screwing and removing all elements causing blockage.
- Page 48 Maintenance Guide Installer caused typical failure issues: Concealed product installation (In-wall). (1). Shower tray height from ground lower than required (18 cm). (4) Inadequate outlet pipe (other than 25mm PN15) use. (2) Vertical non-return valve glued in excess, thus avoiding to close/open, or not installed. Exceeded maximum pumping distances.
- Page 49 Maintenance Guide Installer caused typical failure issues: Faulty installations must be changed to avoid these failures.
- Page 50 Servicing...
- Page 51 Maintenance Guide Step by Step product disassembly. To replace the pressure switch and pipe, the cassette unit must be accessed. Unplug from power line before any further action. Remove hub cap & unscrew cassette cover...
- Page 52 Maintenance Guide Step by Step product disassembly. Bolts to enable easier casset extraction All the products must be installed with a 22 cm free top area to allow the cassette disassembly.
- Page 53 Maintenance Guide Step by Step product disassembly. Remove cassette cover. Remove motor ventilation casing and any other electrical component which may interfere on accessing silicone pressure switch pipe.
- Page 54 Maintenance Guide Step by Step product disassembly. If hose rework needs to be done on installed products, this rework must be done with cassette out from product’s body. Proceeding this way, it will prevent water on products body accessing inside cassette when removing...
- Page 55 Maintenance Guide Replacing the vertical NRV It’s advisable to pump clean water into the pipe before replacing or checking the non-return valve. Remove fixation clip. Remove 1 1/4” nut. Non-return valve joint. A recipient to collect all the water coming from the vertical pipe should be prepared.
- Page 56 Visit us at www.dux.co.nz...
Need help?
Do you have a question about the CICLON L and is the answer not in the manual?
Questions and answers