Table of Contents
Advertisement
Quick Links
Advertisement
Table of Contents

Summary of Contents for Dr. Bridge KHG
- Page 1 V8.0C Profashional Edition 2017-01-09 WWW.KHGUARDIAN.CO M...
-
Page 4: Table Of Contents
User Manual Contents Main Features Installation Instruction The KHG exterior & features Quick Install Main Display Main Control of KHG KHG System Setup The Meaning of Log Field Error Message and Troubleshooting Additional User Instructions Appendix... -
Page 5: Main Features
With the “C” version, no need to change the existing calcium reactor and alkalinity dosing. We do recommend to slightly decrease your current dKH dosing parameters below your desired target, and let KHG do the final fine tuning for your tank automatically. Installation Instruction The KHG exterior &... -
Page 6: Quick Install
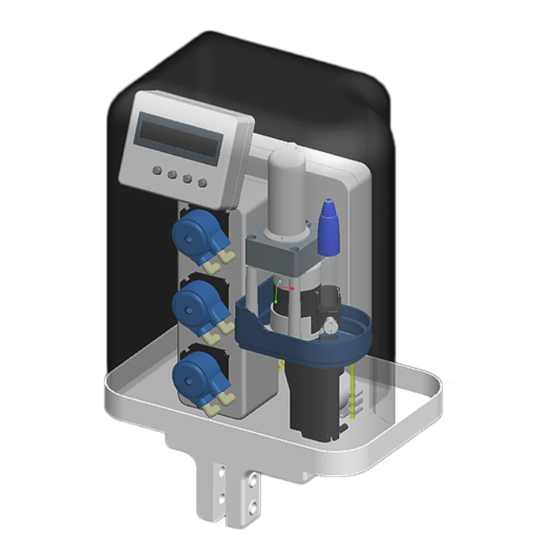
When installing KHG, please ensure the KHG is placed on level ground and is completely upright (Figure 4). At least a construction grade levelling tool must be used to make sure the placement of KHG is level on the X, Y, and Z axis. Complete levelling is crucial as to keep the sodium bicarbonate solution from dripping on the optical and electronical components before entering the reactor chamber. - Page 7 Sodium Bicarbonate Solution OUT. This tube connects to your tank or sump. It delivers the sodium bicarbonate solution to your tank to use in combination with the KH auto correction feature of KHG. Reagent Solution. This tube connects to the KHG reagent solution bottle.
- Page 8 If KHG shows “KS_ERR”, there may be blockage in the tube and KHG will force into areboot. At the same time please check if the tube is free from blockage and make sure there are reagent solution in the storage bottle.
-
Page 9: Main Display
User Manual Please note, if the alkalinity obtained by the KHG deviate by 1.5 dKH from your desired dKH setting (“KH auto correction”), KHG will show error messages. KHG will assume this is a major deviation and will suspend all subsequent dosing of sodium bicarbonate solution and enter into a forced reboot and return back to standby mode. - Page 10 LED is blinking steadily, please press the “RESET” button to stop. ENG Mode ON Advanced function only. Do not use unless being instructed by a qualified KHG support staff. ENG Mode OFF Advanced function only. Do not use unless being instructed by a qualified KHG support staff.
-
Page 11: Khg System Setup
Date and time of the current testing performing. KHG System Setup Auto mode: Default value is 1. 1 means KHG is in automatic mode. Any other value will disable automatic mode. Check intervals (Min): This is to set the minutes intervals between each KHG test. Unit is minutes. We recommend setting the intervals to 180 minutes. - Page 12 KH auto correction : This is to set your desired tank dKH value. The unit is dKH. As a full functioning dKH controller, KHG not only monitors your tank alkalinity, but with KH auto correction, KHG will also actively maintain your desired dKH level.
- Page 13 Clear SD: Press “DO” to initiate SD card memory purge. KHG has log feature for user analysis. However, the record log takes up memory on the SD card, and we recommend performing the SD card memory purge every 3 months.
-
Page 14: The Meaning Of Log Field
User Manual The Meaning of Log Field eg: 10/07 15:07:49 W.131 %0 AK.35.00 KH :7.90 (Figure 12) • 10/07 22:12 Date / Time. • W.131 Tank Water Input Pump run how many pitches. • optically matching agent dropped speed to assess the percentage of possible errors. •... - Page 15 KH<ERR = KH value low error This error message indicates the tested value is 1.5dKH lower than the “KH auto correction” setting. KHG will stop dispensing Sodium Bicarbonate until this error has been cleared. Please check if your “KH auto correction” setting is a reasonable.
-
Page 16: Additional User Instructions
Upon initial assembly and installation, please make sure to perform 5 (five) dKH readings to ensure optimal performance and accuracy. Upon using KHG, at any time if you wish to move KHG, you must use the "Purge Chamber" function to completely drain out all liquids in the Reaction Chamber. Moreover, please detach and invert the Reaction Chamber from the unit and pat dry the insides with paper towel. - Page 17 Gateway : 192.168.1.1 Port : 8090 Please note the above default setting cannot be changed. If your mobile devices are in this IP range, you can connect to the KHG by entering below in your browser : http://192.168.1.120:8090 Page 13...
- Page 18 We would strongly recommend to keep KHG in a protected container away from saltwater splashes. Please contact your dealers for details. Please do not attempt to open the cover of the KHG other than normal cleaning along the path of the liquid tubings. Warranties are void if the KHG body cover has been opened.
- Page 19 User Manual Display Panel Short-Cuts: To calibrate pH 4: Press and hold buttons 1 + 4 for 3 seconds. To calibrate pH 7: Press and hold buttons 2 + 4 for 3 seconds. To KS_DS_Gas: Press and hold buttons 1 + 2 for 3 seconds. To SW_Tube De_Gas: Press and hold buttons 1 + 3 for 3 seconds.
- Page 20 Contact : SALES@KHGUARDIAN.COM SUPPORT@KHGUARDIAN.COM...
Need help?
Do you have a question about the KHG and is the answer not in the manual?
Questions and answers