Advertisement
Assembly and mounting
instructions for the
ChopShop Saw Hood
1
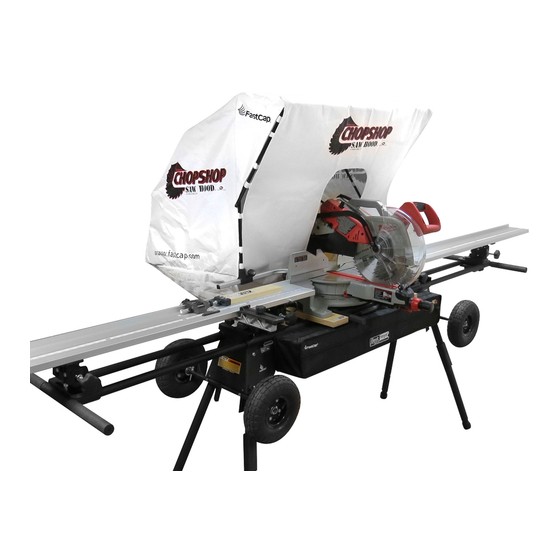
Remove ChopShop Saw
Hood and aluminum poles
from box.
4
Unstrap the 3 Velcro hood
wraps and let the saw hood
fall into position.
Some small modifications
STOP
to the Saw Hood may
be necessary, allowing it
All miter
to fit into the accessory
box saws
mounting holes on each
are not the
individual saw. These
same
modifications are generally
limited to:
FastCap LLC • 888-443-3748 • www.fastcap.com
2
Insert the aluminum pole in
the peacock tail and tighten
knob.
5
We recommend that you
place a trash can or box under
the ChopShop Saw Hood,
which allows the dust and
debris to collect in one spot.
1. Grinding
a corner off
the aluminum
mounting arm
where the
round 3" post
attaches.
WE INNOVATE
3
Insert 1/2" roll pipe into
accessory holes in mitre saw.
Some accessory holes are
1/2" or 5/8" in diameter. If
there is a little movement
this should not be a
problem.
6
You can also mount the
ChopShop Saw Hood to a
table. Two mounting holes on
each peacock tail will accept
standard wood screws.
2. Making a
bushing out of
a 1/2 copper pipe
allowing the 3"
mounting post to
fit into the larger
diameter accessory
holes.
Advertisement
Table of Contents

Related Manuals for FastCap ChopShop

Summary of Contents for FastCap ChopShop
- Page 1 Unstrap the 3 Velcro hood You can also mount the place a trash can or box under wraps and let the saw hood ChopShop Saw Hood to a the ChopShop Saw Hood, fall into position. table. Two mounting holes on...
- Page 2 (C). • Adjust accessory hole (A) to an upright position and clamp down using handle (B). • Now, simply place the ChopShop Saw Hood accessory rods (D) into the accessory hole on tile clamp. Now you are ready to go.
Need help?
Do you have a question about the ChopShop and is the answer not in the manual?
Questions and answers