
Summary of Contents for Shelly ShellyEye
- Page 1 3G & WiFi Smart Camera USER GUIDE WARRANTY & WARRANTY TERMS Allterco Robotics EOOD Sofia, Bulgaria © 2018...
- Page 2 The smart camera with 3G & WiFi, Shelly Eye by Allterco Robotics streams live video, saves videos on Cloud or SD. Shelly Eye can send motion and audio detected alerts, hear and respond with two-way audio and the integrated battery provides up to a 24h of recording without power supply.
-
Page 3: Specification
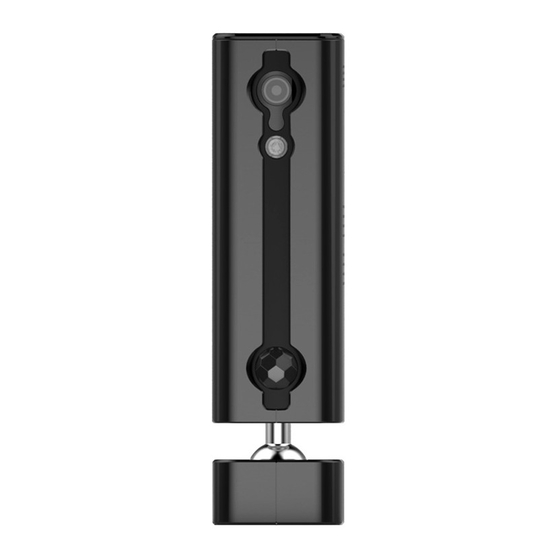
Specification Camera Sensor: 1MP CMOS Motion detection Resolution: • Angle - 120° • HD – 1280x720 p • Range – up to 5 m • WVGA – 640x352 p Power supply: 5V/2A DC Camera Lens: Power consumption: < 5W • Aperture - F2.2 Battery: Li-Ion 1000mAh •... -
Page 4: Mobile Application
CAUTION! Keep the remote control devices (mobile phones, tablets, PCs) away from children. CAUTION! Use the Device only with power grid which complies with all applicable regulations. In case Shelly Eye is connected to the power grid and a short circuit occurs, it may damage the Device. MOBILE APPLICATION FOR SHELLY EYE ®... -
Page 5: Initial Setup
All you need is an Internet connection and our mobile application, installed on your smartphone or tablet. Initial Set-Up The first time you open the Shelly Eye mobile app, you have to create an account to manage your Shelly Eye® cameras. Registration 1. - Page 6 You will see the following screen - fig. 5 Scan the QR code placed on Shelly Eye. Upon successful scan of the code, the UUID of the Device will be shown below the QR code frame. Press the tick sign at the top right of the screen.
- Page 7 Device to another Wi-Fi network, reset it. To reset the Device press the button 10 consecutive times, then the LED will turn purple. After that the Device will restart. If not, please repeat or contact our customer support at: support@shelly.cloud fig. 6 fig. 7...
- Page 8 Step 3: You will hear a voice prompt to scan the QR code on your phone with Shelly Eye. Place the screen of your phone in front of Shelly Eye and wait for the camera to scan the QR code (fig. 9).
- Page 9 Press Next when you hear the voice prompt that Shelly has scanned and connected successfully. Step 5: Your Shelly Eye will connect to your WiFi and will be added to your account (fig. 10). Step 6: You will hear the voice prompt that Shelly has connected successfully. Press on “Start Using”...
- Page 10 Press on “No voice prompt” (fig. 6) Step 2: Your Shelly Eye will connect through mobile data and will be added to your account (fig. 10). Step 3: You will hear the voice prompt that Shelly has connected successfully. Press on “Start Using”...
-
Page 11: Warranty Terms
Manufacturer using the contact data of the Manufacturer’s company. 6. The User may contact the Manufacturer via e-mail at support@shelly.cloud for operational problems that may be resolved remotely. It is recommended that the User contact the Manufacturer before sending the Device for servicing. - Page 12 • Intentional or negligent improper handling, storing or transportation of the Device, or in the event of non-observance of the instructions included in this warranty.; • When a non-standard power supply, network, or faulty Devices have been used; • When there is a non-compliance between warranty card and/or without a purchase receipt, or attempted forgery of these documents, including (but not limited to) the warranty card or the documents proving the purchase.
- Page 13 12. The Manufacturer is not responsible for any property damage caused by a defect in the Device. The Manufacturer is not liable for indirect damages (including but not limited to loss of profits, savings, lost profits, claims by third parties) in connection with any defect of the Device, nor for any property damage or personal injury arising out of or related to the use of the Device.
Need help?
Do you have a question about the ShellyEye and is the answer not in the manual?
Questions and answers