Advertisement
Quick Links
FirstStudio
B
A
D
Figure 1
PROFESSIONAL PHOTOGEAR
Figure 2
Figure 4
Figure 6
Figure 8
For detailed specifications,
product tutorial videos
Portrait Kit Instruction Sheet • Item #s:
®
C
E
Figure 3
Figure 5
Figure 7
Figure 9
and more, please visit www.photoflex
DP-FSPTKT / DP-FSPT3KT
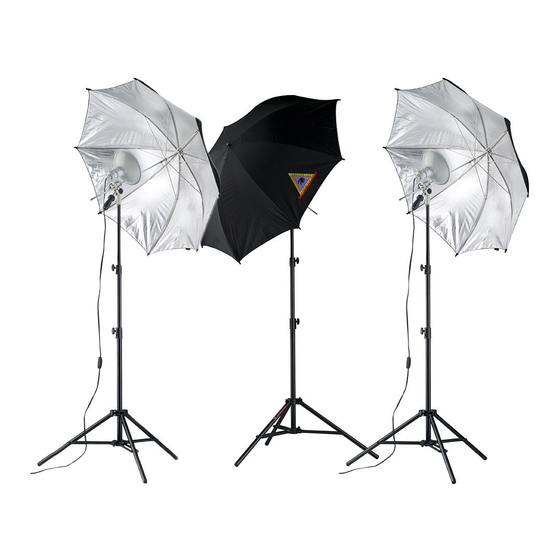
FirstStudio Portrait Kit
The FirstStudio Portrait Kit is an exceptional lighting solution, which
features either a two-light or three light setup for creating traditional
portrait lighting. The FirstStudio Portrait Kit features FirstStar
heads, 250 watt halogen lamps, Compact LiteStands
adjustable silver-lined umbrellas. Lightweight and easy to set up for
capturing memorable moments in portraiture.
This kit includes:
Figure 1
(Two light kit shown)
A. (2) FirstStar Lamp Heads
B. (2) 250 Watt Bulbs
C. (2) Adjustable Swivel
D. (2) 6.5' Compact LiteStands
E. (2) 45" Silver Umbrellas
A quick word about SAFETY:
The high wattage bulbs in the FirstStar will burn hands when they
are hot, so please keep children away from lamps. When you
leave the room, be sure to turn off the lamps. Always disconnect
power supply when changing the lamps.
Replacing the Lamps
The First Star lamps give approximately 800 hours of use, but a
spare is a good idea. Bulbs can be replaced when cool, the same
way a household bulb is changed. The inner tungsten halogen lamp
is protected by a shatter resistant Pyrex
about the oil in your hands causing blistering or otherwise damag-
ing the bulb. For replacment bulbs use the 250 watt bulb
(SKU # DP-250B). Other bulbs may be used, as long as they do not
exceed 250 watts.
Connecting the FirstStar Lamphead to Your Swivel
1. First loosen the securing knob on the swivel. Figure 2
2. Line up the Swivel with the yoke of the lamphead and slide into center
position. Figure 3
3. Once you have the lamphead in position, tighten securing knob.
Figure 4
Setting up Your LiteStands
4. Loosen the securing knob on the brace collar. Figure 5
5. Slide the brace collar down as you pull out the legs. Figure 6
6. Secure the brace collar. Figure 7
7. To adjust the height of the LiteStand, loosen a knob below the
section you wish to lift and pull the section up to the desired
height; then tighten the knob to secure the section.
Figures 8, 9 and 10
.com
Visit photoflexlightingschool.com® for the best free learning resource!
®
light
®
and 45 inch
®
outer shell, so no worries
®
Rev 11/20/13
Advertisement

Related Manuals for Photoflex FirstStudio DP-FSPTKT


Summary of Contents for Photoflex FirstStudio DP-FSPTKT
- Page 1 Figures 8, 9 and 10 Figure 8 Figure 9 For detailed specifications, product tutorial videos and more, please visit www.photoflex .com Visit photoflexlightingschool.com® for the best free learning resource! ® Rev 11/20/13...
- Page 2 Figure 14 Figure 15 Figure 16 Figure 17 Figure 20 Securing Knob Figure 18 Figure 19 Figure 21 For detailed specifications, product tutorial videos and more, please visit www.photoflex .com Visit photoflexlightingschool.com® for the best free learning resource! ® Rev 11/20/13...
- Page 3 • Warranties are cannot cover damage caused by accidents, improper care or use. the Photoflex logo are trademarks or registered trademarks of Photoflex and/or its affiliates in the U.S. and other countries. Third party trademarks are the property of their respective owners. For detailed specifications, product tutorial videos and more, please visit www.photoflex .com Visit photoflexlightingschool.com® for the best free learning resource! ® Rev 11/20/13...