Table of Contents
Advertisement
Available languages
Available languages
Quick Links
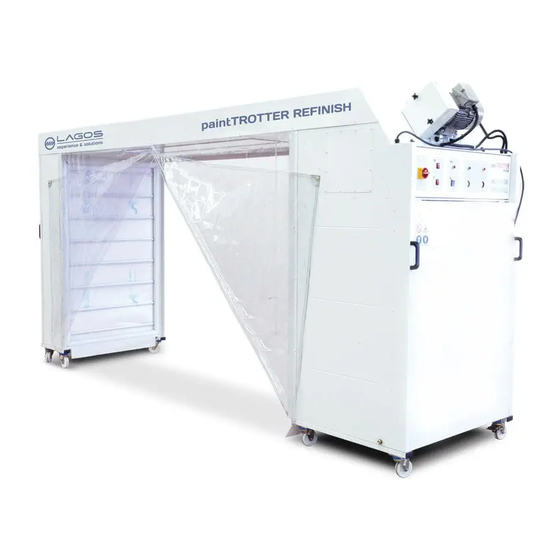
PT REFINISH EVO
ES
Manual de montaje y utilización
EN
Assembly and use manual
FR
Manuel de montage et d'utilisation
............................................................................
....................................................................................
.........................................................................
2
15
28
Advertisement
Chapters
Table of Contents

Related Manuals for Lagos paintTROTTER REFINISH

Summary of Contents for Lagos paintTROTTER REFINISH
- Page 1 PT REFINISH EVO Manual de montaje y utilización ................Assembly and use manual ..................Manuel de montage et d’utilisation .................
-
Page 2: Table Of Contents
CONTENIDO DEL KIT ......EMBALAJE ......DESCARGA DEL PALLET ......MONTAJE ......INSTRUCCIONES DE SEGURIDAD ......INSTRUCCIONES DE USO ......RECOMENDACIONES DE USO ......FUNCIONAMIENTO DE LA ASPIRACIÓN ......REEMPLAZO DE FILTROS ......COMPROBACIÓN GIRO MOTOR ......INSTRUCCIONES DE PUESTA EN MARCHA ...... -
Page 3: Montaje
MONTAJE Acoplar la estructura central a los laterales. Los adhesivos numéricos facilitan la colocación. Comprobar que coinciden Colocar las estructuras en la posición que se muestra para en cada uno de los extremos. facilitar el montaje posterior (ver foto). Atornillar las estructuras por la parte frontal, trasera, supe- rior e inferior. - Page 4 - FIJACIÓN CONDUCTO DE EXTRACCIÓN Colocar.la chapa con la cortina plástica A (impulsión). Com- probar que el adhesivo numérico de la parte trasera de la El conducto de extracción se coloca sobre el paintTROTTER, chapa coincida con el número colocado en el equipo. Des- como se muestra en la siguiente imagen: en-rollar la cortina completamente y atornillar la chapa por la parte frontal y superior.
-
Page 5: Instrucciones De Seguridad
B) DESPLAZAMIENTO CONDUCTO DE EXTRACCIÓN Para el desplazamiento manual desbloquee el freno de las rue- Asegúrese de que el conducto de extrac- das y mueva la cabina portátil hasta la posición deseada suje- ción no esté comprimido para evitar caídas tando la máquina mediante las asas colocadas en los laterales de presión y garantizar una buena ventila- del equipo. -
Page 6: Instrucciones De Uso
Además de proteger debidamente las áreas ajenas a la re- una luz dirigida y sin sombras. También incorpora una pan- paración , Lagos recomienda extender el papel protector talla aspirante que limpia el ambiente de nieblas residuales hasta el suelo para canalizar con mayor eficiencia la co- de pintura de la acción de pintar y lijar de forma que el ope-... -
Page 7: Reemplazo De Filtros
FILTROS REEMPLAZO DE FILTROS DE ASPIRACIÓN MUY IMPORTANTE: La malla metálica siempre quedará por la parte interior del filtro, es decir, entre filtro y ventilador. Esta Filtros de malla tiene como misión que el filtro no sea succionado por el cartón con ventilador. -
Page 8: Comprobación Giro Motor
COMPROBACIÓN DE GIRO DEL MOTOR El giro del motor puede comprobarse de varias formas, pero la más sencilla y práctica es localizar el motor en la cabina Por favor, DESCONECTE LA ALIMENTA- (situado en uno de los laterales encima del panel de man- CIÓN ELÉCTRICA del paintTROTTER. -
Page 9: Instrucciones De Puesta En Marcha
2 minutos son los necesarios antes de entrar con el Infra- rrojo en el área de pintado. - PUESTA EN MARCHA DE LA MÁQUINA El paintTROTTER Refinish viene con un enchufe de 380 voltios, trifásico con neutro y cable de tierra. - Page 10 - Tensión entre fases: pruebe cada fase (referencia R1, S1 y T1) y asegúrese de tener 400 voltios. PaintTROTTER Refinish EVO está equipado con iluminación ATEX II 3G con 4 tubos fluorescentes o 58 vatios cada uno. - Tensión entre las 3 fases y el neutro: debes alcanzar los 230 voltios.
- Page 11 Debe girar el dial de control hasta llegar a la posición de presión deseada. Finalmente, cambie la máquina. Gracias por tu confianza. PIEZAS DE REPUESTO Lagos estará a su lado durante toda la vida útil ptrspareparts.cabinaslagos.com de su máquina.
-
Page 12: Garantía
GARANTÍA CARACTERÍSTICAS TÉCNICAS La garantía de paintTROTTER tiene un plazo de validez de 12 CAUDAL DE AIRE ASPIRADO: 5600 - 6800 m³/h meses a partir de la fecha de adquisición. VELOCIDAD DE AIRE EN PANTALLA: 1 m/s Durante este período todos los defectos de material y de fabri- cación serán subsanados gratuitamente. -
Page 13: Certificaciones Painttrotter Evo
NOMBRE Y DIRECCIÓN DEL FABRICANTE Name and address of the manufacturer Nom et adresse du fabricant Equipos Lagos, S.A. P.I. Bergondo 24, ES 15165. Bergondo, A Coruña (Spain/Espagne) OBJETO DE LA DECLARACIÓN Subject of the declaration Objetif de la déclaration... -
Page 14: Cumplimiento De Normativa
CUMPLIMIENTO DE LA NORMATIVA Esta cabina cumple favorablemente con los artículos R.4222-14 a R.4222-16 del Código del Trabajo y con las recomendaciones de la guía práctica de ventilación n°9.1 (Cabinas de pintura líquida, INRS ED 839). - Page 15 KIT CONTENT ......PACKAGING ......UNPACKAGING ......ASSEMBLY ......SAFETY INSTRUCTIONS ......INSTRUCTIONS FOR USE ......DESCRIPTION OF THE ASPIRATION ......REPLACEMENT OF THE EXTRACTION FILTERS ......MOTOR TURNING CHECK ......COMMISIONING INSTRUCTIONS ......WARRANTY ......TECHNICAL CHARACTERISTICS ......CONTROL PANEL ......
- Page 16 ASSEMBLY Place the structures in the position shown in this image to Attach the central structure to the sides. The numerical make easy the following assembly. ad-hesives make the positioning much easier. Check that they match at each of the ends. Raise the central structure with the lighting and apply silico- Screw structures in the front part, rear, top and bottom.
- Page 17 - EXTRACTION DUCT FIXATION Place the trim on the other side. Check that the numerical adhesive on the back of the trim matches the number pla- The extraction duct is placed over the paintTROTTER, as shown ced on your machine. Screw the trim on the front and the in the following picture: top side.
- Page 18 B) MOVEMENT EXTRACTION DUCT In order to displace it manually unlock the wheel brake and Make sure the exhaust duct is not compres- move the mobile spraybooth until the desired position holding sed to prevent pressure drops and ensure the machine using the handles placed on the machine sides. good ventilation.
- Page 19 Besides from protecting properly the areas not involved in lour matching. It also incorporates a filter screen to clean the repair, Lagos recommends extend the protective paper the paint dust generated through the painting and sanding from the lower zone to the ground as well as over the mo- actions so the operator can work in a clean and healthy bile panels, to conduct more efficiently the extracting flow.
- Page 20 REPLACEMENT OF EXTRACTION FILTERS FILTERS VERY IMPORTANT: the metal mesh will always be situated on the inner side of the filter, that is, beetween the filter and the fan. the purpose of this mesh is to stop the filter from being sucked Filters by the fan.
- Page 21 MOTOR TURNING CHECK The engine rotation can be checked in several ways, but the simplest and most practical way is to locate the en- gine in the cabin (located on one side above the con- Please DISCONNECT THE ELECTRIC trol panel) and to visually check the direction of rotation. POWER SUPPLY from the paintTROT- Pressure control switch for...
- Page 22 We consider that 20 seconds are necessary before entering with the Infrared in the painting area. - STARTUP OF THE MACHINE The paintTROTTER Refinish comes with a 380 Volt socket plug, Three-phase with neutral and ground cable. NEVER CONNECT THE NEUTRAL ON ONE OF THE 3 PHASES, THE PRODUCT WILL GO IN ALARM MODE.
- Page 23 - Voltage between phases: test each phase (reference R1, S1 and T1) and make sure that you have 400 volts. The paintTrotter Refinish is equipped with ATEX II 3G lighting with 4 fluorescent tubes og 58 Watts each. - Tension between the 3 phases and neutral: you have to reach 230 volts.
- Page 24 - PRESSURE CALIBRATION The pressure switches are preset with the factury values indi- ca-ted to the right (200Pa and 400Pa) However, if these settings are not optimal for your work, you can easily change the values yourself. Unplug the Trotter Paint Refinish and open the control panel, then unscrew the plastic covers protecting the switches.
- Page 25 FILTER G4 SUPERIOR PT REFINISH EVO (960 x 645) 15079 FILTER G4 LOWER PT REFINISH EVO (960 x 940) 11952 FILTER OF PLENUM 1853 COVS DETECTOR 4365 MASK TAPE 2.6 X 22.5 ACCESSOIRE OPTIONNEL 15989 SIDE CHIMNEY paintTROTTER Refinish Evo 16007 ROOF CHIMNEY paintTROTTER Refinish Evo...
- Page 26 NOMBRE Y DIRECCIÓN DEL FABRICANTE Name and address of the manufacturer Nom et adresse du fabricant Equipos Lagos, S.A. P.I. Bergondo 24, ES 15165. Bergondo, A Coruña (Spain/Espagne) OBJETO DE LA DECLARACIÓN Subject of the declaration Objetif de la déclaration...
- Page 27 REGULATORY COMPLIANCE This booth complies favorably with articles R.4222-14 to R.4222-16 of the Labor Code and with the recommendations of Practical Ventilation Guide No. 9.1 (Liquid Paint Boo- ths, INRS ED 839).
-
Page 28: Contenu Du Kit
CONTENU DU KIT ......INSPECTION DE LA PALETTE ......EMBALLAGE ......DÉCHARGEMENT DE LA PALETTE ......MONTAGE ......INSTRUCTIONS DE SÉCURITÉ ......INSTRUCTIONS D’USAGE ......PRÉCONISATIONS D’UTILISATION ......FONCTIONNEMENT DE L’ASPIRATION ......FILTRES ......VÉRIFICATION ROTATION MOTEUR ......INSTRUCTIONS DE POUR L´UTILISATION ...... -
Page 29: Montage
MONTAGE Assemblez la structure centrale aux latéraux. Les re``eres numériques facilitent le placement. Vérifiez qu’ils coïncident Positionnez les structures tel qu’indiqué (voir les photos) à chacune des extrémités. afin de faciliter le montage. Assemblez et vissez les structures extérieures à la partie centrale, en commençant par le bas, puis sur le dessus. - Page 30 - FIXATION DE LA GAINE D’EXTRACTION Mise en place des rideaux : Placez le rideau gauche en le vissant sur la petite structure à l’aide du bandeau mé- La gaine d’extraction est placée sur le dessus de le paintTROT- talli-que. Une fois fixé, veillez à le dérouler complètement. TER, selon l’image ci-après : Fixez la partie supérieure du rideau à...
-
Page 31: Instructions De Sécurité
B) DÉPLACEMENT GAINE D´EXTRACTION Pour le déplacement, débloquez les freins des roues et dé- S’assurer que la gaine d’extraction n’est pas pin- pla-cez la cabine mobile jusqu’à la position désirée. cée afin d’éviter les pertes de charge et assurer Lorsque la position souhaitée a été atteinte, activez les freins une bonne ventilation. -
Page 32: Instructions D'usage
En plus de protéger dûment les zones extérieures à la ré- avoir peint ou poncé afin que l’opérateur travaille dans une paration, Lagos recommande d’étendre le film de masqua- ambiance propre et saine. L’air aspiré est filtré par plusieurs ge de la zone inférieure jusqu’au sol pour canaliser avec étapes de filtrations, l’une d’elles de charbons actifs. -
Page 33: Filtres
Remettez en place le cadre complet en verrouillant les 4 d’apport d’extraction loquets Rebranchez paintTROTTER Refinish Evo, celui-ci est prêt à fonctionner correctement de nouveau. Afin de procéder au remplacement des filtres, veuillez sui- vre scrupuleusement les informations suivantes: Veuillez DÉBRANCHER L’ALIMENTATION... -
Page 34: Vérification Rotation Moteur
VÉRIFICARION ROTATION DU MOTEUR Lorsque vous branchez la fiche de courant de paintTRO- TTER à la prise murale de l’atelier, veillez à ce que le mo- VEUILLEZ DÉBRANCHER L’ALIMENTA- teur tourne dans le bon sens. Une flèche, visible près TION ÉLECTRIQUE du paintTROTTER. du moteur, vous indiquera le sens de rotation correct. -
Page 35: Instructions De Pour L´utilisation
INSTRUCTIONS POUR L´UTILISATION Lorsque vous branchez paintTROTTER sur la prise électrique de votre magasin, assurez-vous que le moteur tourne dans le bon sens. Une flèche est visible près du moteur, elle indiquera Cette partie de la notice traite des instructions liées à la bonne le bon sens de rotation. - Page 36 Les tubes fluorescents sont alimentés par 2 ballasts (chaque mentation électrique de votre atelier ne soit pas appropriée au ballast gère 2 tubes). bon fonctionnement du PaintTROTTER Refinish EVO. Comme pour chaque intervention, le paintTROTTER devra être Effectuez, au moyen d’un voltmètre, les mesures suivantes: débranché.
- Page 37 - ETALONNAGE DE PRESSION Les pressostats sont réglés en usine avec les valeurs indiquées ci-après (200 Pa et 400 Pa) Alarme filtre Alarme filtre apport extraction...
-
Page 38: Garantie
FILTRE G4 SUPÉRIEUR PT REFINISH EVO (960 x 645) 15079 FILTRE G4 INFÉRIEUR PT REFINISH EVO (960 x 940) 3345 FILTRE PLÉNUM 1853 DETECTEUR DE COVS 4365 ROULEAU MASQUAGE 2.6 X 22.5 ACCESSOIRE OPTIONNEL 15989 FIXATION MURALE paintTROTTER Refinish Evo 16007 FIXATION TOITURE paintTROTTER Refinish Evo... -
Page 39: Certifications Painttrotter Evo
NOMBRE Y DIRECCIÓN DEL FABRICANTE Name and address of the manufacturer Nom et adresse du fabricant Equipos Lagos, S.A. P.I. Bergondo 24, ES 15165. Bergondo, A Coruña (Spain/Espagne) OBJETO DE LA DECLARACIÓN Subject of the declaration Objetif de la déclaration... - Page 40 CONFORMITÉ AUX RÈGLEMENTS Cette cabine répond favorablement à la fois aux Articles R.4222-14 à R.4222-16 du code du travail et aux recommandations guide pratique de ventilation n°9.1 (Cabines d’application par pulvérisation de p r o - duits liquides, INRS ED 839).
- Page 41 P.I. Bergondo, B24 ES-15165 A Coruña, Spain T.: +34 981 784 909 F.: +34 981 795 248 info@cabinaslagos.com w w w . c a b i n a s l a g o s . c o m...
Need help?
Do you have a question about the paintTROTTER REFINISH and is the answer not in the manual?
Questions and answers