Advertisement
Quick Links
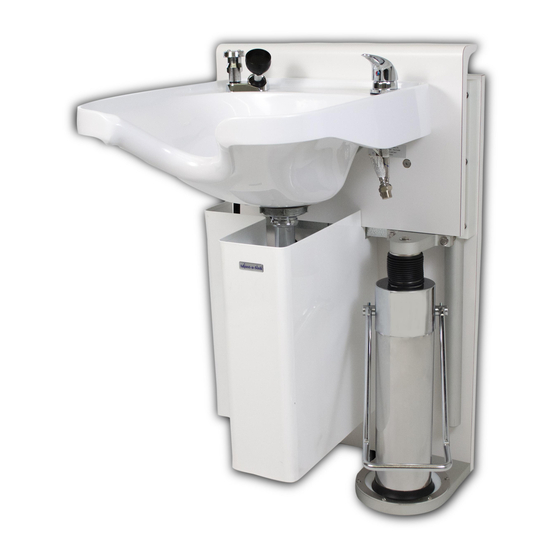
Adjust-a-Sink
£ £ £ £
K100 SERIES
**INSTALLATION INSTRUCTIONS**
10/2011
Congratulations on the purchase of your new Adjust-a-Sink
System-the elevating sink that
®
offers the ultimate in comfort and safety. The Adjust-a-Sink
System utilizes a unique hydraulic lift
®
mechanism and a UPC listed, patented 3-stage telescoping plumbing unit* that allows the operator to
raise and lower the shampoo bowl a total of 12" simply by pumping the convenient foot pedal. This
foot pedal can also be rotated to the side, providing the stylist an unobstructed work area when
needed.
The Adjust-a-Sink
System was designed with simplicity and long lasting durability in mind. The lift
®
system, cultured marble shampoo bowl, laminated panels and chrome plated pump make the entire
system easy to clean and virtually maintenance free.
IMPORTANT: Please read through all these instruction sheets and become familiar with all the
parts and requirements PRIOR to installation. Although the system can be installed in most
work areas with the proper water and waste connections, there are necessary steps that are
very important to follow to ensure the proper operation of the Adjust-a-Sink®. Refer to the
appropriate local and state codes as it applies to the location of the waste drain and use of a
hair trap (interceptor) for your particular installation.
The following Step-by-Step Instructions reference the following Accessible Systems drawings:
K100 Overall Assembly, Sheet 1
K100 Overall Assembly, Sheet 2
K100-87 Plumbing Rough-In Drawing
Required Hardware/Supplies Not Included: 1 ½" White PVC UPC Listed P-Trap, ½" ID Rigid
Copper Tubing, 90 Degree Supply line shut-off valves, Long-Length Sheet Rock Screws, 5/16" Bolts-
Washers-Nuts (if mounting to cabinet), Plumbing Supplies such as Plumbers Putty, Sealant, Silicone
Caulk, etc.
Thank you for purchasing the Adjust-a-Sink®. For replacement part orders or further
information please contact Customer Service at: Accessible Systems LLC - 2940 Weeks Ave
S.E. Minneapolis MN 55414
Local Building Codes May Apply. Adjust-a-Sink® is a registered trademark of Accessible Systems, LLC
*Patent Numbers 5,893,396 5,867,847
1 of 11
Advertisement

Summary of Contents for Adjust-a-Sink K100 Series
- Page 1 Adjust-a-Sink®. Refer to the appropriate local and state codes as it applies to the location of the waste drain and use of a hair trap (interceptor) for your particular installation.
- Page 2 FLUSH and SQUARE BEHIND the Adjust-a-Sink Wall Mounting Panel. There must be NO counter top lip or ledge overhanging the Wall Mounting Panel, as it will interfere with the sink action as it elevates, causing possible damage to both the Adjust-a-Sink and surrounding cabinetry.
- Page 3 Water Supply Lines: 1/2” ID rigid copper tube: HOT: Refer to Drawing K100-87 for the Location of the Water Lines COLD: Refer to Drawing K100-87 for the Location of the Water Lines Stub out 4” from the finished wall. IMPORTANT: Since many installations may not be able to locate the plumbing rough in exactly as specified, refer to Drawing K100-87 Plumbing “Rough-In”...
- Page 4 STEP 2: WALL MOUNTING PANEL INSTALLATION Carefully unpack the balance of the Adjust-a-Sink® System and verify all components are included and undamaged. The Adjust-a-Sink® System comes with most of its components already assembled. 2B. Install the shampoo bowl Sink Mounting Bracket and the Lift Backsplash with the hardware provided.
- Page 5 IMPORTANT: Be sure to use the Mainline Strainer Basket provided from Adjust-a-Sink when using a MP3000W bowl – the basket can be installed with or without the rubber gasket. When using a Belvedere bowl, use the bowl manufacturer’s basket strainer.
- Page 6 The shampoo bowl is shipped directly from the manufacturer. It is possible that there may be slight variations in bowls. If the 3-Stage Telescoping Drain system IS NOT adjusted properly at installation, damage or breakage of the drain system may result - We have attached the bracket on the 3-Stage Telescoping Drain system, but it must be properly adjusted during installation.
-
Page 7: Step 4. Shroud Installation
FINAL TESTING/LEAK TESTING PROCEDURE Turn on the faucet and let run for 3-5 minutes at both the highest and lowest height positions. Check all assembled plumbing joints to verify seals. Take appropriate action to address any leaks. The telescopic drains are pressure tested per ASME standards and date coded prior to shipment–they should not leak if installed properly. - Page 8 Ensure level Adjustment nut Note: Nut for adjusting the sink angle Note: Ensure drain is level – perpendicular to floor Note: The lift system limits out prior to the Fully Assembled Unit – In Up Position drain limiting out, the drain is perpendicular to the floor, and the cables face the wall Note: Model shown utilizes side-mounting bracket.
- Page 9 Components are manufactured from the highest-grade materials and should provide years of trouble-free service. The “Adjust-a-Sink”® warranty is two (2) years on all parts and five (5) years on the hydraulic pump. Altering the 3-Stage Telescopic Drain in any way voids its warranty.
- Page 10 In this position, and with moderate water pressure, you should be able to provide for a comfortable and dry shampoo. Again, the Adjust-a-Sink works best with the client sitting ®...
- Page 11 Operation of the Adjust-a-Sink® (cont.) Position the Client Like This Not Like This! Note: Proper Neck/Bowl Position 11 of 11...
Need help?
Do you have a question about the K100 Series and is the answer not in the manual?
Questions and answers