Table of Contents

Related Manuals for DrRobot Jaguar 4x4

Summary of Contents for DrRobot Jaguar 4x4
- Page 1 All-Terrain Autonomous Navigation Robot with GPS-IMU Jaguar 4x4 Wheel With Manipulator Arm User Guide Install Fuse; Charge the battery pack before use Copyright © 2001-2018, Dr Robot Inc. All Rights Reserved. www.DrRobot.com V07.08.18.Q...
- Page 2 Failure to follow these warnings could cause serious injury or death and/or damage to the robot. Copyright © 2001-2018, Dr Robot Inc. All Rights Reserved. V07.08.18.Q www.DrRobot.com...
- Page 3 Dr Robot. End users are authorized to use for personal research and educational use only. Duplication, distribution, reverse-engineering, or commercial application of the Dr Robot or licensed software and hardware without the expressed written consent of Dr Robot is explicitly forbidden. www.DrRobot.com Contact General: info@DrRobot.com...
-
Page 4: Table Of Contents
Using Dr Robot Jaguar Control Program Recharging Hardware and Electronics Network Settings Hardware Architecture Jaguar 4x4 Wheel Base System Jaguar Manipulator Arm System Further Development & Programming The Jaguar Control program Advanced Development Copyright © 2001-2018, Dr Robot Inc. All Rights Reserved. -
Page 5: Specifications
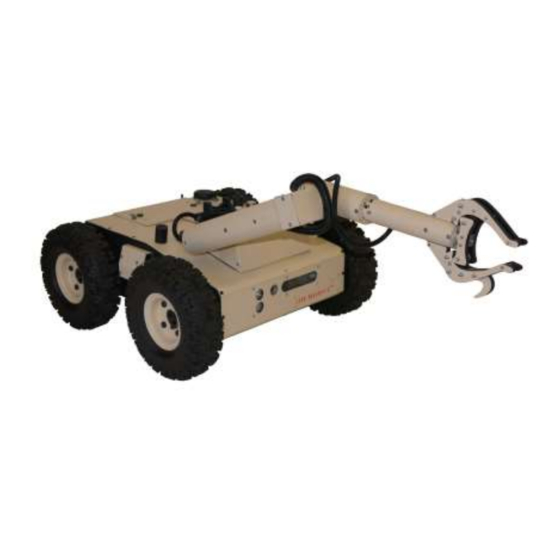
It is designed for tough terrains and capable of running over vertical step up to 155mm and climbing up low rise stairs (up to 110mm step). Jaguar 4x4 wheel with Arm Platform is fully wirelessly 802.11N connected. It integrates outdoor GPS and 9 DOF IMU (Gyro/Accelerometer/Compass) for autonomous navigation. - Page 6 Height: 432mm (17”) Width: 573mm (22.5”) Length: 615mm (24”) Weight: 32.8Kg (Standard Configuration) Carrying Payload (on flat surface): max 15Kg Dragging Payload (on flat surface): max 50Kg Copyright © 2001-2018, Dr Robot Inc. All Rights Reserved. www.DrRobot.com V.07.08.18.Q - 6 -...
-
Page 7: Jaguar Core Components
Full development kit including SDK, data protocol and sample codes, supporting Microsoft® Robotics Studio, Microsoft® Visual Studio, ROS, NI LabVIEW®, MATLAB®, Java® Jaguar Core Components JAGUAR4x4W-ME Jaguar 4x4 Wheel Chassis (including motors and encoders) JAGUAR-ARM Jaguar Manipulator Arm PMS5006 Motion and Sensing Controller... -
Page 8: Knowing Your Robot
Manipulator Arm Joint 3 Swappable Battery Pack Manipulator Arm Joint 1 Power Switch Handle Bar External Ethernet Socket (Option) Jaguar 4x4 Wheel Platform with Manipulator Arm Copyright © 2001-2018, Dr Robot Inc. All Rights Reserved. www.DrRobot.com V.07.08.18.Q - 8 -... -
Page 9: Operation Scenario
“Jaguar Control” program - installed by the Setup.exe from CD Google Earth program - could be downloaded from http://earth.google.com/download-earth.html. Please follow its installation instruction. Axis camera SDK – installed from CD Copyright © 2001-2018, Dr Robot Inc. All Rights Reserved. www.DrRobot.com V.07.08.18.Q - 9 -... -
Page 10: Operation Of Jaguar Robot
displays and controls Axis camera. Once you start this program, you will see a “Login Window” Google Earth is then loaded (this may take a while). Copyright © 2001-2018, Dr Robot Inc. All Rights Reserved. www.DrRobot.com V.07.08.18.Q - 10 -... - Page 11 Google Earth map to your interested point, then clicking “SaveSetPoint” button. The location value center will then be saved “outdoorrobotconfig.xml” when program is closed. Copyright © 2001-2018, Dr Robot Inc. All Rights Reserved. www.DrRobot.com V.07.08.18.Q - 11 -...
- Page 12 Jaguar Jaguar Turning Control Forward / Backward Control Manipulator Arm J1 Up Manipulator Arm J2 Up Manipulator Arm J1 Down Manipulator Arm J2 Down Gamepad Controller Copyright © 2001-2018, Dr Robot Inc. All Rights Reserved. www.DrRobot.com V.07.08.18.Q - 12 -...
- Page 13 By checking , you will enable the collision avoidance function. When switching to manipulator arm control, the GUI will display the manipulator arm position if you set the arm initial position. Copyright © 2001-2018, Dr Robot Inc. All Rights Reserved. www.DrRobot.com V.07.08.18.Q - 13 -...
- Page 14 KML data, there is risk of memory leak. You could manually clear these KML data by right-clicking on “Temporary Places”, then choosing “Delete Contents”. (That is why we did not hide Google Earth program) Copyright © 2001-2018, Dr Robot Inc. All Rights Reserved. www.DrRobot.com V.07.08.18.Q - 14 -...
-
Page 15: Recharging
DO NOT exceed the 2A charging current and do not modify the battery voltage. It should be "22.2V (6S)" for Jaguar robot. 5) Connect the charging 7-Pin, 3-Pin & 2-Pin connectors to charger as below images. Copyright © 2001-2018, Dr Robot Inc. All Rights Reserved. www.DrRobot.com V.07.08.18.Q - 15 -... - Page 16 For more detail about charger station operation, warning and error message, maintenance and safety message, please refer to “Intelligent Digital Balance Charger Operation Manual”. Copyright © 2001-2018, Dr Robot Inc. All Rights Reserved. www.DrRobot.com V.07.08.18.Q - 16 -...
-
Page 17: Hardware And Electronics
The included pre-configured wireless 802.11 B/G router has the following pre-set settings: SSID DriJaguar Router LAN 192.168.0.245 128bits Login ID drrobot drrobotdrrobot Password drrobot Key Type Open Key Device Default Network Settings Note: The Ethernet modules are configured to serial-to-Ethernet mode in Jaguar platform. - Page 18 Control Power Motion Sensing Controller (Jaguar Ver.) Control Power Port Laser Scanner Head Lights 9 DOF IMU (Gyro/ Accelerometer/Compass) GPS Module 3.3V Camera (AV) Power 5V Copyright © 2001-2018, Dr Robot Inc. All Rights Reserved. www.DrRobot.com V.07.08.18.Q - 18 -...
-
Page 19: Jaguar 4X4 Wheel Base System
Jaguar 4x4 Wheel Base System Motor Driver Board Two motor driver boards are used, one for the left and right track/wheel motors while the other one is for the arm motor. Input power H-Bridge 2 channels Max current up to 10A continuous power per channel, peak up to 20A per channel for a few seconds... - Page 20 Max 50A continuous, Max 100A peak Max charge rate Cycle life 500-1000 times Charger Charger type LiPo Charger Maximum charge current Maximum discharge current Power Input 100-240V Copyright © 2001-2018, Dr Robot Inc. All Rights Reserved. www.DrRobot.com V.07.08.18.Q - 20 -...
-
Page 21: Jaguar Manipulator Arm System
Horizontal Field of View Frame rate H.264: 30 fps in all resolutions Motion JPEG: 30 fps in all resolution Video compression H.264 (MPEG-4 Part 10/AVC), Motion JPEG Dimension Copyright © 2001-2018, Dr Robot Inc. All Rights Reserved. www.DrRobot.com V.07.08.18.Q - 21 -... -
Page 22: Further Development & Programming
After “Yaw”, the value will be the estimate robot heading angle. You could use it or estimate the heading by raw gyro, accelerometer, compass and GPS sensor data. The unit is radian. After “Gyro”, the data will be 3-axis raw gyro sensor data. Copyright © 2001-2018, Dr Robot Inc. All Rights Reserved. www.DrRobot.com V.07.08.18.Q - 22 -... - Page 23 You could read temperature sensor via analog channel 4(AI 4). The temperature sensor is B57164K103J, you could find how to convert the readings to temperature from the sample codes. Copyright © 2001-2018, Dr Robot Inc. All Rights Reserved. www.DrRobot.com V.07.08.18.Q - 23 -...
-
Page 24: Advanced Development
Please refer to document “GPS-IMU Sensor Module and Outdoor Autonomous Navigation Program” for detail on autonomous navigation programming using the Jaguar GPS and IMU system module. Support and sample codes are available for using OpenCV, LabVIEW and MATLAB. Please contact support@drrobot.com for further information. Copyright © 2001-2018, Dr Robot Inc. All Rights Reserved.
Need help?
Do you have a question about the Jaguar 4x4 and is the answer not in the manual?
Questions and answers