Table of Contents
Advertisement
Quick Links
Advertisement
Table of Contents

Summary of Contents for HortiMaX FertiMiX-Go!
- Page 1 FertiMiX-Go! Installation and User Guide SV 0.001/02/2017 130492MAN110...
- Page 2 This document may not be copied or made public by means of print, photocopy, microfilm or any other process, without the written permission of HortiMaX B.V.. Publication date:01/02/2017 15:54 130492MAN110...
-
Page 3: Table Of Contents
Contents 1 Preface 1.1 Terminology and method of notation 1.1.1 General information 1.1.2 Components, stickers and names 1.1.3 Method of notation 1.2 Documentation overview 1.2.1 Provided with every FertiMiX model: 1.2.2 FertiMiX-Go! 2 Product information and safety instructions 2.1 Intended use 2.1.1 Original Equipment Manufacturers (OEM) information 2.2 Certificates and declarations 2.2.1 Type plates... - Page 4 5.1.2 Checking pH control settings 5.2 Operating the system pump 5.2.1 Setting and checking water pressure and fertilizer supply to the Venturis 6 FertiMiX-Go! Quick start guide 6.0.1 Irrigation and fertilization schedule 6.1 Switching on the unit 6.2 Valves, valve groups and irrigation groups 7 Maintenance 7.1 General information on operating the unit...
-
Page 5: Preface
FertiMiX-Go!. It contains specific information on the installation and operation of the FertiMiX-Go!. The FertiMiX series is HortiMaX's fertigation solution for application in a horticultural environment. The FertiMiX-Go! unit is the entry-level model of our FertiMiX range. -
Page 6: General Information
HortiMaX-Go! 1.1.1 General information Term Description Dealer This means both the dealer and the installer of the FertiMiX-Go! unit. User The end user of the unit. Controls A collective term for the settings, measurements, alarms and readouts based on which the unit is controlled. -
Page 7: Method Of Notation
HortiMaX-Go! Pipe Fresh water suction pipe Zuigleiding vers Pipe Pressure pipe Persleiding Pipe From filling pump Vanaf vulpomp 1.1.3 Method of notation The following symbols and method of notation are used in this document: Note: This notice provides important information or a warning. Ignoring this information may result in damage. -
Page 8: Product Information And Safety Instructions
The equipment and software provided with it must be used as delivered and are subject to the instructions in the HortiMaX documentation included with the equipment and software. Your warranty will be void if you fail to observe the instructions provided by HortiMaX. -
Page 9: Quality Control
2.2.2 Quality control Every HortiMaX unit is checked and tested for correct operation before shipment. The corresponding certificate can be found in the documentation included with the unit. A control cabinet that passes our quality inspection is provided with the label below on the inside of the cabinet. -
Page 10: Packaging, Storage And Shipment
2.3.1 Packaging and storage HortiMaX takes the utmost care to deliver the purchased product to you in perfect condition. In rare cases, however, damage may occur during shipping. That is why you should always check the packaging and the product for damage or signs of rough handling. -
Page 11: Chemicals
To ensure that the unit is installed successfully, we have set a number of dealer/installer requirements and general installation requirements. 2.5.1 Dealer/installer requirements The unit and related software and components should be installed by a qualified HortiMaX dealer/installer. HortiMaX considers a dealer/installer to be qualified if that person meets the following requirements:... -
Page 12: General Installation Requirements
HortiMaX-Go! Possesses expertise in installing electrical and water systems. 2.5.2 General installation requirements Observe the following guidelines when installing the hardware: Make sure that the unit is level. Install the unit on a firm surface that is able to support its weight. -
Page 13: Electrical Installation Requirements
HortiMaX-Go! Fill the suction pipes fully with water and bleed them of air before com- missioning. To prevent damage during transport, certain components are shipped sep- arately Make sure to install these components correctly. 2.5.4 Electrical installation requirements Please note the following installation requirements with regard to the electrical components: Ensure that there is a stable power source. -
Page 14: Monthly Maintenance
Pipes: check for leaks. 2.7 Recycling and removal If you do not return your HortiMaX product to us at the end of its life cycle, you should dispose of it yourself. Bear in mind that the pipes may still contain fertilizer residues. Pump the residues into marked containers and dispose of them in the prescribed manner. -
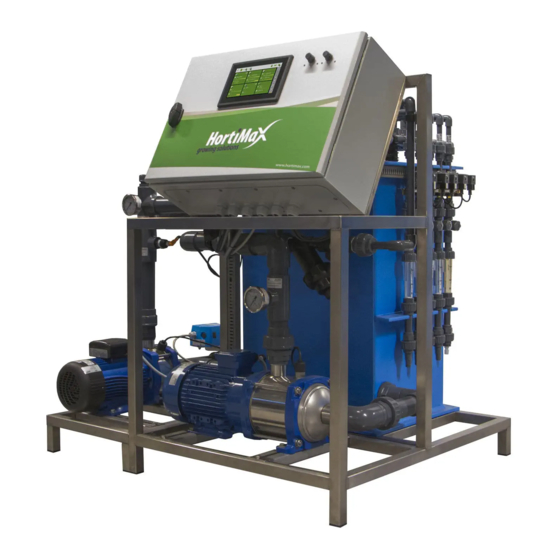
Page 15: Hardware
HortiMaX-Go! Hardware This chapter describes the hardware of the FertiMiX-Go! unit. The basic configuration can be expanded with a number of extra options. As a result, the number of sensors and dosing channels in the diagrams can vary from your unit. -
Page 16: Dosing Street And Measurement Module
HortiMaX-Go! Description Pump thermal cut-out (optional) Integrated process computer and control panel 500-micron sieve filter Pressure module with filter Venturi (at least 1, no more than 5) Supply pipes (at least 1, no more than 5) for fertilizers and acid/lye (optional) 3.1.1... -
Page 17: Filling Module With Float Valve
HortiMaX-Go! Component Description Dosing valve Needle valve Fertilizer dosing Sight glass of venturi flow meter channel Pressure module with filter* Optional acid dosing channel, recognizable by location and different colour sight glass * If necessary, shorten the included suction hose or replace it by a pipe of a different length and/or diameter. -
Page 18: Pressure Module With Filter
HortiMaX-Go! 3.1.3 Pressure module with filter The pressure module is located directly after the connection point of the irrigation water distribution pipe. The pressure module leads part of the irrigation water back to the measurement module and the venturi in order to:... -
Page 19: Main Cabinet
The main cabinet consists of a metal cabinet equipped with control hardware and software and a control panel. Type FertiMiX-Go! main cabinet Dimensions H400xW300xD150 Characteristics HortiMaX-Go! built-in controller 20800400 Smart Switches Climate Control Weather + Alarm 20801510 Smart Switch Irrigation Control EC 20801200 Smart SwitchIrrigation Control System Pump... -
Page 20: Spare Components, Extra Options And Peripheral Equipment
3.2 Spare components, extra options and peripheral equipment You can order spare components, extra options and peripheral equipment. See the HortiMaX website for the latest information. Please remember to include your original order confirmation with your new order. 3.2.1 Extra options The unit can be expanded with the following options: Item no. -
Page 21: Peripheral Equipment And Accessories
HortiMaX-Go! Item no. Name Description 74181807 EC pre-blending EC pre-blending including SmartSwitch (Also required: filling pump and EC sensor) 3.2.2 Peripheral equipment and accessories The base unit, without peripheral equipment, can control irrigation based on time or can be activated manually (manual start). After you install the required sensors and configure the software, the unit will automatically adjust the irrigation schedule (the timing and quantity of irrigation) based on the climate conditions. - Page 22 HortiMaX-Go! 20801300 Smart Switch - filling pump Irrigation Control...
-
Page 23: Installing The Unit
HortiMaX-Go! Installing the unit This chapter is a supplement to the 'Installation requirements' chapter in the General FertiMiX Manual. This chapter contains specific information on how to install the unit. Before commissioning the unit, always test the unit with fresh water before using fertilizer, acid or base solutions. - Page 24 HortiMaX-Go! Each dosing channel is supplied as such so you only have to tighten the screw couplings. Description Dosing street sealing cap Mixing tank protective cap Dosing street coupling piece Connection in the mixing tank Dosing valve cable Venturi Fertilizer/Acid supply pipe Use the already installed dosing channels as an example.
-
Page 25: Connecting Additional Sensors
Additional valve cards can be connected to the unit. For this purpose, you can install an extra Smart Switch. If the unit has been modified or expanded, follow the steps as described in the chapter 'Commissioning instructions for the dealer’ of the HortiMaX-Go!. Make the appropriate adjustments where necessary. -
Page 26: Preparing The Unit For Initial Use
HortiMaX-Go! Preparing the unit for initial use Before the unit can actually be put into use, the dealer should check the following settings and adjust them where necessary. Before connecting the fertilizer stock tanks, test the unit with fresh water. -
Page 27: Setting And Checking Water Pressure And Fertilizer Supply To The Venturis
HortiMaX-Go! System pump off In the off mode, the system pump is switched off and cannot be activated by the computer. You can use this function initiate an emergency stop switch off the unit for a prolonged period of time. - Page 28 HortiMaX-Go! Set the correct water pressure to the venturi Turn the adjustment screw (2) until the pressure gauge (1) after the filter displays 2.2 bars. This is the pressure across the venturis. Equal fertilizer dosing by the venturi Due to a difference in viscosity, one fluid may flow faster through the venturi than another.
-
Page 29: Fertimix-Go! Quick Start Guide
The settings described below are examples and not based on your growing conditions or crop. Do not copy these settings on your unit. HortiMaX cannot not be held responsible for crop damage resulting from incorrect settings. -
Page 30: Valves, Valve Groups And Irrigation Groups
HortiMaX-Go! 6.2 Valves, valve groups and irrigation groups The computer distinguishes between a valve, a valve group and an irrigation group. It is important that you understand these terms, so you can program the unit correctly. Valve: a valve is the final point in the irrigation circuit that is controlled by the computer. -
Page 31: Maintenance
HortiMaX-Go! Maintenance In addition to the points described in the General Manual, the following maintenance instructions should be observed for the FertiMiX-Go!. 7.1 General information on operating the unit The HortiMaX-Go!'s process computer is equipped with a touchscreen control display.
Need help?
Do you have a question about the FertiMiX-Go! and is the answer not in the manual?
Questions and answers