
Subscribe to Our Youtube Channel
Summary of Contents for Procusini Procusini 5.0
- Page 1 Procusini® 5.0 Original installation and User manual 3D food printer for professional applications As of Nov. 20; EN...
- Page 2 Original operating instructions Procusini® 5.0 Foreword In front of you is the installation and user manual for the Procusini®. This manual contains information on the installation, use and maintenance of the 3D food printer. It also contains important information and instructions regarding safety, installation and use.
-
Page 3: Table Of Contents
Creating your own objects ....................................19 The Procusini® Club ..................................... 19 Transferring the specially created objects to the Procusini® ..................21 Other applications of the Procusini® Club ..........................22 If you have any questions, please do not hesitate to contact us at service@procusini.com. - Page 4 6.2.2 Cleaning the dosing tip ................................... 26 6.2.3 Cleaning the stamp ................................... 27 6.2.4 Cleaning the Procusini silicone mat ............................27 Packing ........................................... 28 Troubleshooting ........................................28 Taking back your old device ................................... 29 Maintenance, repair, service ..................................29 Safety instructions for maintenance ..............................29 If you have any questions, please do not hesitate to contact us at service@procusini.com.
-
Page 5: Disclaimer
Procusini® food in a commercial/business environment. Although we have achieved a very high standard in the reproduction of 3D models using the Procusini® Club, it is the responsibility of the user to qualify and validate the application of the printed object for the intended purpose; this is especially true for applications in regulated areas such as catering, event catering and bakery/pastry. - Page 6 Original operating instructions Procusini® 5.0 Product Data Sheet Procusini® 5.0 Production Suitable for Food of suitable consistency Technology Layer-by-layer building of food (FDM) heatable Stainless steel cartridge volume 60 ml Installation space X: 250 mm...
-
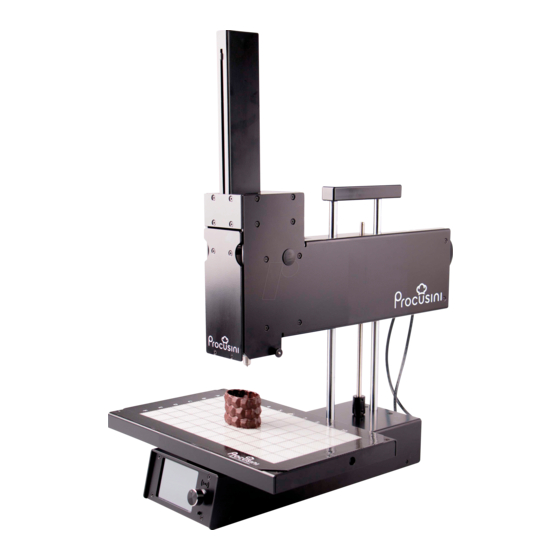
Page 7: Main Components Of The Procusini
Original operating instructions Procusini® 5.0 Main components of the Procusini® Level indicator Handle Cartridge holder On/Off switch Production platform Power socket SD card slot Navigation wheel Display If you have any questions, please do not hesitate to contact us at service@procusini.com. -
Page 8: Qualification Of The Personnel
Original operating instructions Procusini® 5.0 2 Staff qualification This device is not intended for use by persons with reduced physical, mental or sensory capabilities, or lack of experience and knowledge, unless they have been given supervision or instruction concerning use of the device by a person responsible for their safety. -
Page 9: General Safety Instructions For Machine Operation
Warning: Never operate the Procusini® unattended! Warning: Higher temperatures can occur at the printhead of the Procusini®. Therefore, do not touch the Procusini® during operation. Be sure to change the food cartridge only after the Procusini® has cooled down sufficiently. -
Page 10: Installation, Place Of Operation
3.3.2 Installation, place of operation Only set up the Procusini® on a stable, horizontal, sufficiently large surface. Note that the production platform moves to the left and right during operation and requires corresponding space. It also moves in a vertical direction. -
Page 11: Intended Use
All technical interventions, including assembly and maintenance, are to be carried out exclusively by qualified customer service authorized by Print2Taste. The Procusini® is designed only for printing food in the cartridges provided for this purpose with the templates and objects provided for this purpose from the Procusini® Club. -
Page 12: Liability And Warranty
3.5.2 Warranty The warranty for the Procusini® is 12 months from the date of purchase. Please keep the original packaging and the transport locks in case you need to return the device under warranty! This is the only way to ensure safe transport of the Procusini®! -
Page 13: Description Of The Function And Operation Of The Machine
Before first use, wash with warm soapy water and dry thoroughly. Place the flexible printing carpet pad on the production platform so that you have a flat surface. Do not cut on the Procusini silicone mat. Do not use sharp objects that can pierce or cut the Procusini silicone mat. -
Page 14: Preparation Of The Cartridges
Connect the power supply of your Procusini® to the socket on the back of the unit (see picture). 2. Plug the power supply of the Procusini® into the socket. 3. Turn on the power switch of the Procusini® (see picture). -
Page 15: Preparing The First Production With The Procusini
Original operating instructions Procusini® 5.0 4.3.1 Preparing the first production with the Procusini®. Your Procusini® shows the start screen Procusini To start Press the navigation wheel - your Refill 100% Procusini® will move Material Start with click ... -
Page 16: Inserting/Removing The Procusini® Stainless Steel Cartridge
More detailed information and the current application notes for foodstuffs can be found at www.procusini.club. Tip: For the first production of an object with the Procusini®, we recommend starting with our 3D marzipan to get a feel for using the machine. -
Page 17: Producing With The Procusini
Original operating instructions Procusini® 5.0 Produce with the Procusini Please insert the supplied SD card sideways into the slot provided. The Procusini logo on the SD card is facing backwards. Your Procusini® shows the start screen Procusini To start Press the navigation wheel - your... - Page 18 14m 55s Please wait for this preheating time to avoid damage to your Procusini® and to obtain optimal printing results. If you have any questions, please do not hesitate to contact us at service@procusini.com.
-
Page 19: Switching Off The Procusini
For more recommendations on food handling, see the application notes in the Procusini Club. Now press the on/off switch on the Procusini® to switch off the power to your unit. If you have any questions, please do not hesitate to contact us at service@procusini.com. -
Page 20: Creating Your Own Objects
Original operating instructions Procusini® 5.0 5 Create your own objects The Procusini® Club An internet connection is required to create an object with the Procusini® Club. For this purpose, use Google Chrome only. Open Google Chrome and type www.procusini.club in the search bar. - Page 21 Original operating instructions Procusini® 5.0 Under Applications you have the various options to create your own objects. The principle of creating your own template is largely similar for the different applications. As an example, the procedure with the "3D Objects" application is illustrated here.
-
Page 22: Transferring The Specially Created Objects To The Procusini
Insert the SD card back into the SD card slot of the Procusini®. Now your created objects for the respective food are on your Procusini® and you can start the production. If you have any questions, please do not hesitate to contact us at service@procusini.com. -
Page 23: Other Applications Of The Procusini® Club
Original operating instructions Procusini® 5.0 Other applications of the Procusini® Club 5.3.1 Logos Under Applications you will find the "Logos" function. Here you can now upload your desired logo. To do this, specify their desired dimensions and the food from which you want to produce the logo. -
Page 24: Tracing Contours
Original operating instructions Procusini® 5.0 Enter your text in the corresponding field. For texts below each other, first create a line, click "Add text", then create the second text and add Now you can use the arrow keys to determine the position of the texts. -
Page 25: Objects With Own Food
Original operating instructions Procusini® 5.0 3D objects with own food The expert application allows you to make your own settings. Select "3D objects with own food". Now you will be prompted to upload an STL file of your choice, as in "3D Objects". -
Page 26: Other User Interface Functions
6.1.1.3 Automatic cartridge change If the cartridge becomes empty during production, the Procusini automatically detects this and initiates a cartridge change. Please follow the instructions on the display. If you have any questions, please do not hesitate to contact us at service@procusini.com. -
Page 27: Cleaning
CUTTING HAZARD: There may be sharp edges and threads on the Procusini® stainless steel cartridge and Procusini® dispensing tip. The Procusini® stainless steel cartridge is heated in a food-specific manner. Please be sure to wait until it has cooled down before removing it. -
Page 28: Cleaning The Stamp
Shake off excess water and air dry the flexible pressure pad. Store flat, the flexible pressure pad must not be bent or folded. Do not cut on the Procusini silicone mat. Do not use sharp objects that can pierce or cut the Procusini silicone mat. -
Page 29: Packing
7 Troubleshooting With the Procusini® you have purchased a product that has been designed according to the state of the art and is safe to operate. Nevertheless, problems or malfunctions may occur. Therefore, we would like to describe here how you can eliminate possible malfunctions: Be sure to observe the safety instructions! After switching on, the 3D printer does not work. -
Page 30: Taking Back Your Old Device
85354 Freising Germany www.procusini.com We now wish you much pleasure with your Procusini® and look forward to your feedback, your suggestions and your creative ideas. Your Procusini Team If you have any questions, please do not hesitate to contact us at service@procusini.com.
Need help?
Do you have a question about the Procusini 5.0 and is the answer not in the manual?
Questions and answers