Table of Contents
Advertisement
Quick Links
Advertisement
Table of Contents

Summary of Contents for Angekis RS232
- Page 3 Item Parameter Power supply DC 12V±10% Working temperature -10℃~55℃ Working humidity ≤90% RH RS485, RS422, RS232 Communication 2400bps, 4800bps, 9600bps, 19200bps Baud rate RS422 and RS232 port Ports Display blue LCD screen 420mm(L)*260mm(W)*170mm(H) Size Accessories: name quantity unit note connecter...
-
Page 4: Table Of Contents
Contents Contents 1. Front panel and rear panel introduction ....4 1.1 All keys’ function introduction ......4 1.2 LCD screen. -
Page 5: Front Panel And Rear Panel Introduction
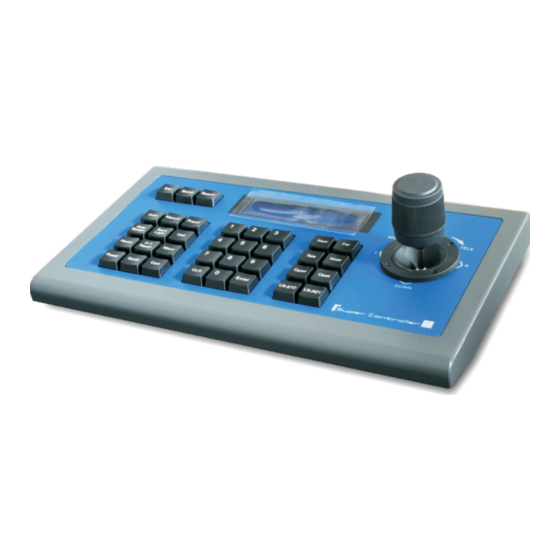
introduction 1. Front panel and rear panel introduction 1. Front panel and rear panel introduction 1.1 All keys’ function introduction Function key Near Auto Manual Preset Back Data Tele Wide Call Light Screen Open Home Menu Close Reset Power SetID LR-STD LR-REV basic function keys... - Page 6 introduction 【Manual】 Enable manual focus. 【Data Screen】 open/close data screen. 【Back Light】 turn on/turn off back light. 【Home】 control the camera toward ahead. 【P-T Reset】 reset the camera. 【Power】 power on/off the camera. 【SetID】 camera ID setup. 【Preset】 camera’s preset setup, it shall be used together with number key and 【Cam】key.
- Page 7 introduction 1.1.3 Number keys: 【CLR】 delete key: delete all information which is keyed in. 【0】~【9】 number key: 0, 1, 2, 3, 4, 5, 6, 7, 8, 9. 【Enter】 confirm key: confirm and save all information which is keyed in. 1.1.4 Video conference camera basic function keys: 【Near】...
-
Page 8: Lcd Screen
introduction 【LR-STD】 press this key, camera will move toward correct direction when operate the joystick. 1.2 LCD screen All operation of the keys or joystick will have corresponding information showed on the LCD screen. LCD screen will get into power saving mode if user do not operate the keyboard controller over 30s ( its brightness reduce to lowest, information which showed on the screen will back to initial status). -
Page 9: Rear Panel Introduction
Rear panel introduction Rear panel: 5 ports for RS422, 1 RS232 port, 1 DC 12V input port, 3 status indicate light. Details as below: 1.5 Function item specification: description item mark interface Connect to RS422 port of video Control command conference camera: ①... -
Page 10: Operation Introduction
Operation 2. Operation introduction 2. Operation introduction 2.1 Single function key and combined function key introduction 2.1.1 Single function key means: press this key, camera will recall a function. 【Auto】、【Data Screen】、【Home】、【Back Light】 、 Single function keys: 【P-T Reset】、【Tele】、 Wide 【... -
Page 11: Camera Id Setup
Operation CAM : 001 Operation: press 【Cam】key, LCD screen will display: CAM : CAM : 001 Press ‘2’ key, LCD screen will display: CAM : CAM : 002 press 【Enter】,LCD screen will display: P:VISCA BR:9600 2.3 Camera ID setup: Sony D70/D100 video conference camera ID will be set as ‘1’ automatically after power on each time, so it shall be set by keyboard controller. -
Page 12: Menu Setup
Operation Preset recall: select the camera ID, then press 【Call】key, LCD screen CAM : 001 will display , key in preset number. CALL PRESET: CAM : 001 For example ‘6’, LCD screen will display , press【Enter】 , CALL PRESET: one preset is recalled. Repeat above steps for recalling other preset, press 【Esc】key to exit. - Page 13 Operation SONY MENU 5: CAM_WBModeInq, LCD screen display , move joystick WB MODE :AUTO left/right to select Auto, In Door, Out Door, One Push WB, ATW or Manual. SONY MENU 6: CAM_AEModeInq, LCD screen display , move joystick AE MODE :AUTO left/right to select Full Auto, Manual, Shutter Priority, Iris Priority, Bright.
- Page 14 Operation SONY MENU 13: CAM_ICRModeInq, LCD screen display , move joystick ICR MODE : oN left/right to select On, Off SONY MENU 14: CAM_AutoICRModeInq, LCD screen display , move autoICR MODE : oN joystick left/right to select On, Off Note: 1.
-
Page 15: Keyboard Controller's Parameter Setup And Inquiry
Setup 3. parameter setup and inquiry 3. parameter setup and inquiry 3.1 system parameter setup the keyboard controller’s system parameter include: password, default factory, key-press sound on/off, ID, lock. Please refer to following setup description of ‘default factory setup’ and ‘keyboard lock setup’ for setup method. - Page 16 Setup SET >> SYS 1 2 3 4 5 key in password, press【Enter】key, LCD screen display EDIT PW SET >> SYS >> 6 move joystick to select item 6, LCD screen display LOCK SET SET >> SYS >> LOCK SET press【Enter】key, LCD screen display ,it means the LOCK OFF...
-
Page 17: Parameter Setup Framework
Setup 3.2 parameter setup framework 4 digit OLD PW: 4 digit >SET PASSWORD NEW PW: 4 digit AGAIN PW: 【Enter】to confirm SURE? >LOAD DEFAULT 【Esc】to quit >SYSTEM Setup 【Enter】to confirm LOAD ISP SURE? 【Esc】to quit Move joystick to select, SOUND 【Enter】to confirm Number【0】-【15】... -
Page 18: Typical Wiring Diagram
wiring 4. Typical wiring diagram 4. Typical wiring diagram 4.1 Typical wiring diagram 1 2 3 4 5 6 7 8 9 VISCA RS422 Refer to table 1 for Detail definition 1 1 2 2 3 3 4 4 5 5 6 6 7 7 8 8 9 9 1 1 2 2 3 3 4 4 5 5 6 6 7 7 8 8 9 9 1 1 2 2 3 3 4 4 5 5 6 6 7 7 8 8 9 9 VISCA RS422... - Page 19 2nd connecter(TXD) of keyboard controller RS232 port connect to the 5th connecter(RXD) of camera RS232 port, the 3rd connecter(GND) of keyboard controller RS232 port connect to the 4th connecter(GND) of camera RS232 port(or use a standard RS232 cable to connect both devices). Keyboard controlle camera Client can select each of above connection method.
- Page 20 RXD OUT - TXD IN- When adopt RS232 control bus, connection method is almost same, the 1st camera’s output port connect to the 2nd camera’s input port, the 2nd camera’s output port connect to the 3rd camera’s input port, and so on.
Need help?
Do you have a question about the RS232 and is the answer not in the manual?
Questions and answers